



A strip of red can do more for a round face than another inch off the ends. On black hair, the contrast is sharp, which is exactly why placement matters so much: put the color too low and the face can feel wider; place it a little higher and the eye travels up and down instead of side to side.
That’s the whole game with black red highlights for round faces. The color itself is only half the story. The other half is where the red lands, how thick the slices are, and whether the front pieces frame the face like a curtain or sit across it like a bar.
That’s the part most mood boards miss. Black hair with red highlights is not about splashing color everywhere. It’s about building lines — face-framing ribbons, soft lowlights, fine babylights, a money piece that starts near the brow and narrows before the cheekbone. The shade matters too. Cherry reads louder than burgundy. Copper warms the skin. Merlot gives the whole look a heavier, richer finish.
If you wear curls, waves, a bob, or a long blunt cut, you can still use red against black hair without making your face look shorter. The trick is to treat the front sections like a contour map and the back like support. A good colorist does not paint the whole head the same way. Neither should you.
1. Cherry Money Pieces That Lift the Face
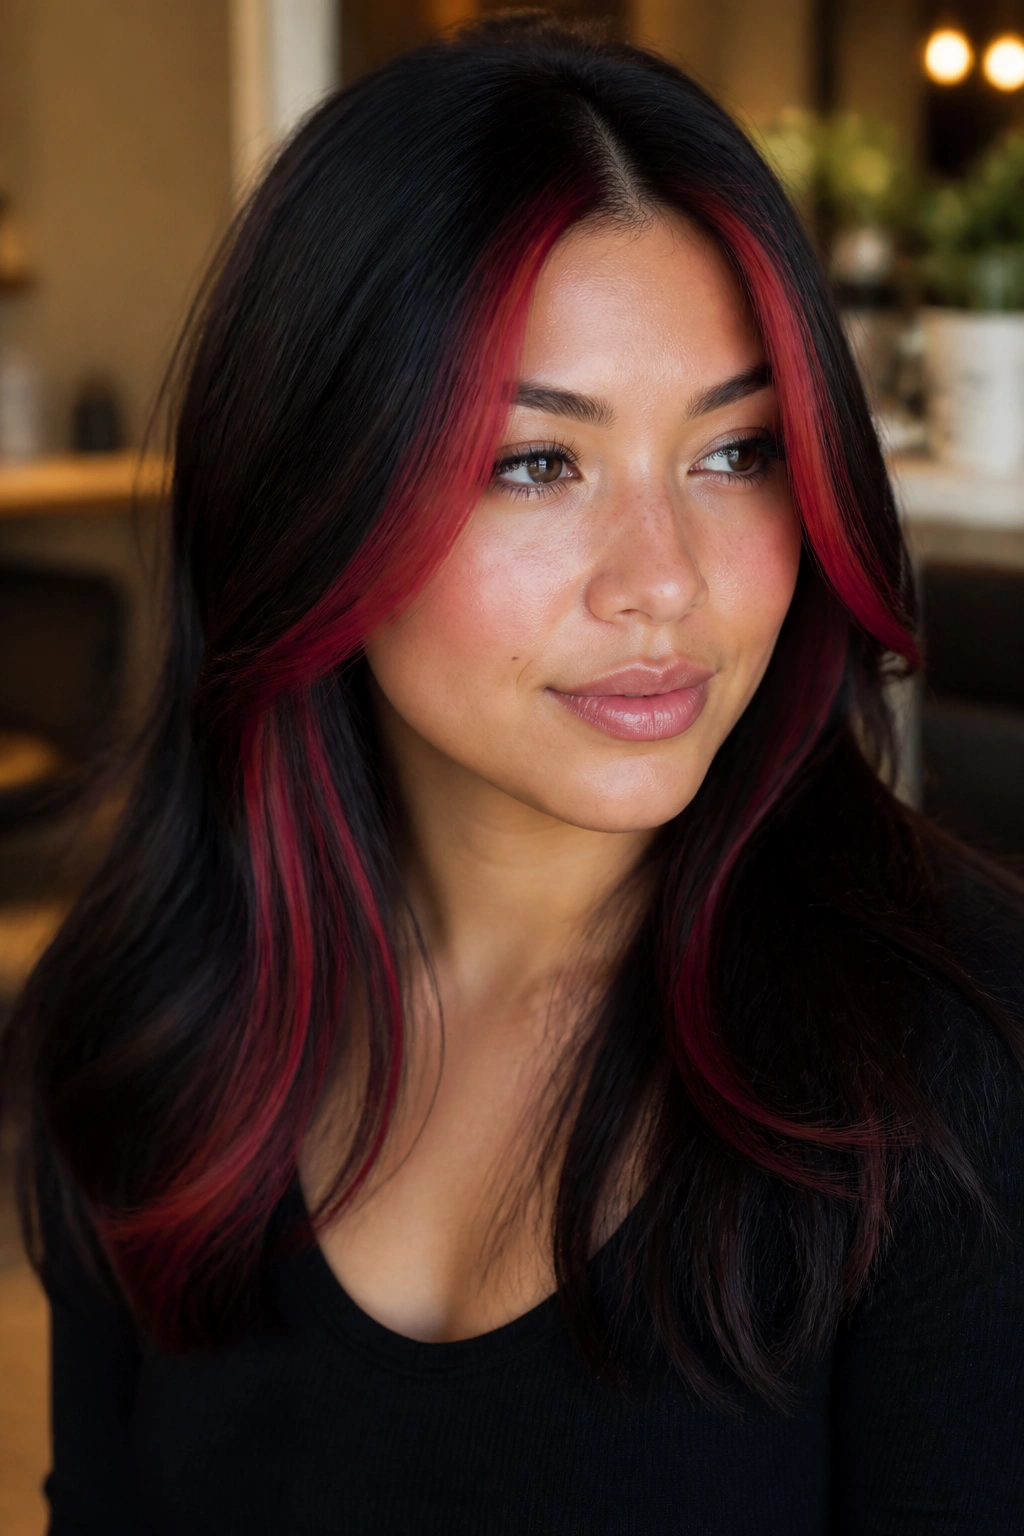
A sharp cherry money piece is one of the fastest ways to give round cheeks a little more length. The brightness sits where the eye naturally goes first, and that front-and-center placement pulls attention upward instead of outward. On black hair, the effect is clean and dramatic.
Why the placement works
Keep the brightest red in the front pieces, but not all the way at the roots. Start the color about 1 to 1.5 inches below the part and let it drop in a soft vertical line toward the jaw. That keeps the face frame from feeling like a wide block.
A money piece is also a good option if you like your base color dark and glossy. You get the hit of red without losing that inky black contrast. The contrast does the heavy lifting.
- Ask for two front ribbons, each no wider than 1/2 inch at the brow.
- Let the red taper lighter toward the ends.
- Keep the root area deep and untouched for at least 2 inches if your hair is shoulder length or longer.
- Wear the part slightly off center so the brightest section does not sit perfectly on the widest part of the face.
Best move: keep the red glossy, not neon. Cherry with a glassy finish looks sharper than a flat bright red.
2. Burgundy Balayage Through the Mid-Lengths
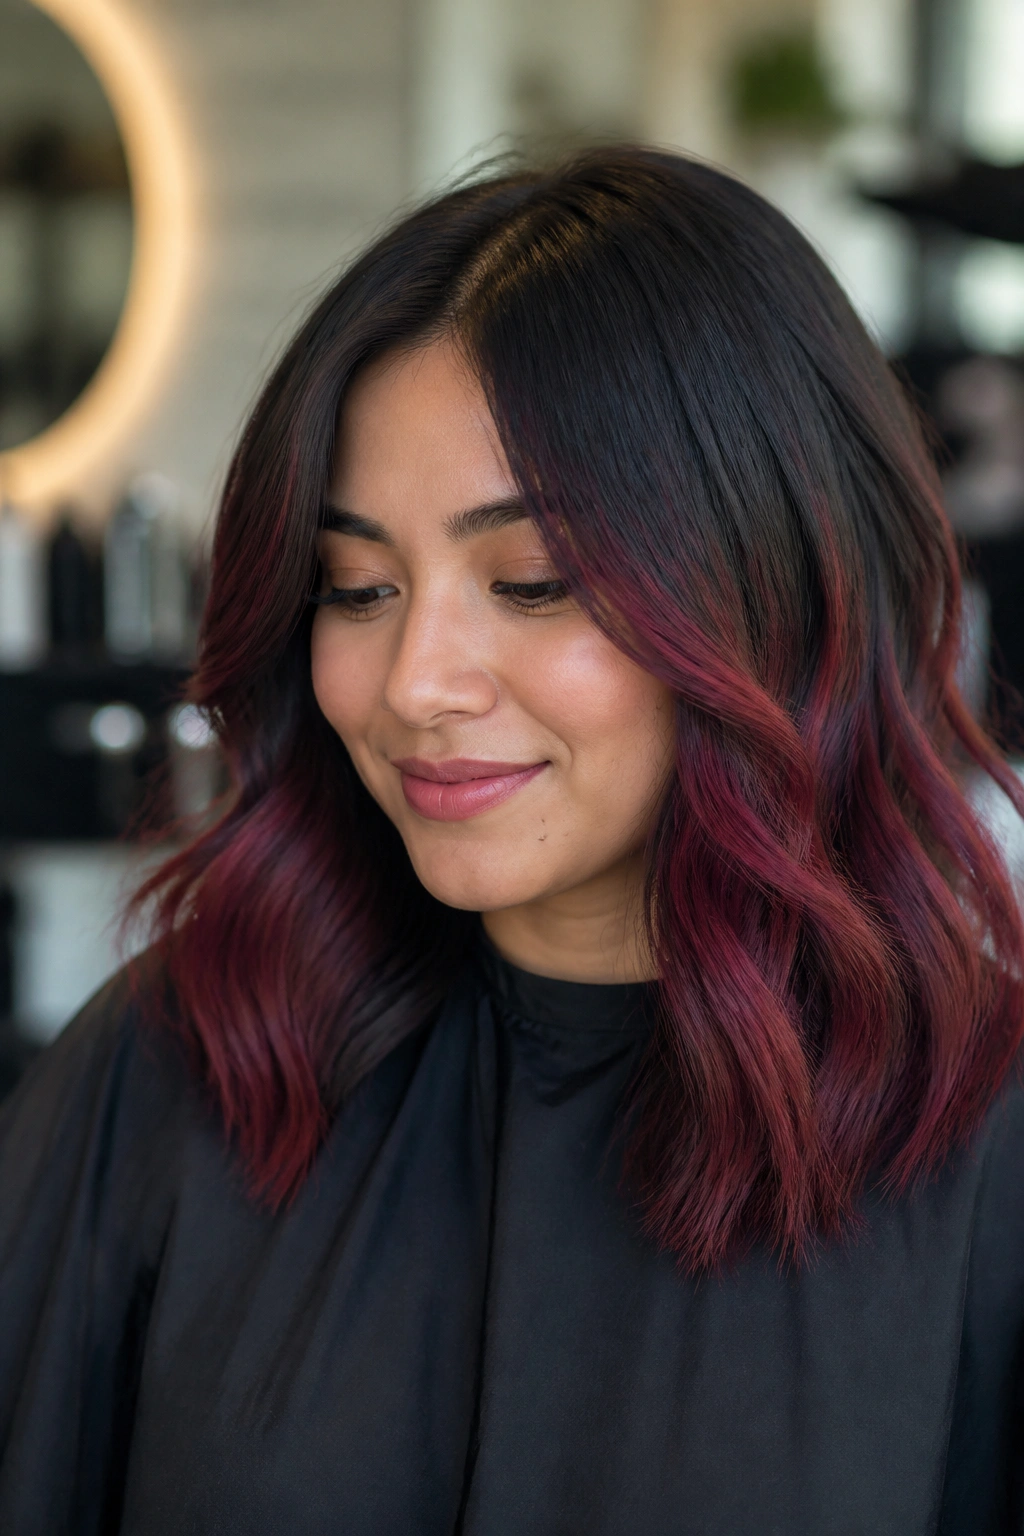
Burgundy balayage is quietly one of the smartest choices for a round face. It softens the black base without creating a hard line that cuts across the cheeks, and that matters more than people think. Thick horizontal brightness can widen a face fast. Vertical, feathered burgundy pieces do the opposite.
The reason this works so well is simple. Balayage is hand-painted, so the color can start lower — usually around the ear to collarbone zone — and drift downward. That keeps the eye moving from top to bottom. On medium or long hair, it feels richer than all-over red and less busy than chunky streaks.
I like burgundy on black hair when the goal is polish rather than drama. It’s not loud in the way cherry can be. It reads deep, wine-dark, and a little moody. That’s useful if your face is round and you want shape without the highlight taking over your whole look.
Wear it with waves, a soft blowout, or even straight hair tucked behind one ear. The long, low sweep helps the face look a touch narrower. No sharp bands. That’s the rule here.
3. Copper-Red Face-Framing Ribbons
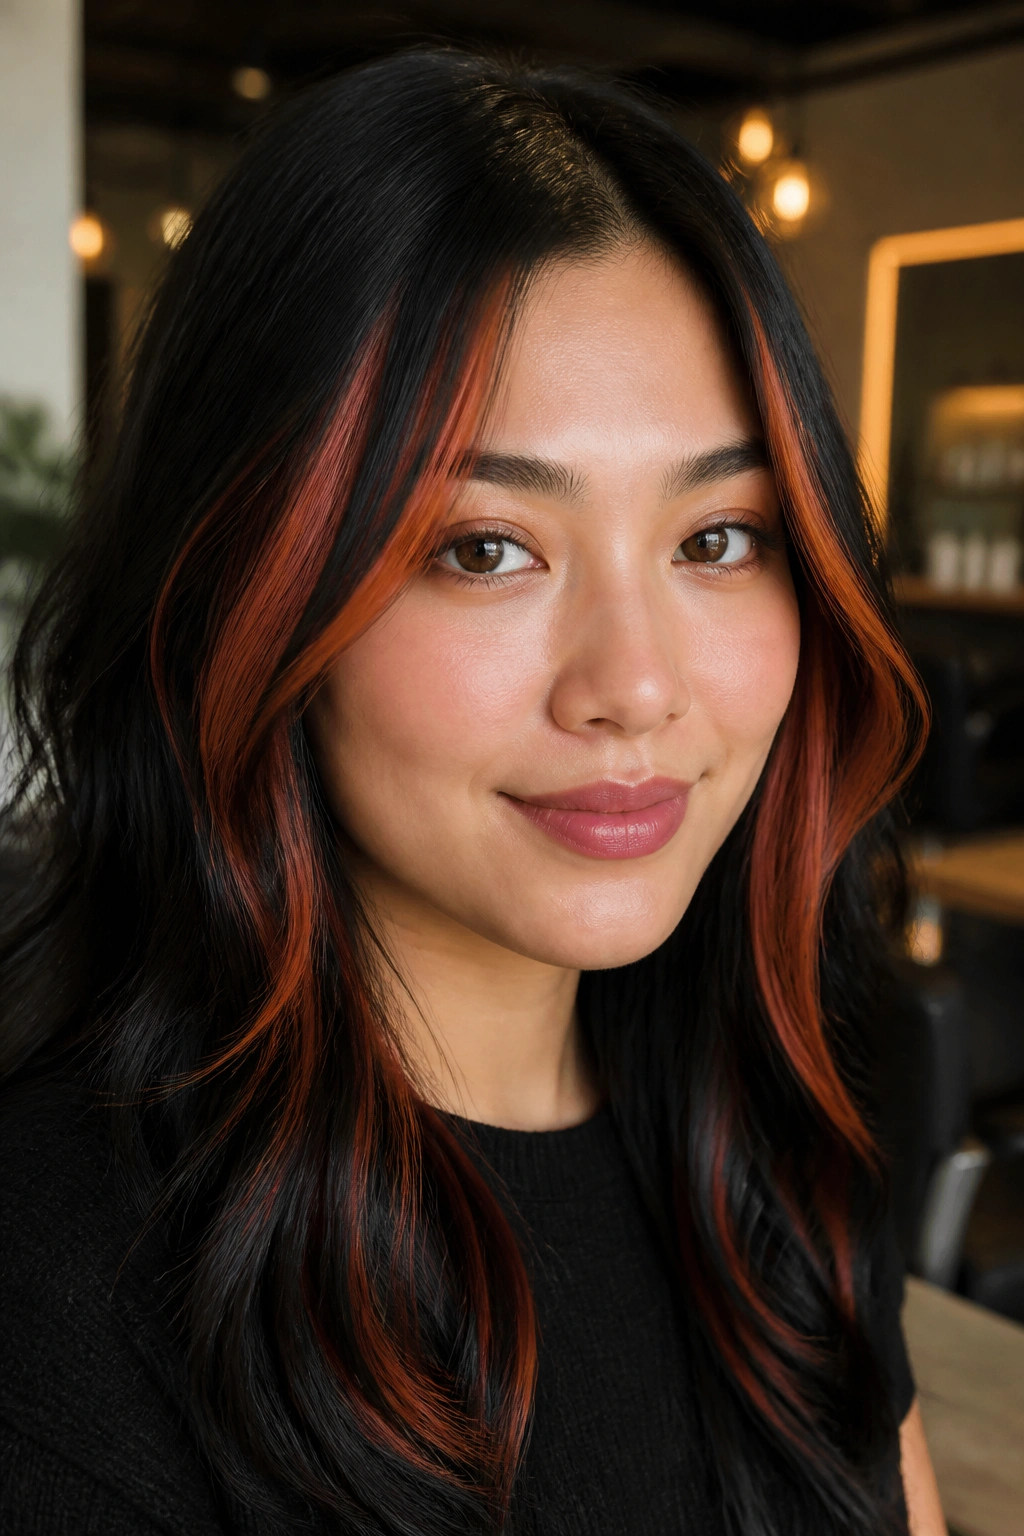
Why do copper-red ribbons flatter a round face so quickly? Because copper brings warmth to the front while the skinny placement keeps the width under control. The result is lively, not bulky. On black hair, copper also gives you that metallic flicker that changes in daylight and looks especially good when hair moves.
How to wear it
Ask for two to four narrow ribbons that begin around the temple and slide down past the cheekbone. The pieces should stay thin at the top — think 1/4 to 1/2 inch slices — then open a little at the ends. That creates the feeling of length.
Copper can go wrong if it’s dumped in thick blocks across the front. Don’t do that. It can make the widest part of a round face look even broader. Keep the ribbons airy, and let the black base stay dominant in the rest of the hair.
A soft side part helps too. It breaks up the symmetry that can make a round face feel extra full. And if your hair is layered, even better — the layers let the copper peek in and out instead of sitting like a stripe.
Ask for a red-orange copper, not pumpkin orange. That difference matters more than salon photos usually admit.
4. Mahogany Peekaboo Panels
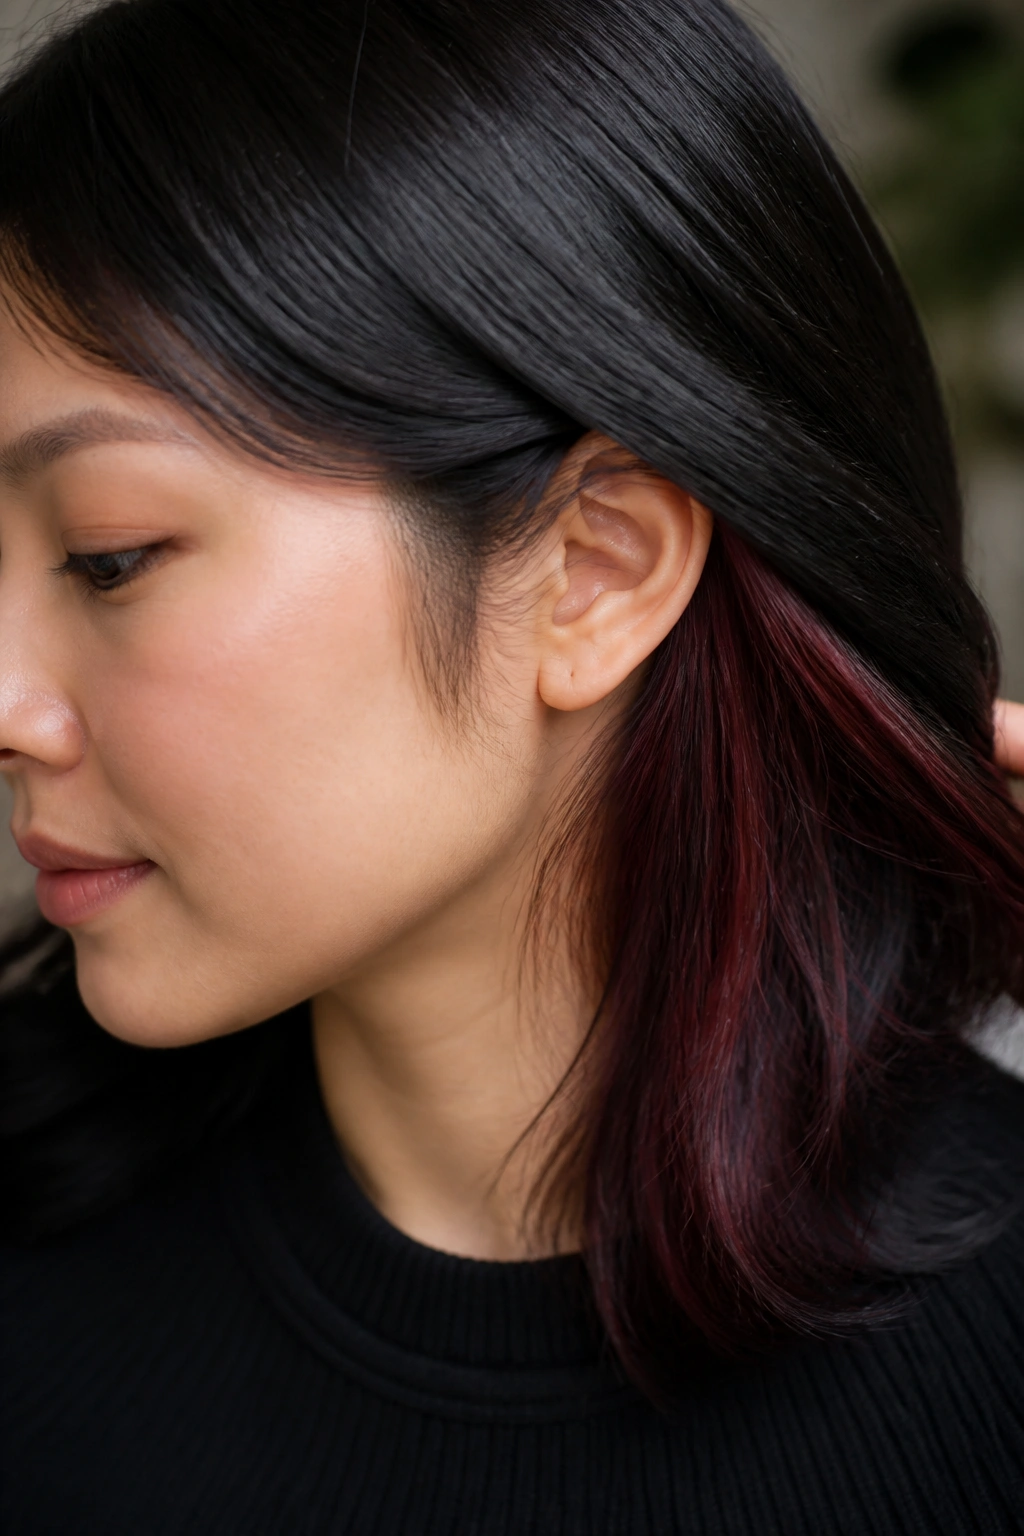
You know those styles that look quiet head-on, then flash color when the hair moves? That’s where mahogany peekaboo panels shine. They’re especially nice on round faces because the color does not sit across the widest point of the cheeks all the time. It shows up in motion. That makes the look feel lighter.
The panels live underneath the top layer, usually around the occipital area and the lower sides. When you tuck your hair behind your ear or bend forward, the red shows through the black like a hidden lining. It’s a neat trick, and it keeps the shape of the face intact.
Where to place them
- Keep the panels below the cheekbone line.
- Use them on medium to thick hair so they do not disappear.
- Choose a mahogany shade with a brown base if you want less contrast.
- Pair them with loose waves so the color breaks up in movement.
This style is useful if you want red but you’re not ready for a full front frame. It feels a little secretive. A little smarter than it first looks. And that usually suits a round face better than a hard, obvious stripe.
5. Crimson Ombre Ends
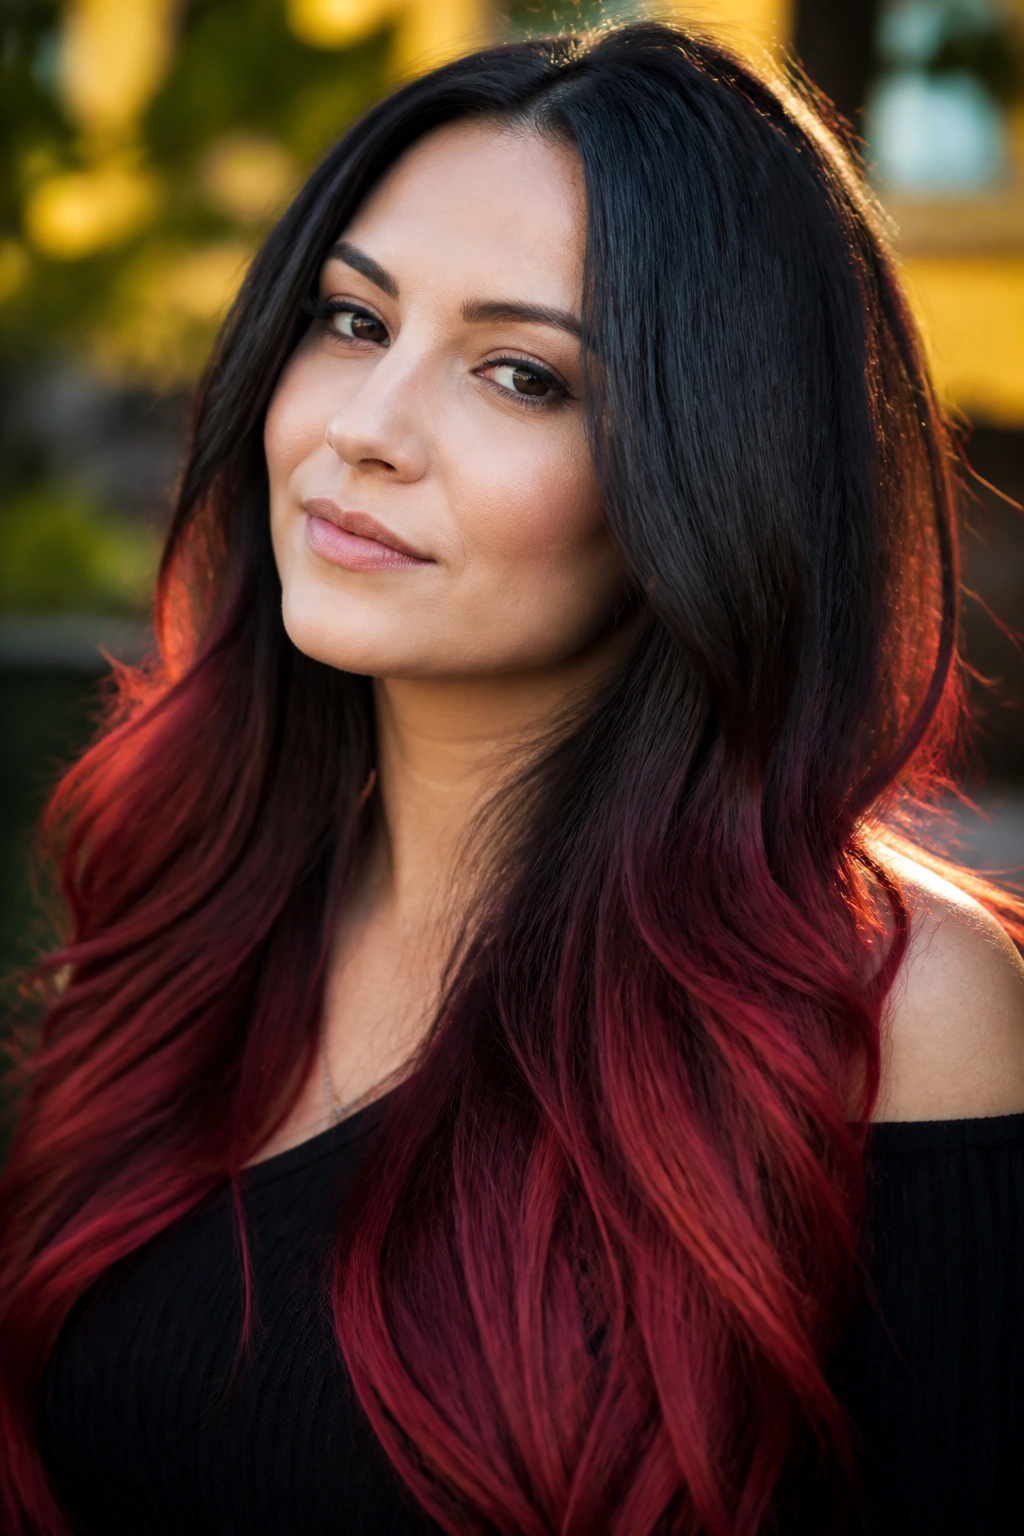
Crimson ombre gives black hair a long, lean line that works beautifully on fuller faces. The top stays deep and dark, then the red opens up gradually from the mid-lengths to the ends. That slow shift pulls the eye down, which is exactly what you want when the goal is to lengthen the shape.
It helps that ombre never sits in one place. The color is spread vertically, so the face isn’t boxed in by a bright band at cheek level. On long hair, that can make a round face look a little narrower without changing anything else about the cut. And if your ends are layered or lightly feathered, the red picks up even more movement.
Crimson is bolder than burgundy, so the finish matters. Keep the transition soft. Hard ombre lines are the enemy here. A true melt — black to deep cherry to crimson — looks richer and far more natural than a blunt color block.
This style also grows out with less fuss than front-heavy highlights. That’s a real bonus if you do not want to live at the salon every few weeks. The ends carry the interest. The roots get to stay calm.
6. Auburn Babylights Around the Hairline
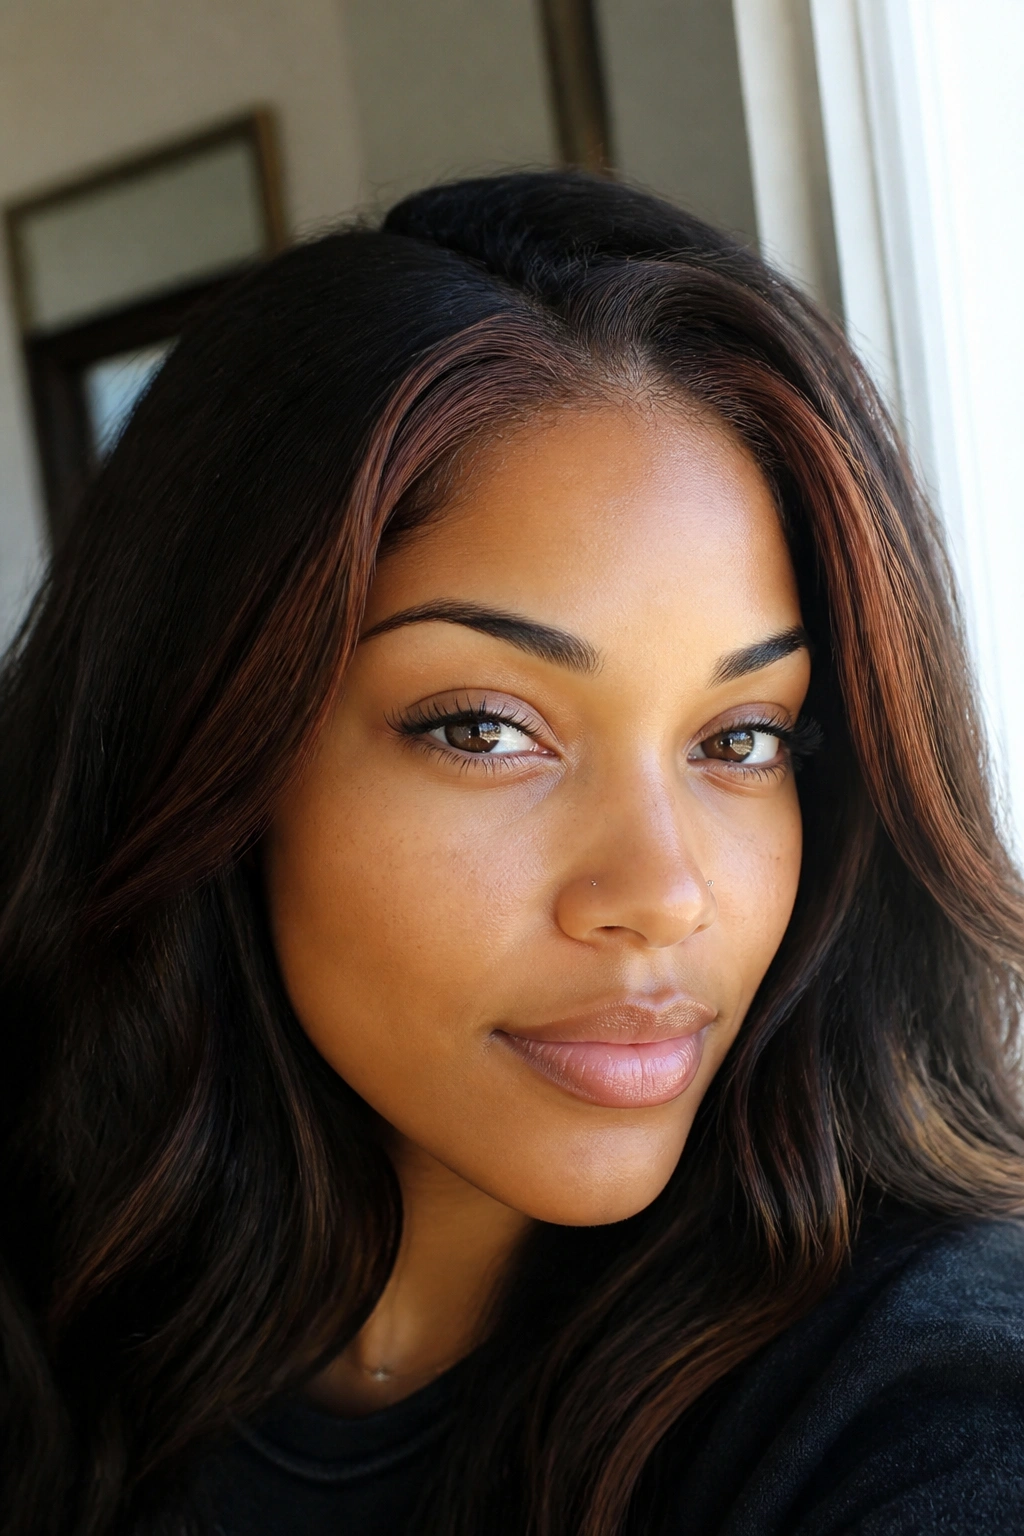
Babylights are the quietest way to wear red on black hair. Instead of chunky streaks, you get ultra-fine threads of color that flicker around the face. On a round face, that finesse matters. The eye sees shimmer, not width.
Auburn is a smart babylight choice because it sits between red and brown. It doesn’t scream. It glows. That makes it especially good if your skin has warm or neutral undertones and you want the color to look soft in daylight, not costume-y under indoor lights.
What makes it different
Unlike chunky highlights, babylights should be so fine that you can barely track each strand from a few feet away. They work best when woven into the hairline, temple area, and a small section just behind the ears. That places the red where it frames the face without crowding the cheeks.
Best for:
- Fine or medium hair
- People who want a subtle change
- Short cuts, lobs, and layered bobs
- Anyone who hates obvious grow-out lines
My take: if you want the color to look expensive and low-fuss, this is one of the safest bets.
7. Wine-Red Underlayers for Wavy Hair
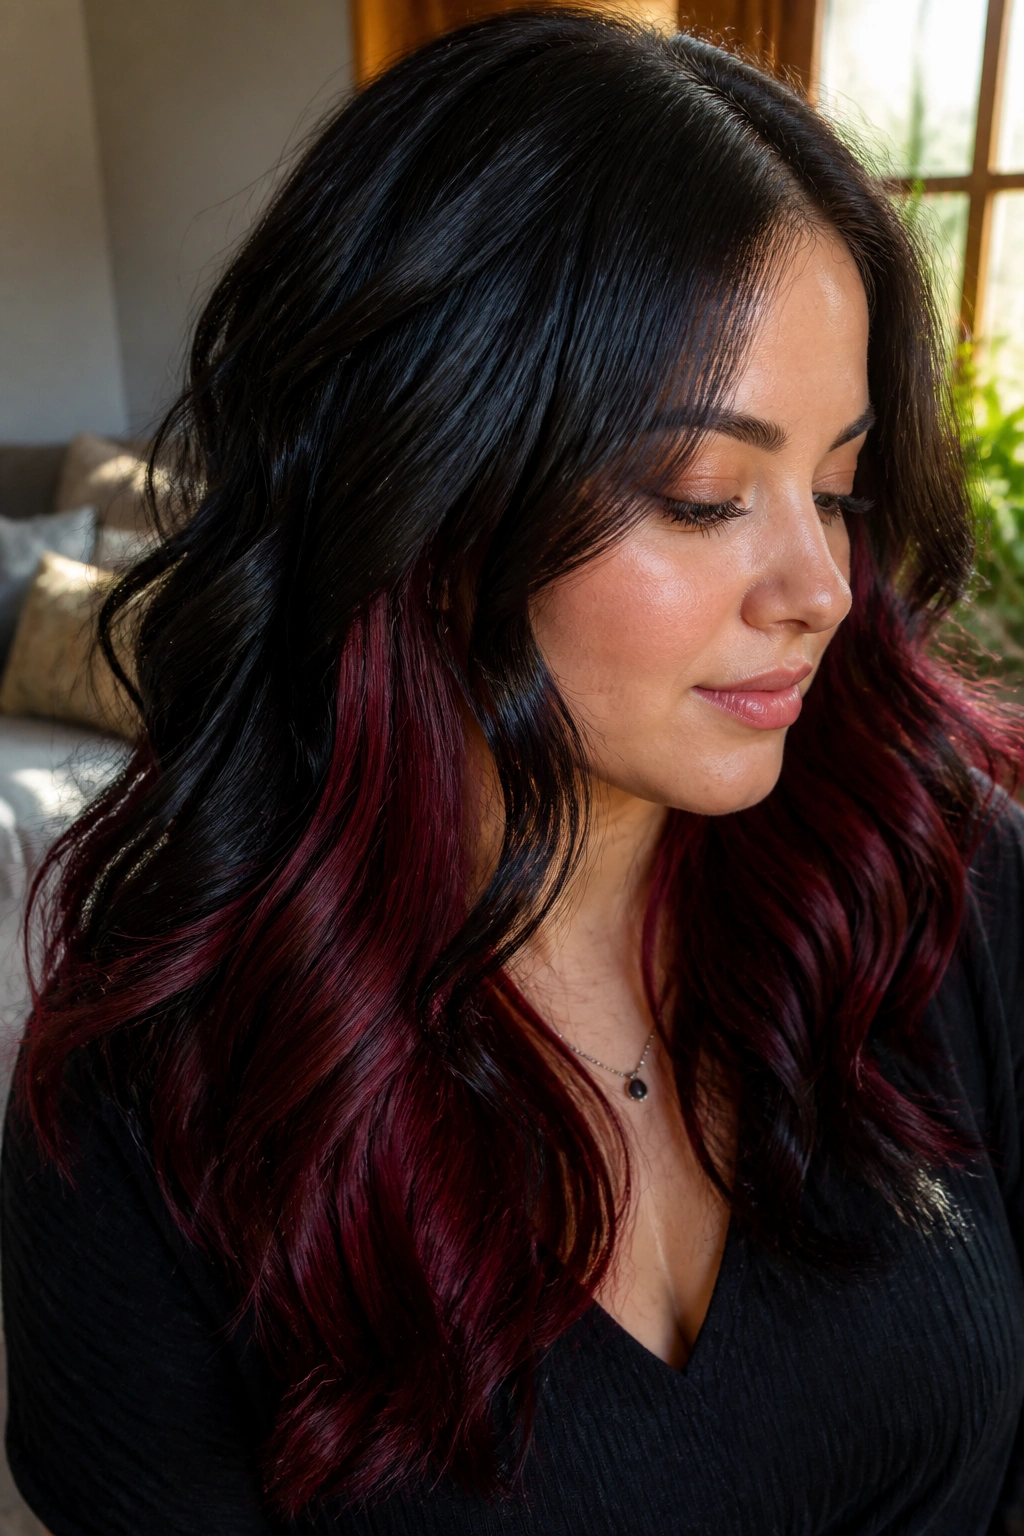
Wine-red underlayers give you a nice little surprise every time the hair shifts. The black outer layer stays dominant, which helps a round face keep its clean outline, while the hidden red underneath adds depth and movement. It’s a good setup for waves, because the bends expose and hide the color in a natural rhythm.
Why it suits round faces
The face does not need extra width at the sides. Underlayers avoid that problem. The color sits lower, usually from the mid-ear area down, so the bright red doesn’t sit level with the cheekbones. That’s the important part.
Waves make the effect better. Straight hair can show too much of the hidden layer if the color is too high. Soft bends keep the reveal controlled. If your hair is thick, ask for fewer but more deliberate panels; if it’s fine, ask for thinner pieces so the red doesn’t swallow the shape.
A wine shade is also useful because it reads deep and plush against black. It’s not cherry-bright. It’s closer to a dark plum-red, which tends to look smoother on darker hair. The contrast is there, but it does not shout.
8. Scarlet Slices Through a Layered Bob
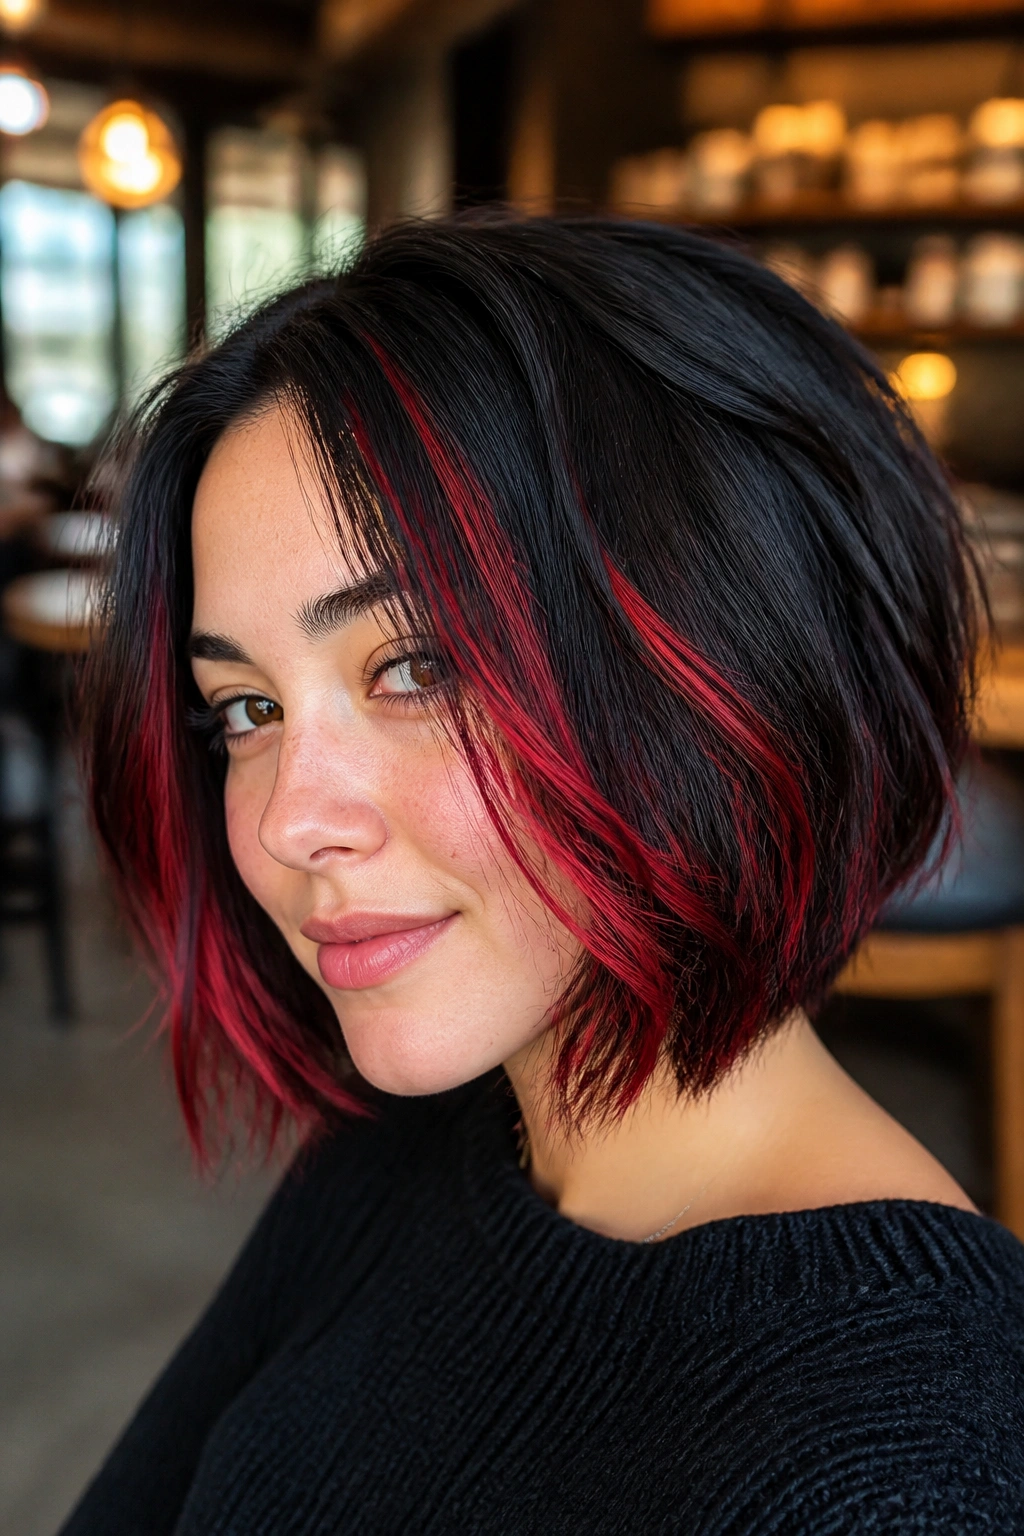
A layered bob can take scarlet in a way a blunt bob sometimes can’t. The movement gives the color room to break up, so the red looks crisp instead of blocky. On a round face, that matters because too much uniformity around the jaw can make the shape feel even fuller.
Scarlet slices work best when they’re placed as narrow vertical pieces between layers. The cut does half the work for you. Each flick of hair catches the red slightly differently, which keeps the style from reading like one solid stripe. That visual break is what slims the face a bit.
I’d keep the scarlet concentrated on the front third of the bob and a few interior pieces near the back crown. That gives the hair depth from every angle, not just the front view. If you wear your bob tucked behind the ears often, this is a fun one. The red flashes in and out, and the face frame stays neat.
A bob already has attitude. Scarlet just turns the volume up a notch.
9. Merlot Gloss With a Soft Shadow Root
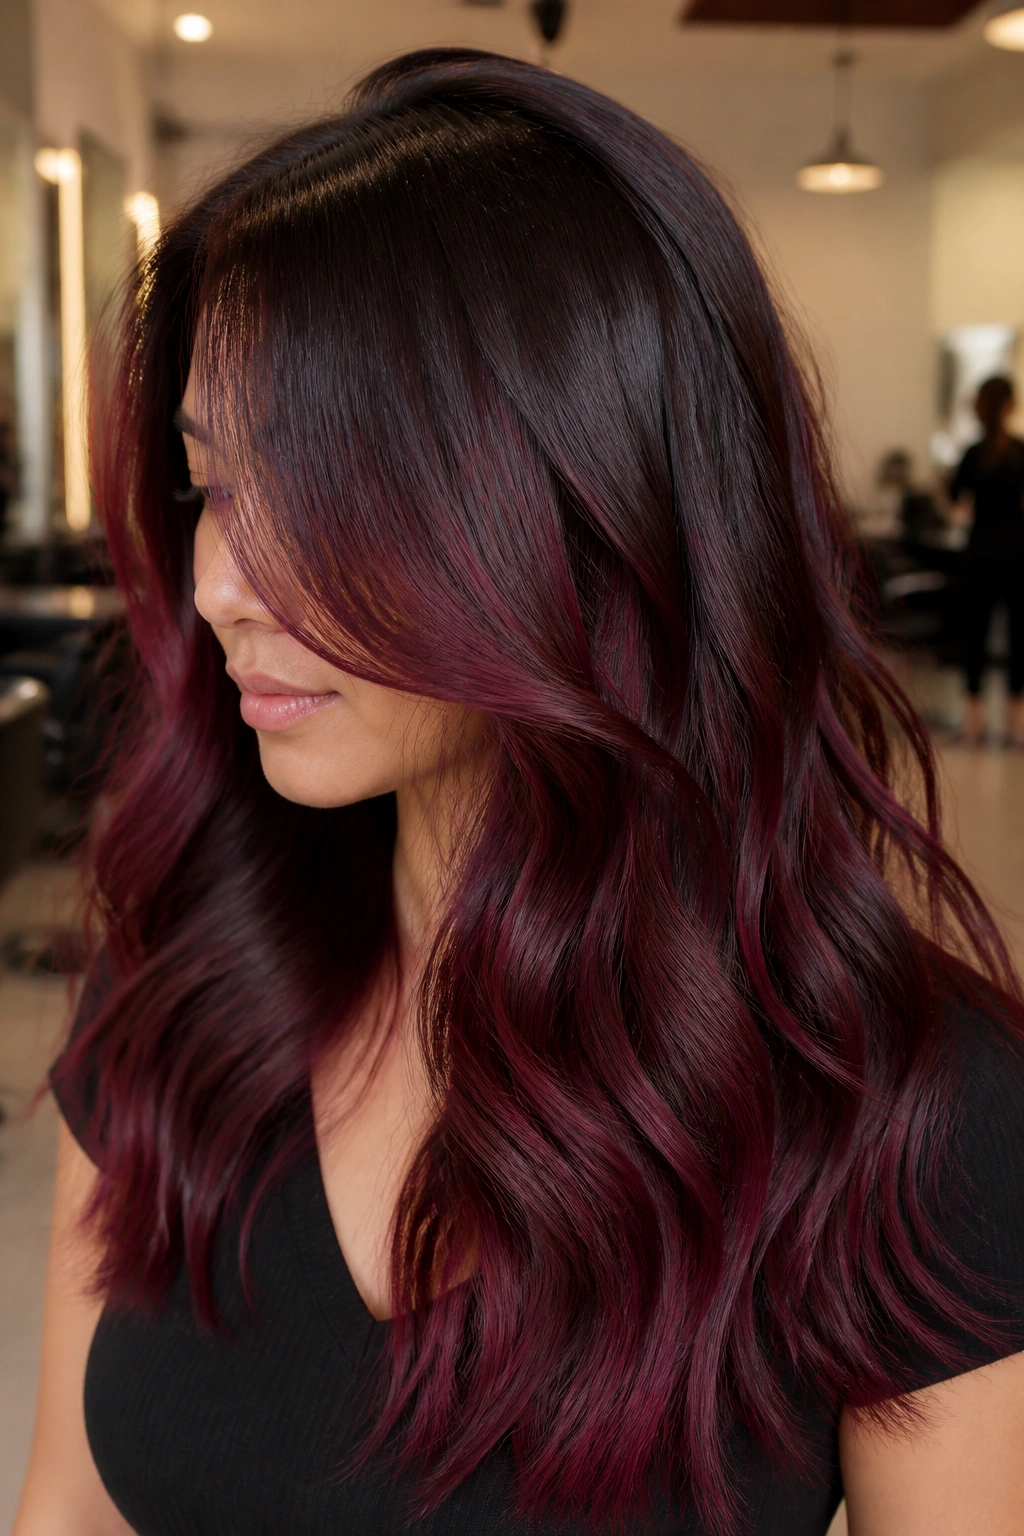
Why does a shadow root help so much on a round face? Because it keeps the top of the head from looking too bright and too flat. A darker root creates lift, and lift is your friend when you want the face to look longer. Merlot through the lengths then brings the color in where it counts.
How to use it
The best version starts with a 1 to 2 inch shadow root in a deep black-brown or softened black. After that, the merlot can bloom through the mid-lengths and ends. That keeps the head shape narrow at the top and richer lower down.
A gloss finish matters here. Merlot can go muddy if it loses shine, especially on darker hair. A color glaze every few weeks keeps the red looking plush instead of flat. You do not need the brightest version of red for this to work. You need dimension.
This one is especially nice on hair that is medium to long and slightly layered. The gloss catches on bends in the hair and gives the face a cleaner outline. If you wear glasses, it looks good with them too. The deep red and the dark frame play off each other in a neat way.
10. Cinnamon-Red Curved Highlight Bands
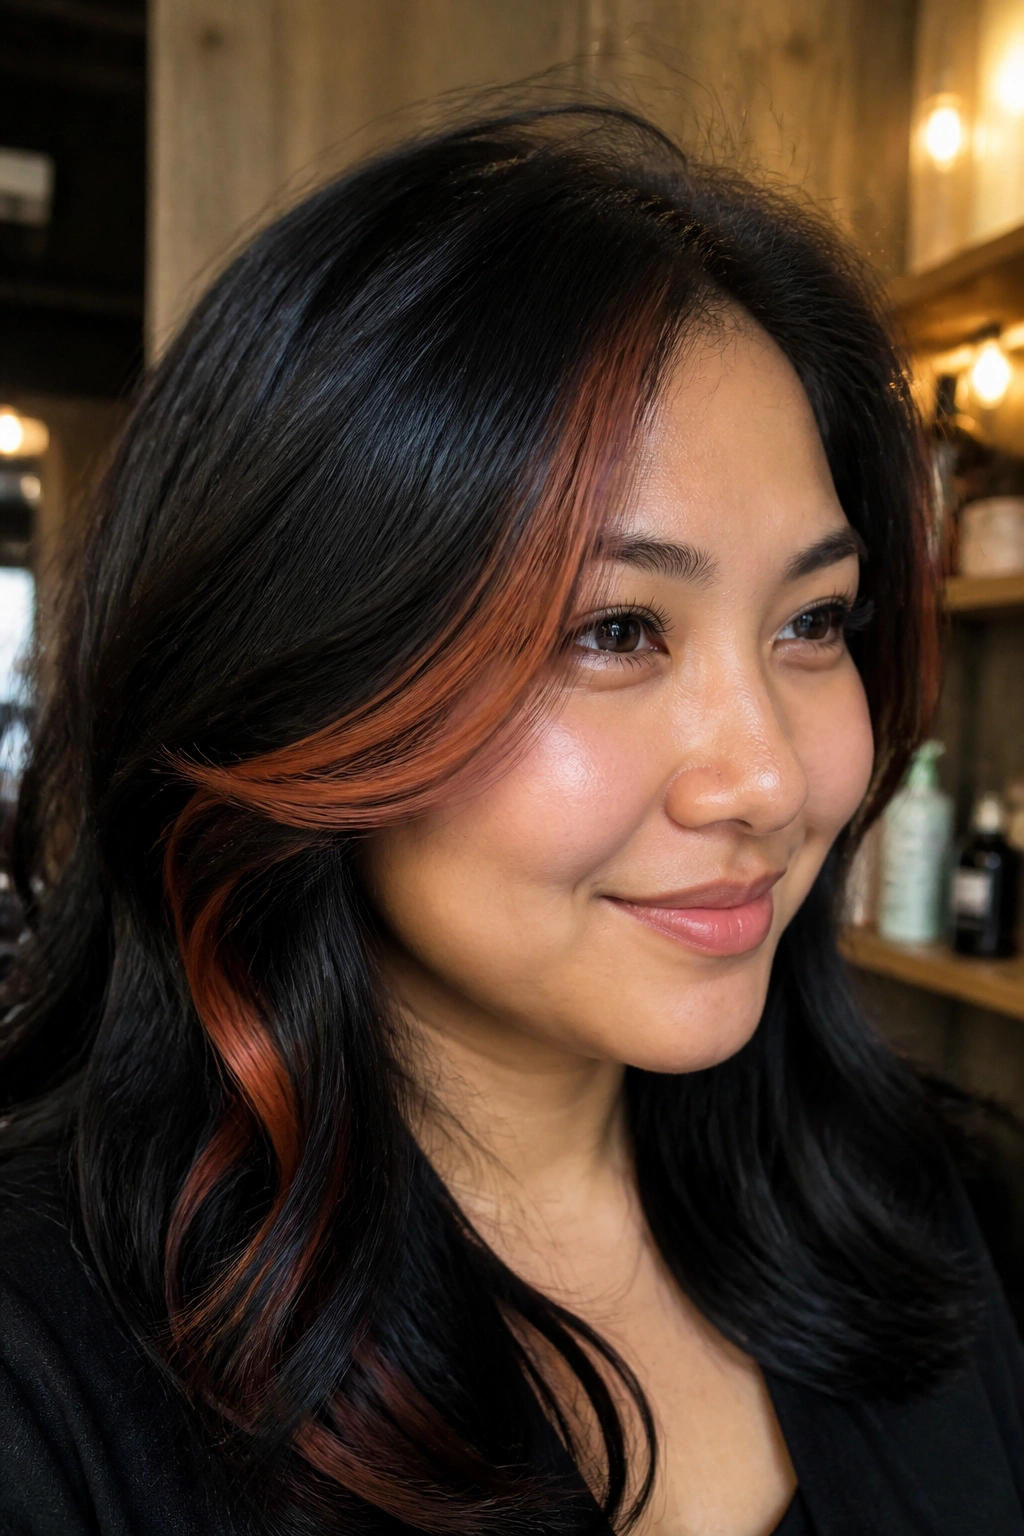
A curved highlight band can sound too bold on paper, but when it’s done right, it follows the face instead of fighting it. That’s the trick. On a round face, a soft arc of cinnamon-red around the outer edge of the hair can draw attention upward and outward in a controlled line.
The color should curve, not cut. Think of the highlight path as a sweeping brushstroke that starts near the temple, bends around the cheek, and fades before it reaches the jaw. The curve matters more than the shade, though cinnamon is a good pick because it bridges red and brown without turning orange.
- Keep the band thin near the temple.
- Let it widen only slightly below eye level.
- Use it on layered hair so the arc looks soft.
- Pair it with loose bends, not tight curls.
This style works on people who like a bit of structure. It has more shape than babylights and less drama than a full money piece. A round face usually looks better when the color feels directional. This does that without turning the front sections into a solid block.
11. Raspberry Highlights on Long Waves
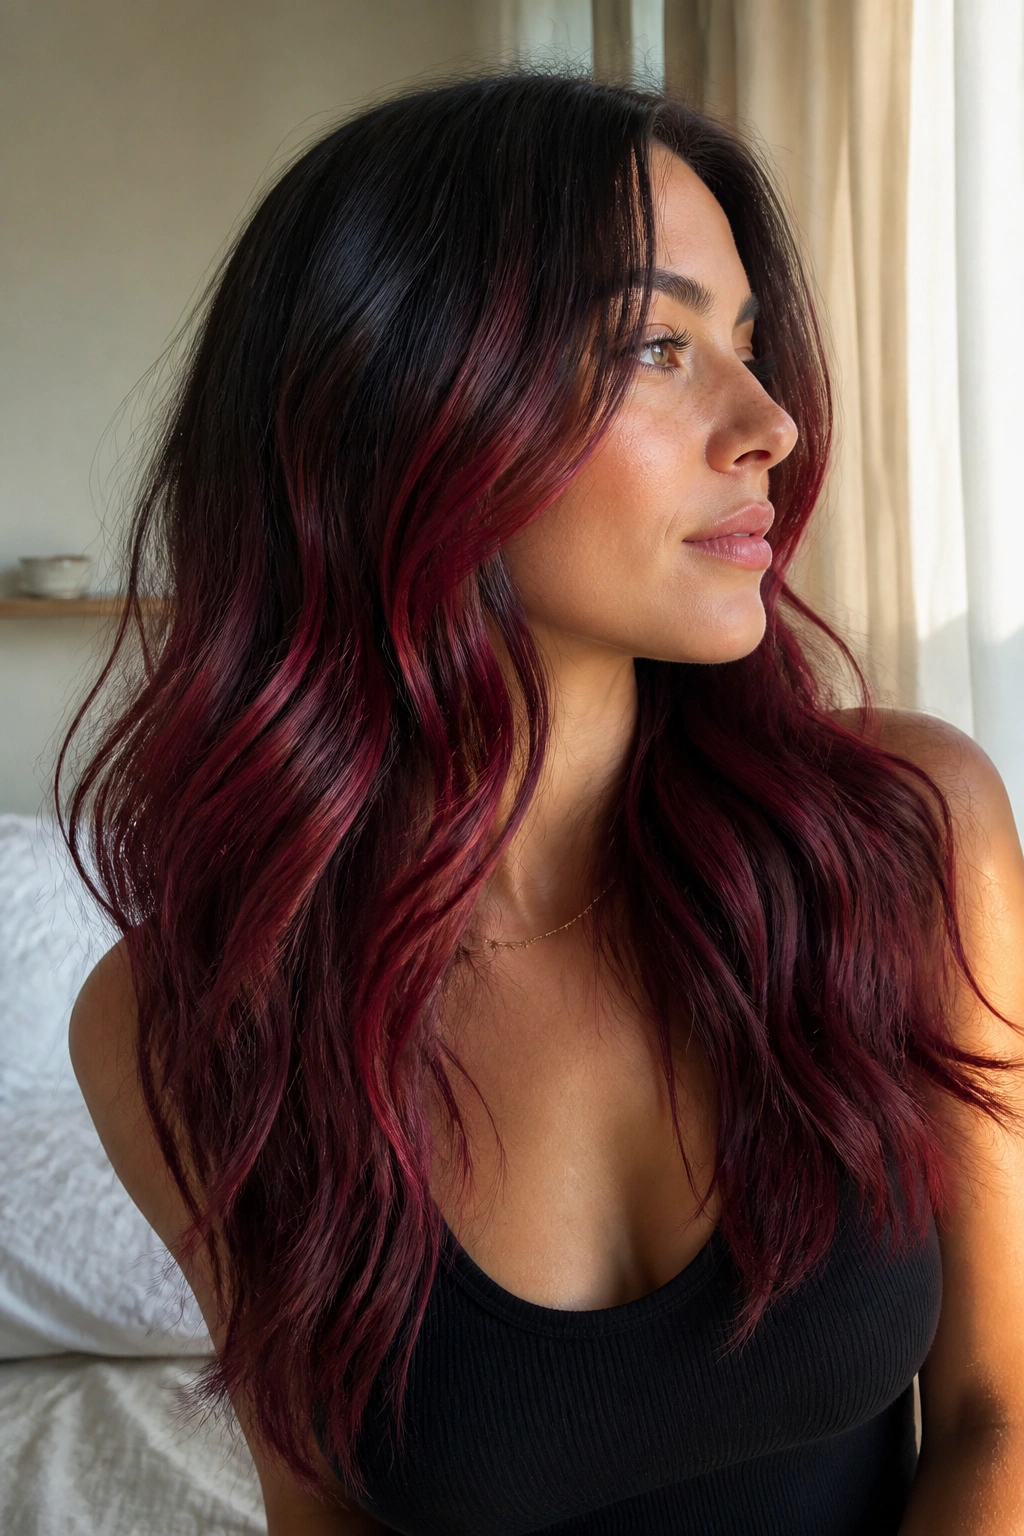
Raspberry is a little cooler than the red shades people usually reach for on black hair, and that cooler edge can be a good thing. It stops the color from looking too orange, and on long waves it creates tiny points of brightness that move with each bend. A round face benefits from that movement because the eye keeps traveling down the length of the hair.
The key is restraint. Raspberry should not be spread evenly across the whole head. If it sits too densely around the cheeks, the face can look wider. I’d keep the strongest pieces below the cheekbone and let the upper front stay darker. The contrast between the dark top and the raspberry wave below gives you a longer line.
This shade is especially useful if your hair tends to flatten. The red shows texture. It can make a simple blow-dry look more deliberate, which is nice if you want color that does part of the styling work for you. The shinier the finish, the better this looks.
A long wave with raspberry through it has a soft, almost velvety feel. That’s a good mood for round faces because it doesn’t scream for attention at the widest point.
12. Auburn-to-Black Color Melt
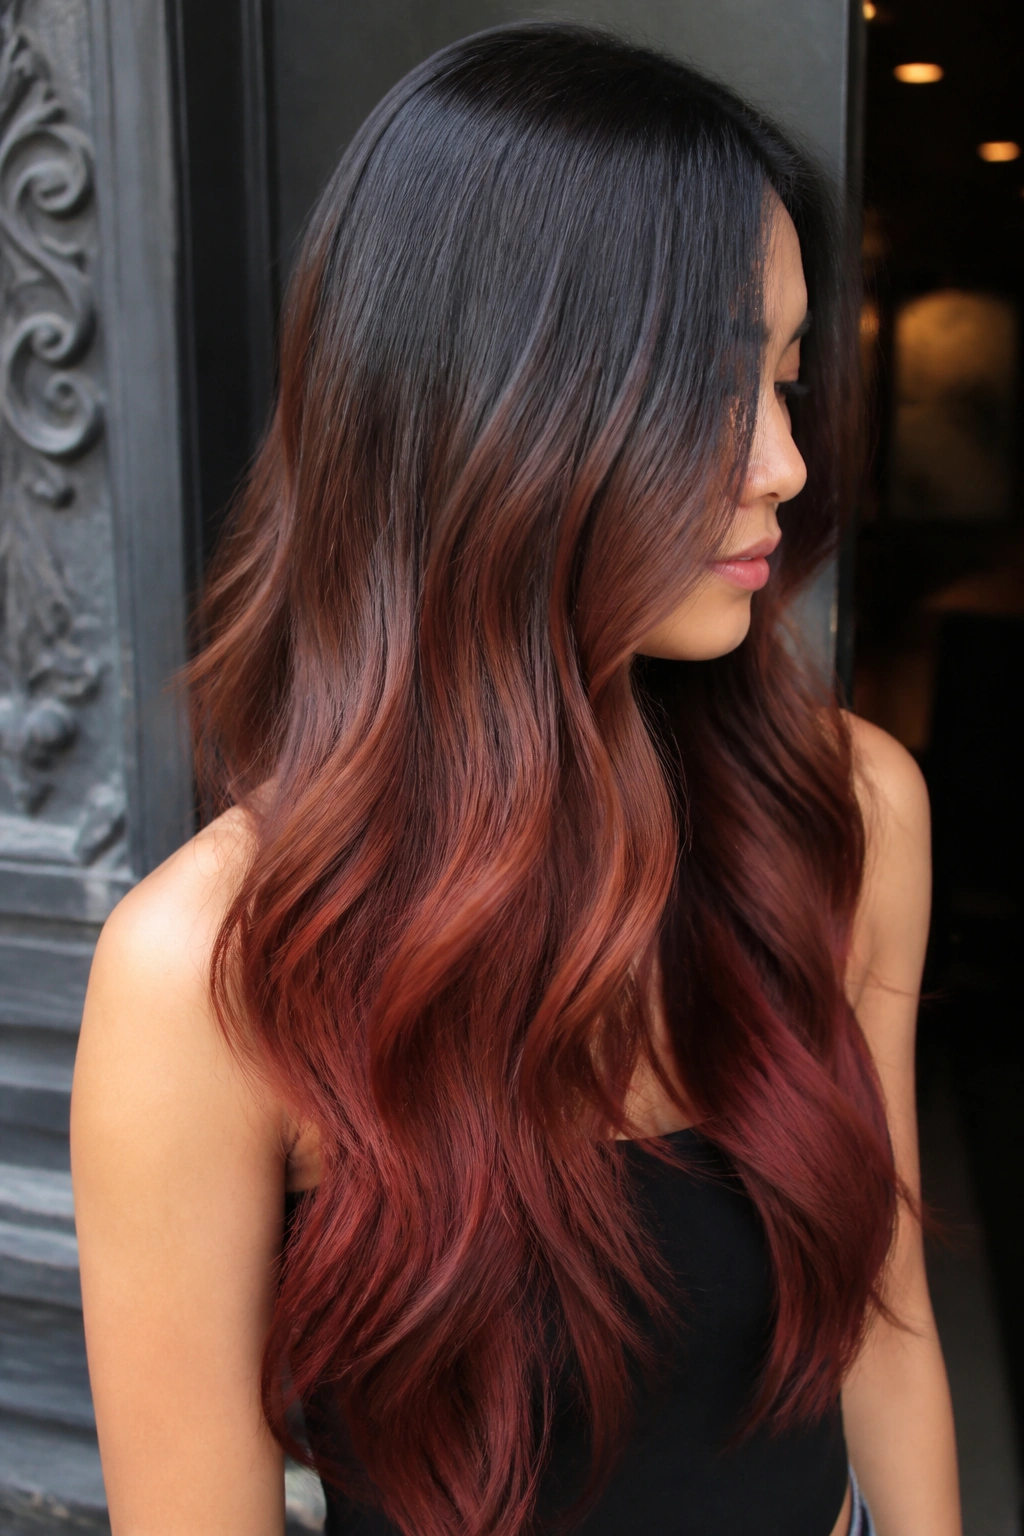
Unlike a high-contrast ombre, a color melt keeps the transition smooth enough that you never see a hard stop. On black hair, that makes auburn feel expensive and grown-in instead of striped. For round faces, it’s a smart way to keep the outline soft while still building length through color.
The best melts start with near-black at the root, shift into deep auburn around the middle, and end in a richer red-brown at the tips. The middle zone does the real work. It creates a gentle vertical fade that keeps the eye moving down the hair shaft. That is what helps the face look less wide.
This style suits anyone who wants red without a lot of upkeep. Because the transition is gradual, regrowth is easier to live with than with sharp foil lines. It also works well on straight hair, where every color change is more visible. If the blend is off by even a little, you’ll see it. So the melt needs to be soft and careful, not hurried.
It’s a good option when you want something polished, not flashy.
13. Garnet Contour Lights at the Temples and Jawline
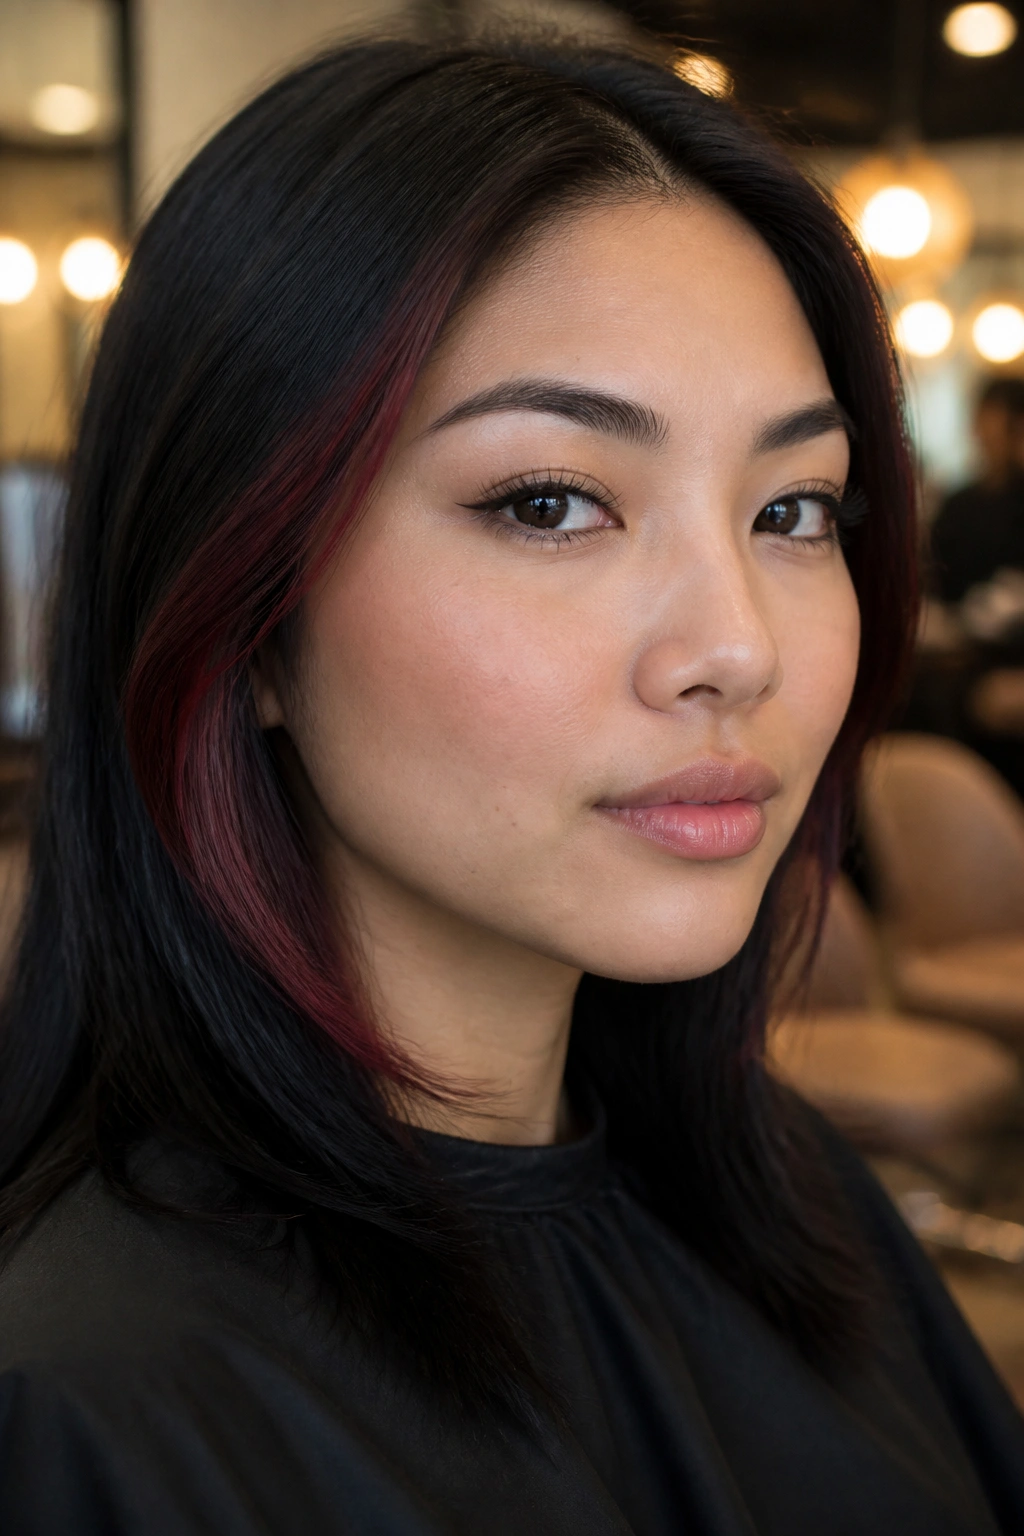
Garnet contour lights are a face-shaping trick, and I mean that in the literal sense. The color sits where contour would sit in makeup: at the temples, just in front of the ears, and in slim pieces that skim the jaw. On a round face, that placement can sharpen the outline without making the color obvious from across the room.
Why this placement matters
The red stays in the perimeter, not across the front. That leaves the center of the face open and stops the highlights from making the cheeks look broader. The effect is subtle but useful. You get a frame, not a stripe.
Garnet is a strong choice because it has enough depth to read elegant on black hair. It doesn’t feel candy-bright. It feels dense, like a gemstone with a dark base. That’s especially nice if you wear the hair behind your ears often, because the color line appears and disappears as you move.
A few placement notes:
- Keep the temple pieces narrow and vertical.
- Let the jawline pieces taper toward the ends.
- Leave the very widest part of the cheek area darker.
- Use a gloss after coloring to keep the garnet rich.
This is one of my favorite approaches for people who want color that works hard in the background.
14. Smoky Red Foilyage for Curls
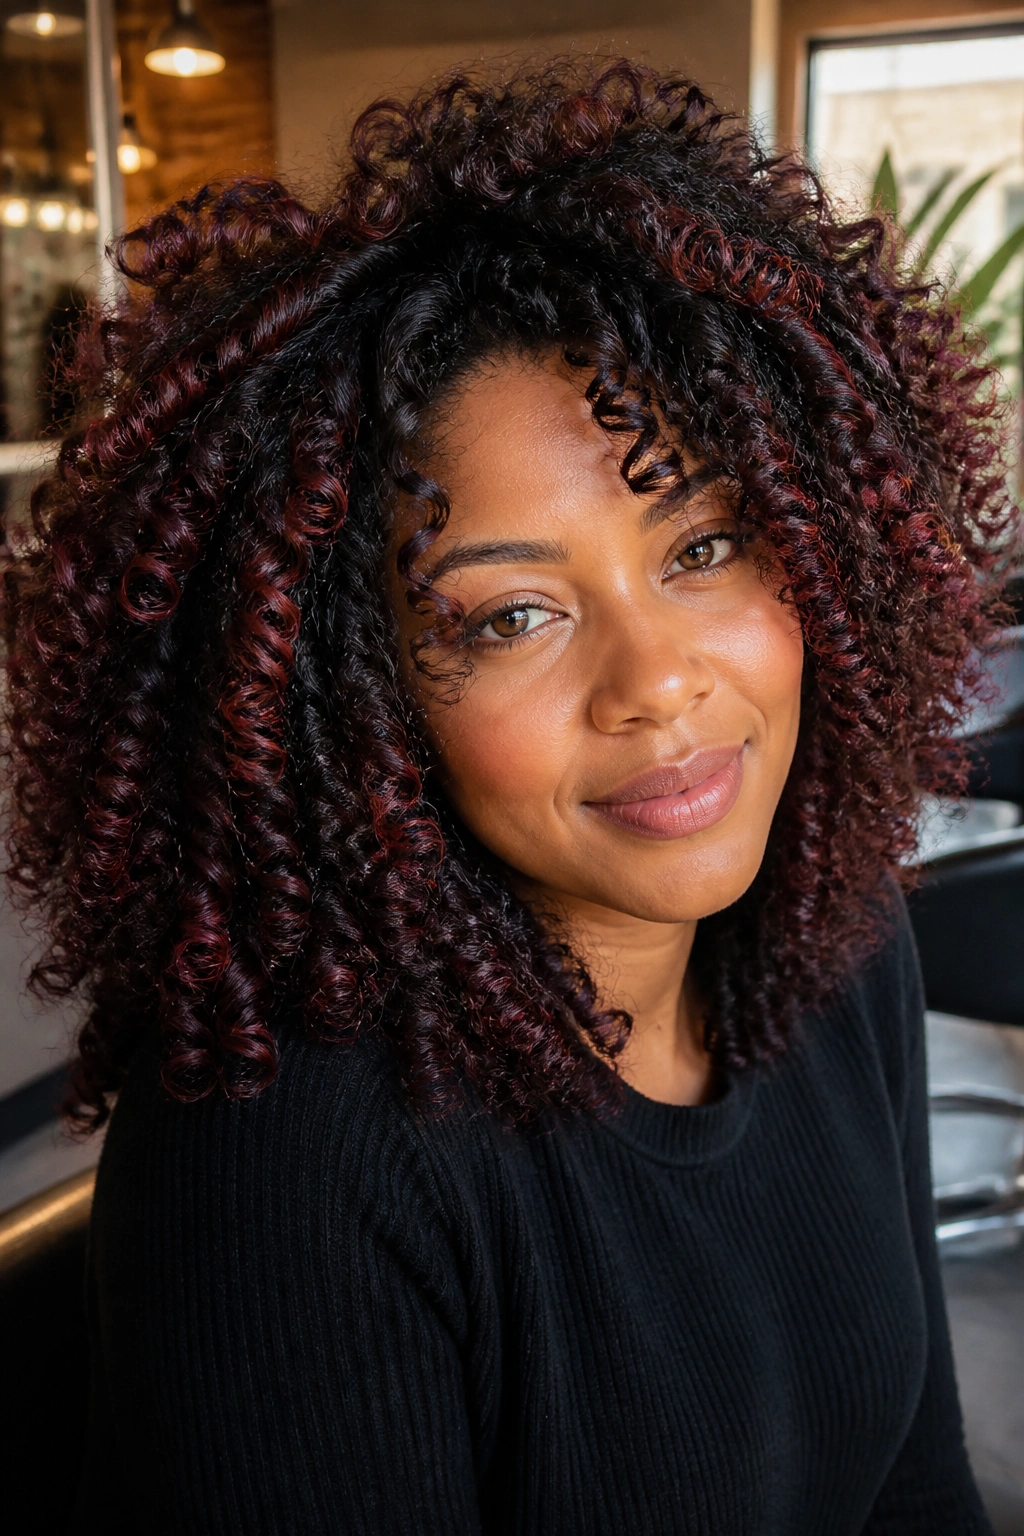
Curls change the whole conversation. They need placement that respects the pattern, or the color can balloon out in places you do not want. Smoky red foilyage does that well because the foil gives the red enough lift to show on black hair while keeping the placement controlled through the curl shape.
The smoky side of the tone is what makes it flattering on a round face. Bright red can look big fast. A softened, smoky red keeps the curl definition without turning the outer shape into one wide halo. Place the lightest pieces on the outer canopy and a few higher curls near the crown. That nudges the eye upward.
Foilyage is a hybrid of foil and balayage, so you get lift plus a soft painted feel. On curly textures, that’s useful because different coils catch the color differently. A good colorist will place the red where the curls fall forward, not just where they sit when wet. That’s a small detail, but it matters.
If your curls are dense, this style can be gorgeous. The red shows movement without flattening the face.
15. Rosewood Face Frame With a Soft Root Stretch
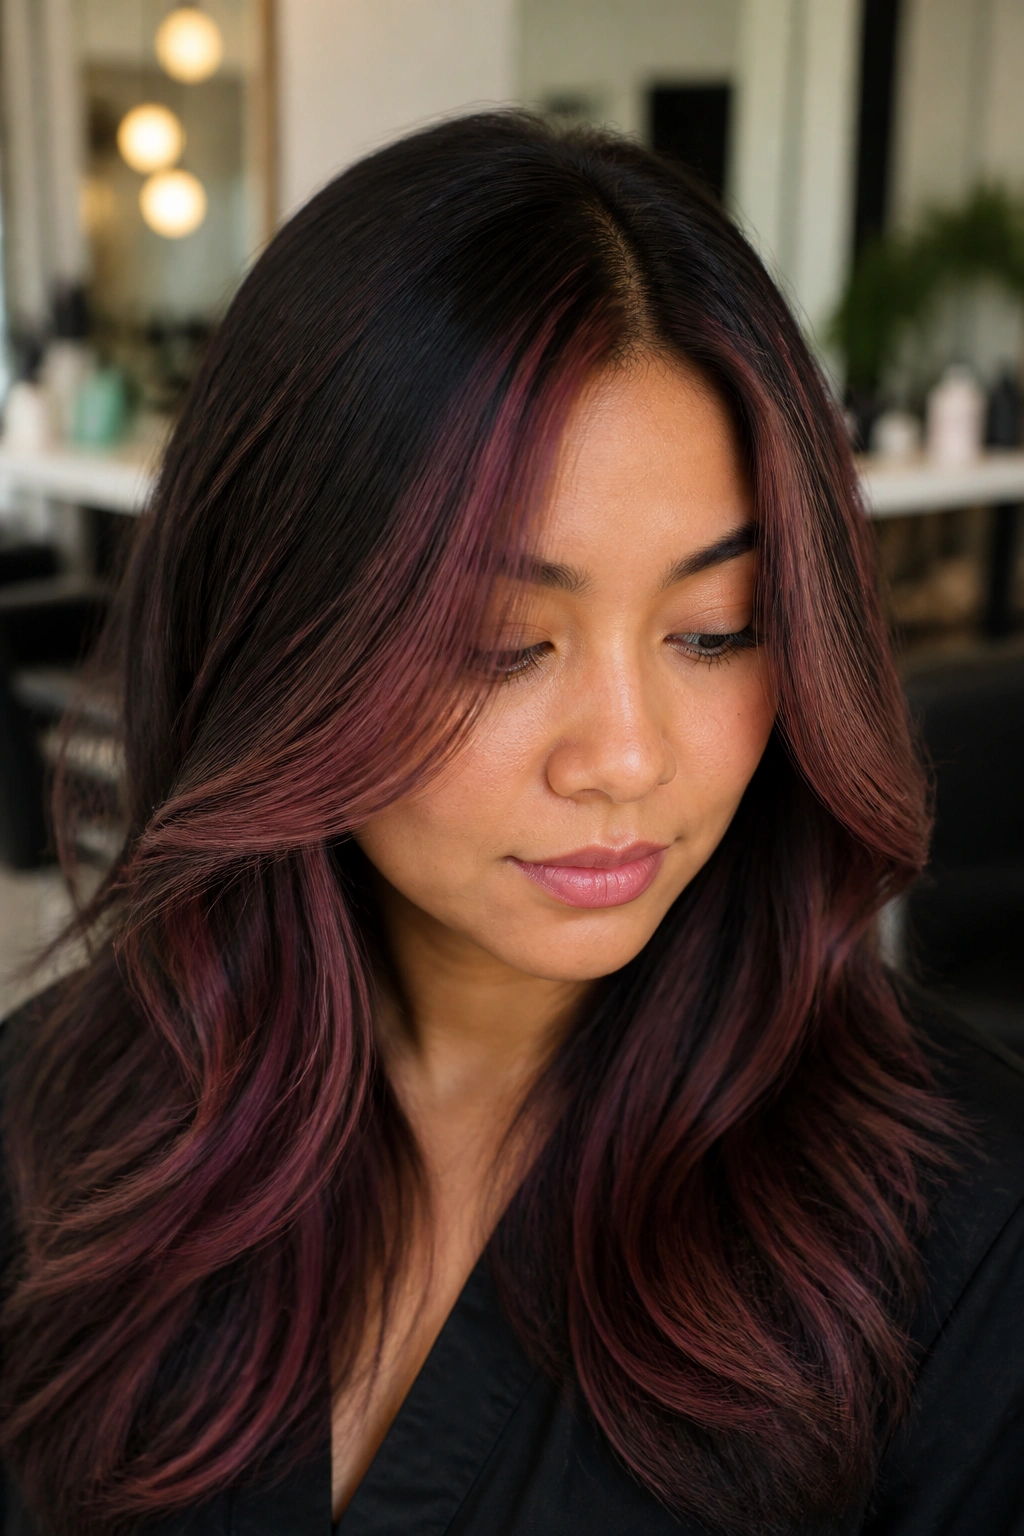
Why does a soft root stretch help a round face? Because it keeps the crown darker and the front lighter in a controlled way. That dark-to-light balance stretches the eye vertically, which is what you want when the cheeks already carry softness. Rosewood is a nice shade for this because it feels red, but not loud.
How to wear it
Ask for a 2-inch root stretch in a deep black or softened brown-black, then let the rosewood bloom through the front lengths. The face frame should be thin at the top and slightly thicker around the collarbone. That puts the visual weight lower and stops the front from puffing out at cheek level.
Rosewood is also flattering if your skin leans cool or neutral. It doesn’t clash the way a hot scarlet can. The tone sits somewhere between dusty red and brownish pink, which sounds odd until you see it on black hair. Then it makes sense. It looks smooth.
This is the kind of color that lets the haircut breathe. It works best with a side part or a soft center part, not a stiff middle line. The part line plus the root stretch together create a cleaner vertical line through the face.
16. Ruby Halo Lights for High Ponytails
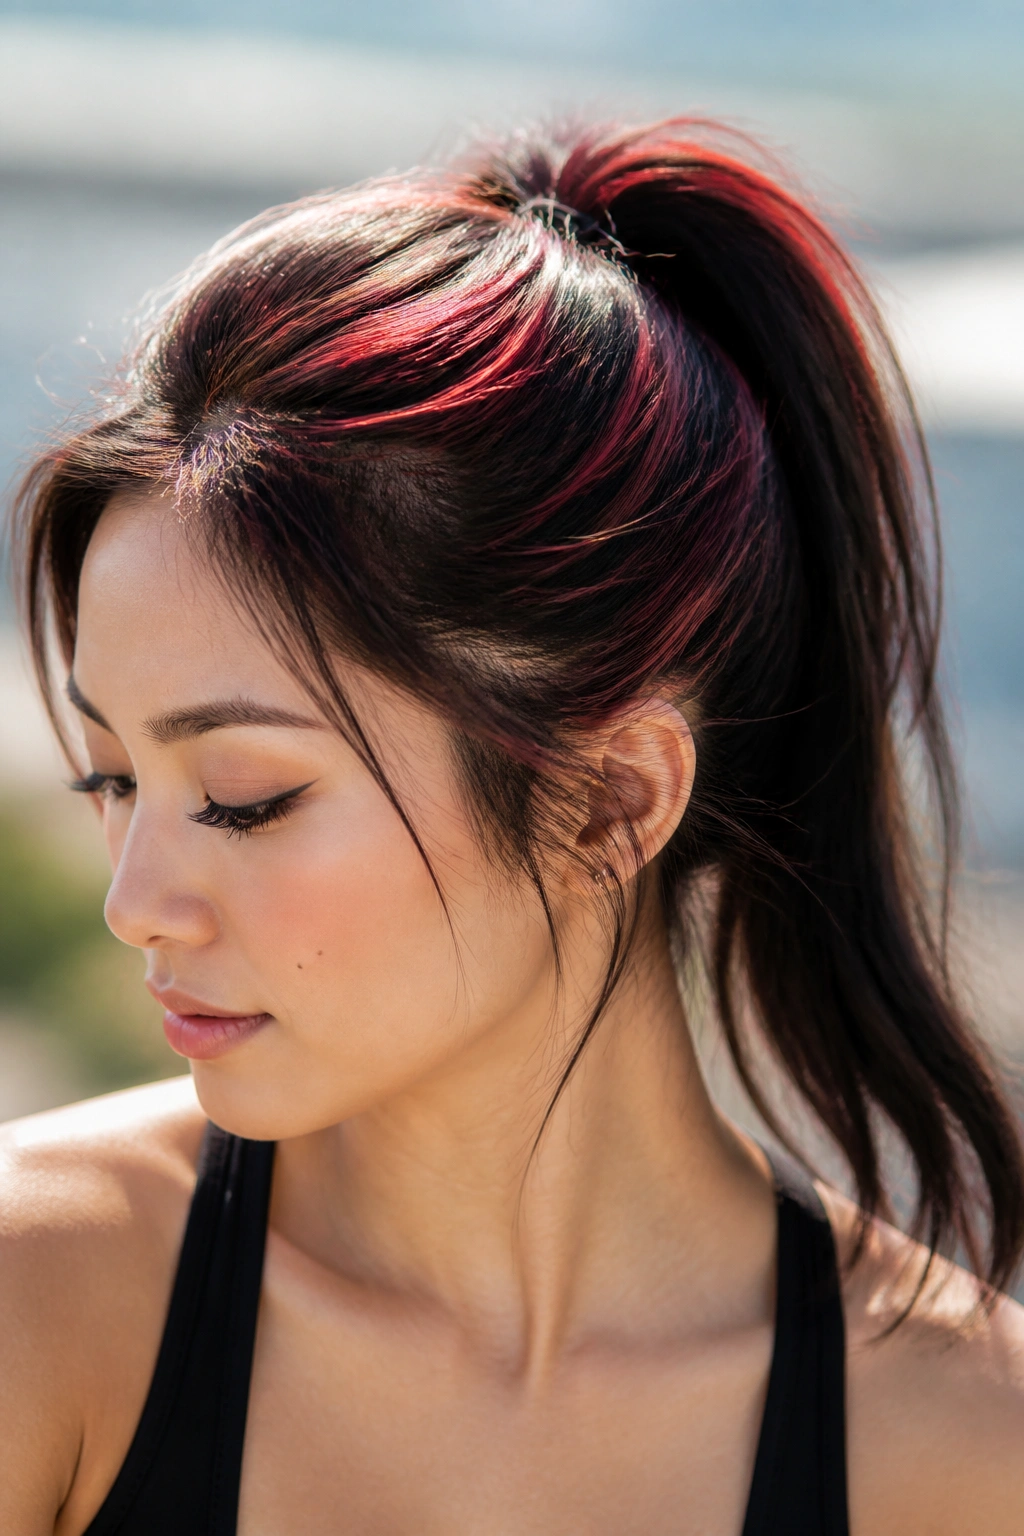
A high ponytail changes how color reads, and that’s why ruby halo lights can be so useful. The color circles the head in a way that still gives lift, because the ponytail itself pulls the eye upward. On a round face, that upward pull is the whole point.
The halo should sit around the crown and upper side sections, not low around the ears. If the red drops too low, the style loses its lift and starts to widen the face instead. Keep the brightest ruby at the top third of the style, where it catches the light as the hair swings. That top placement is the difference between lengthening and flattening.
This one is a good fit if you wear your hair up a lot. It prevents the style from looking like just a plain black ponytail with a bit of color hidden underneath. The ruby becomes part of the shape. And because the ponytail exposes the face, the color can act almost like jewelry.
I’d keep the pieces soft, not stripy. You want a halo, not a barcode.
17. Chestnut Red Micro-Highlights on Short Pixies
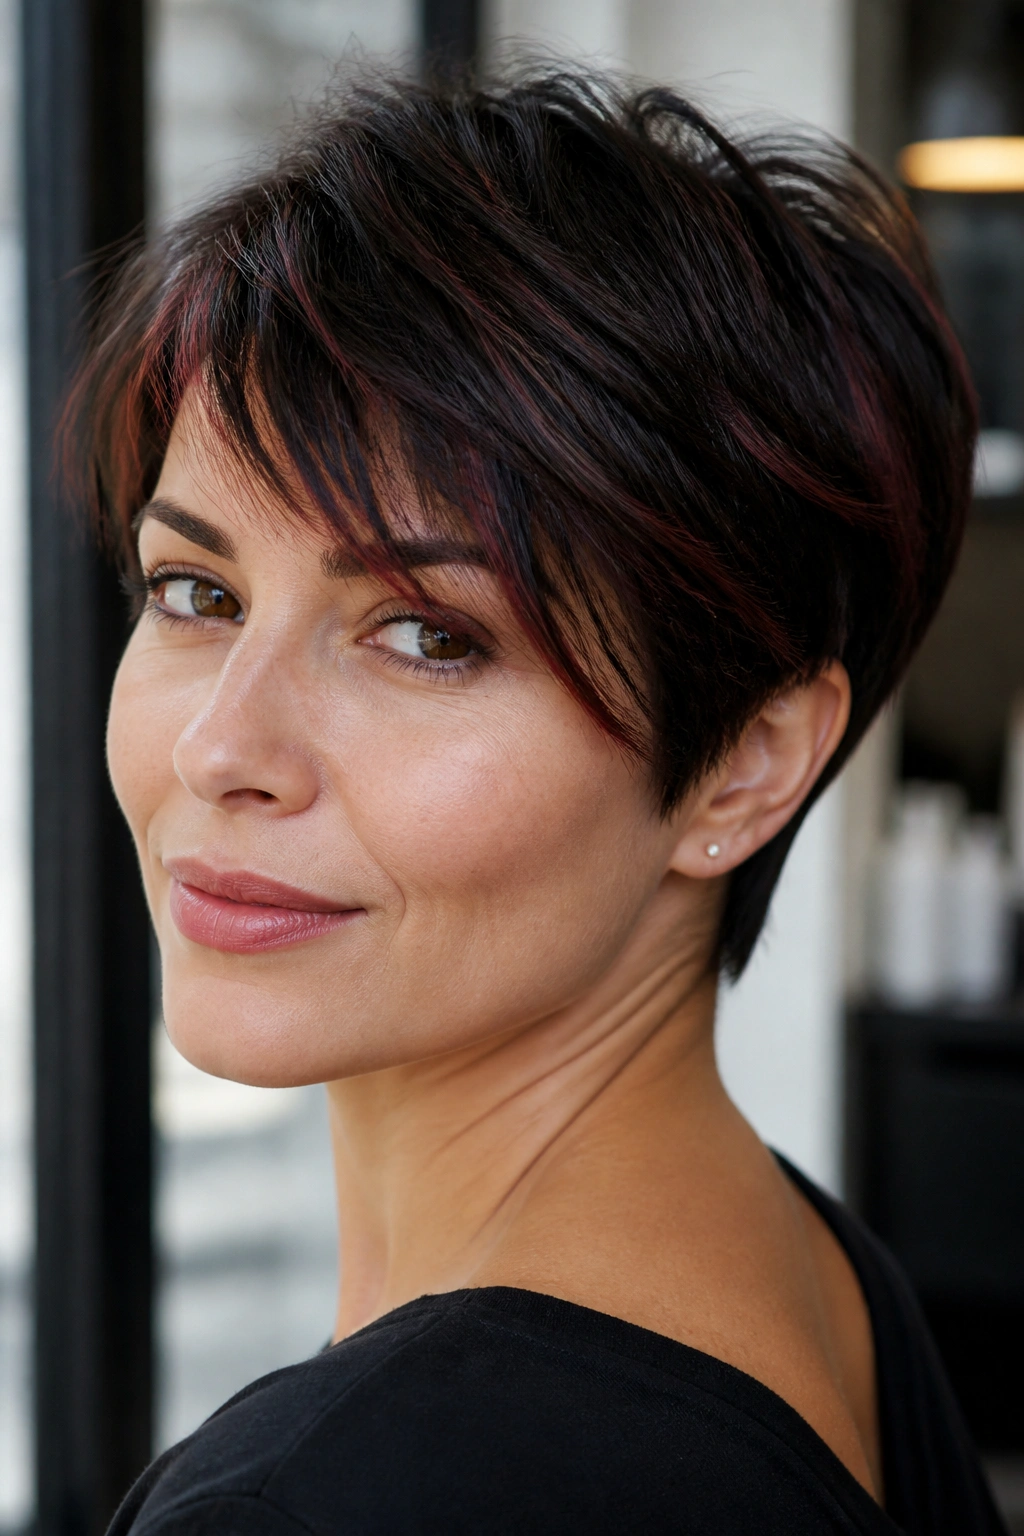
Short hair can carry red better than people expect. On a pixie, micro-highlights in chestnut red add texture without stealing the shape of the cut. For a round face, that matters because a pixie already exposes the face more than longer styles do. The color needs to work with the cut, not fight it.
The best micro-highlights are tiny — 1/8-inch or smaller — and spread unevenly so they never read as one obvious band. Chestnut red is a smart choice because it sits close to brown, which keeps the style grounded. The pixie gets a little spark, but the eye stays on the haircut lines.
A side-swept fringe helps too. It creates a diagonal break across the forehead, and diagonals are your friend when the face is round. Put a few of the red pieces in the fringe area and a few at the crown, and leave the sides softer. That gives you height without a bulky frame.
This style is neat, quick to style, and less fussy than it looks. Tiny pieces. Big effect.
18. Velvet Cherry Panels on Straight Hair
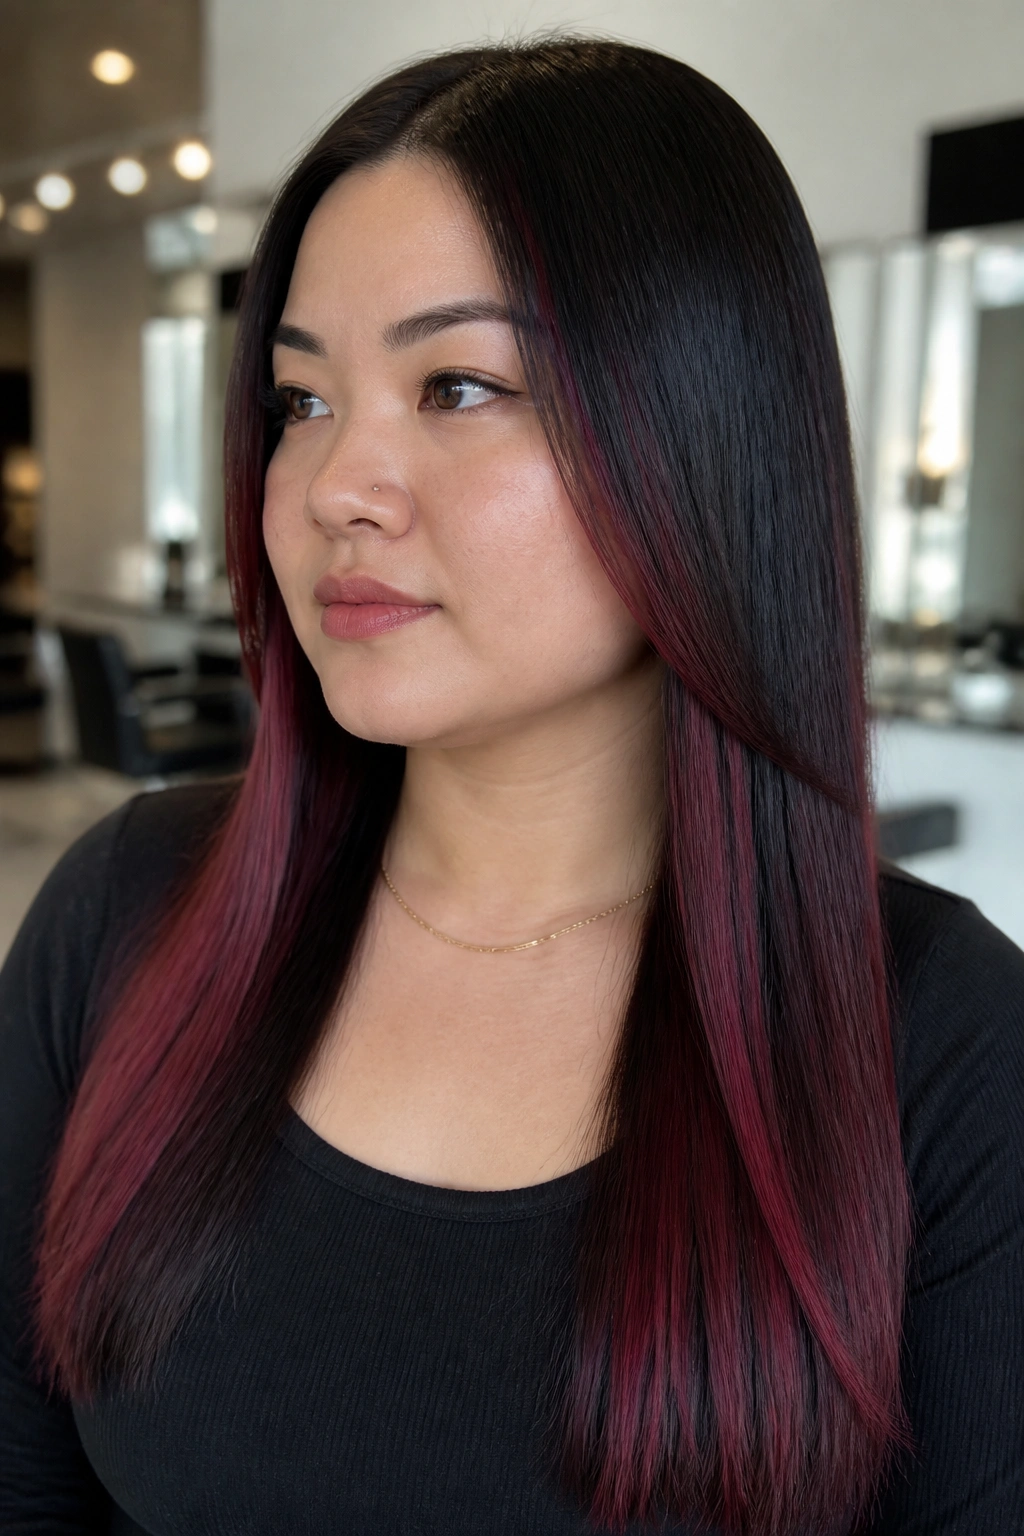
Straight hair is honest. It shows every line, every tone shift, every placement choice. That can be a blessing if you know what you’re doing. Velvet cherry panels work especially well here because they give straight black hair controlled blocks of color instead of fuzzy blends that can disappear.
Unlike wave-friendly balayage, this style leans on clean panel placement. A straight finish makes the red look deliberate, which is useful on a round face because you can put the color exactly where you want the eye to travel. I like slim panels that start above the collarbone and run down the outer lengths. That keeps the front from getting too wide.
The velvet tone matters too. Cherry with a softened, slightly darkened base looks smoother on straight hair than a bright fire-red. It reads plush. That’s a good word for it. Plush. The color looks dense without being heavy, and that density gives black hair a lot of richness.
If your hair is pin-straight, ask for panels that are spaced apart by at least 1 to 2 inches of dark hair. Too many panels close together can make the whole head look broad.
19. Spiced Cranberry Balayage on a Shag
A shag already gives you movement, so it makes sense to color it with something that loves movement too. Spiced cranberry balayage does that job well. The soft, textured layers keep the color from sitting in one heavy place, and that helps a round face because the eye sees lift, not width.
What to ask for
Ask for the brightest pieces on the outer layers, the curtain bangs, and the ends of the longest face-framing pieces. Keep the crown darker. That contrast gives the shag a little grit while still shaping the face. If the color starts too high around the cheek area, the whole cut can look fuller than it is.
- Use thin painted pieces through the bang area.
- Keep the cranberry deeper at the root and richer at the ends.
- Let some of the inner layers stay black for contrast.
- Blow-dry with a round brush only at the front if you want extra lift.
Spiced cranberry is a nice middle ground between red and brown. It looks warm, but not orange. On a shag, that warmth makes the layers easier to read. The cut looks intentional. The face looks a little longer. And the whole thing feels less polished in the boring sense and more lived-in.
20. Deep Garnet Lowlights With Baby-Fine Red Threads
A lot of people chase highlights and forget that lowlights do half the shaping work. On black hair, deep garnet lowlights can make the red highlights pop while also pulling the face inward a touch. For a round face, that’s useful. The darker pieces create shadows around the sides, and the baby-fine red threads give you movement without a thick color block.
The mix is the point. Too much bright red all at once can widen the look around the cheeks. But if you tuck lowlights between tiny red threads, the contrast becomes more dimensional and a lot less blunt. That’s especially helpful on dense hair that likes to sit wide at the sides.
I’d keep the lowlights around the outer perimeter and scatter the red threads higher through the top layers. That way the brightness lifts the eye, while the darker pieces keep the shape neat. The ratio should lean darker, not lighter.
This is the kind of finish I reach for when someone wants red hair that still feels grounded. Not flashy. Not flat. Just smart. And on a round face, smart color usually beats loud color.
A good black-and-red look does not need to shout to be noticed. The best ones shape the face first, then bring the color second. That’s why placement, shade depth, and the size of each highlight matter more than any single red tone on its own. Give the eye a vertical path, keep the sides from getting too busy, and the whole style starts working with your face instead of against it.
