



Black hair can swallow color if the placement is lazy. Caramel can fix that fast—but only when it’s painted with enough thought to flatter a round face instead of widening it.
That’s the real trick with black caramel highlights for round faces: you want brightness that pulls the eye down, not a chunky band that keeps attention parked at the cheeks. A good colorist thinks in lines, curves, and balance. Where the light lands matters more than how light it is.
I like caramel on a black base because it gives warmth and movement without forcing the whole head into copper territory. The good versions look expensive in the plainest sense of the word: soft ribbons, clean blends, and a little shine at the ends. The bad versions? Stripey, too orange, or placed so wide across the face that they make everything look shorter.
The 20 looks below lean on different placement tricks—face-framing, babylights, ombré, contour pieces, hidden panels, and a few bolder streaks. Some are subtle. Some are louder. All of them are built to work with a round face instead of fighting it.
1. Soft Face-Framing Caramel Ribbons
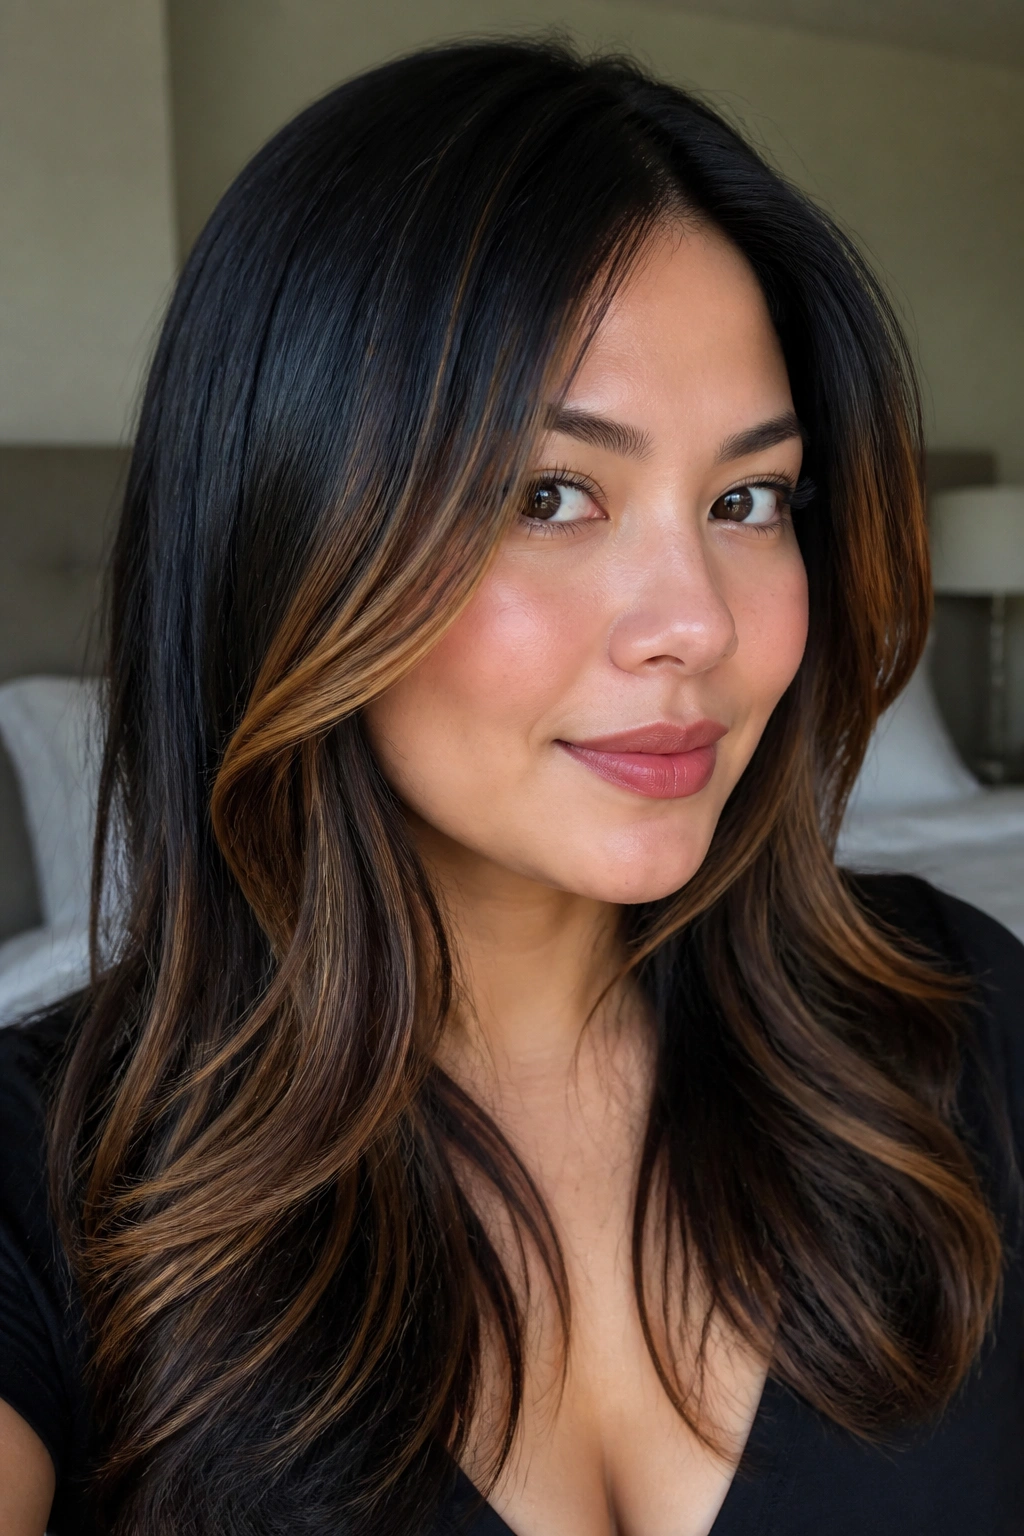
This is the safest place to begin, and honestly, one of the prettiest. Soft caramel ribbons placed just outside the cheekbone create a gentle vertical line that helps a round face look longer right away. The trick is to keep the light pieces narrow at the top and a little fuller near the collarbone, so the eye moves downward instead of stopping at the widest part of the face.
Why it flatters round faces
A round face usually reads as widest through the cheeks, so anything that adds light right at that level can make the face feel broader. These ribbons avoid that problem. They start lower, bend softly around the face, and keep the contrast gentle enough that the color looks blended rather than carved in.
Ask for this:
- Caramel pieces that begin just below the cheekbone
- A soft taper toward the ends
- A shade that sits one to two levels lighter than the black base
- Blended edges, not hard stripes
Small tip: keep the front pieces a little thinner than you think you need. Thin reads polished. Thick reads blocky.
2. Deep Root Shadow Balayage With Soft Caramel Ends
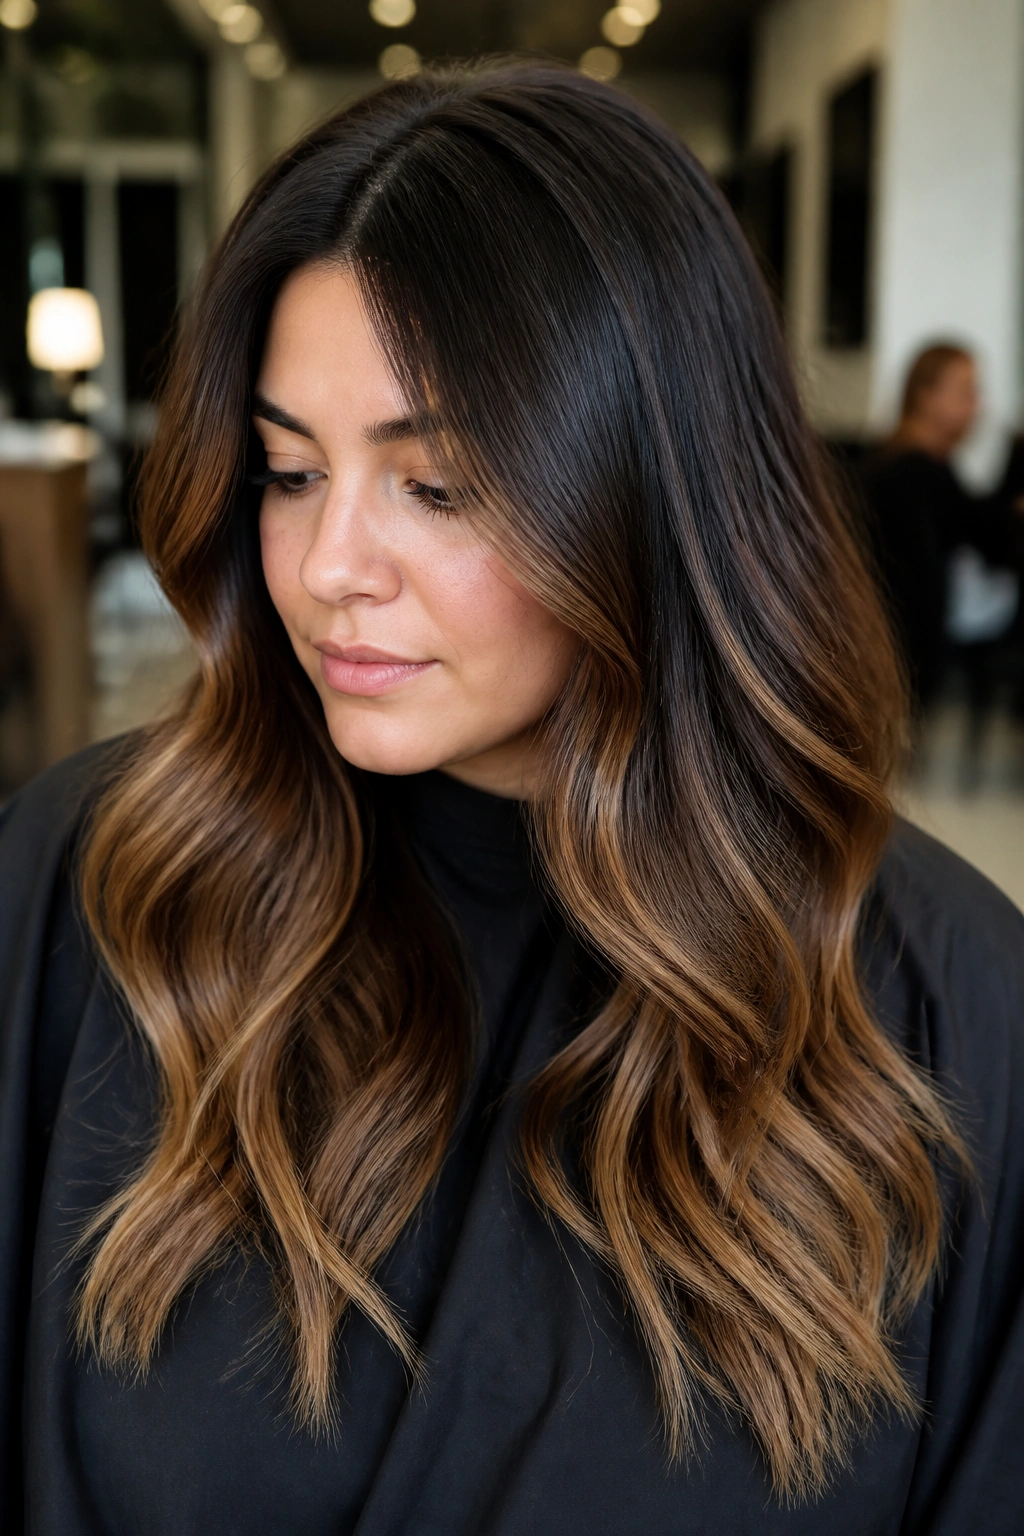
A deep root shadow changes the whole mood of black caramel highlights for round faces. Instead of spreading brightness evenly from scalp to ends, you keep the roots dark and let the caramel open up lower on the hair shaft. That darkness at the top gives the face a longer look, especially if your cut sits at chin or shoulder length.
This style also saves you from that awkward grow-out line that can happen when highlights are too close to the scalp. The darker root melts into the caramel, so the hair feels lived-in rather than freshly striped.
The best version uses a gradual fade over 3 to 5 inches. Shorter than that, and the blend can look abrupt. Longer than that, and you lose the lift. If your face is round, ask the colorist to keep the brightest pieces below the widest part of the cheeks. That single move does a lot of work.
3. Thin Temple Money Pieces
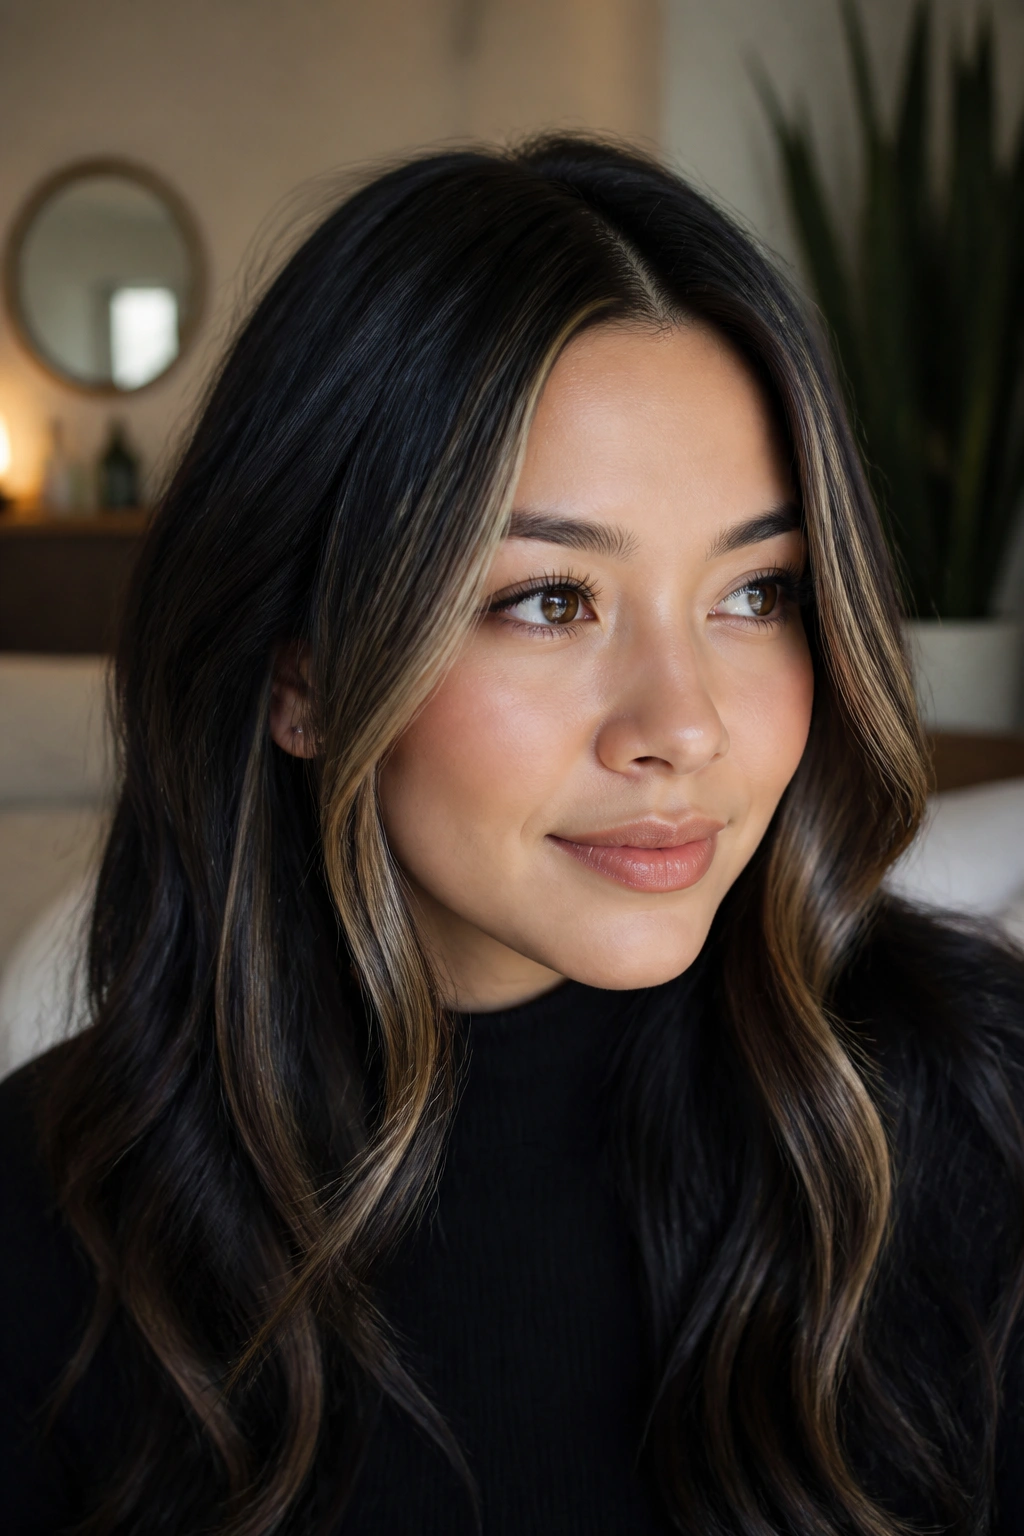
Want brightness without turning your cheeks into the main event? Thin temple money pieces are the answer. They sit just at the hairline, angle back toward the ear, and create a clean frame that gives a round face a little edge. I like this placement because it feels sharper than all-over highlights, but it still looks soft once the caramel starts to warm up against the black base.
How to ask for it
Ask for two narrow front panels, one on each side, with the lightest point starting near the temples rather than straight across the forehead. The pieces should be slim near the root and slightly wider as they fall, almost like a curtain that’s been tugged open. If they’re too thick, they make the face look shorter. Too pale, and they can fight the black base instead of blending into it.
A side part helps here. So does loose waves. Straight hair can make the panels look sharper than you want.
4. Fine Babylights Over Black Hair
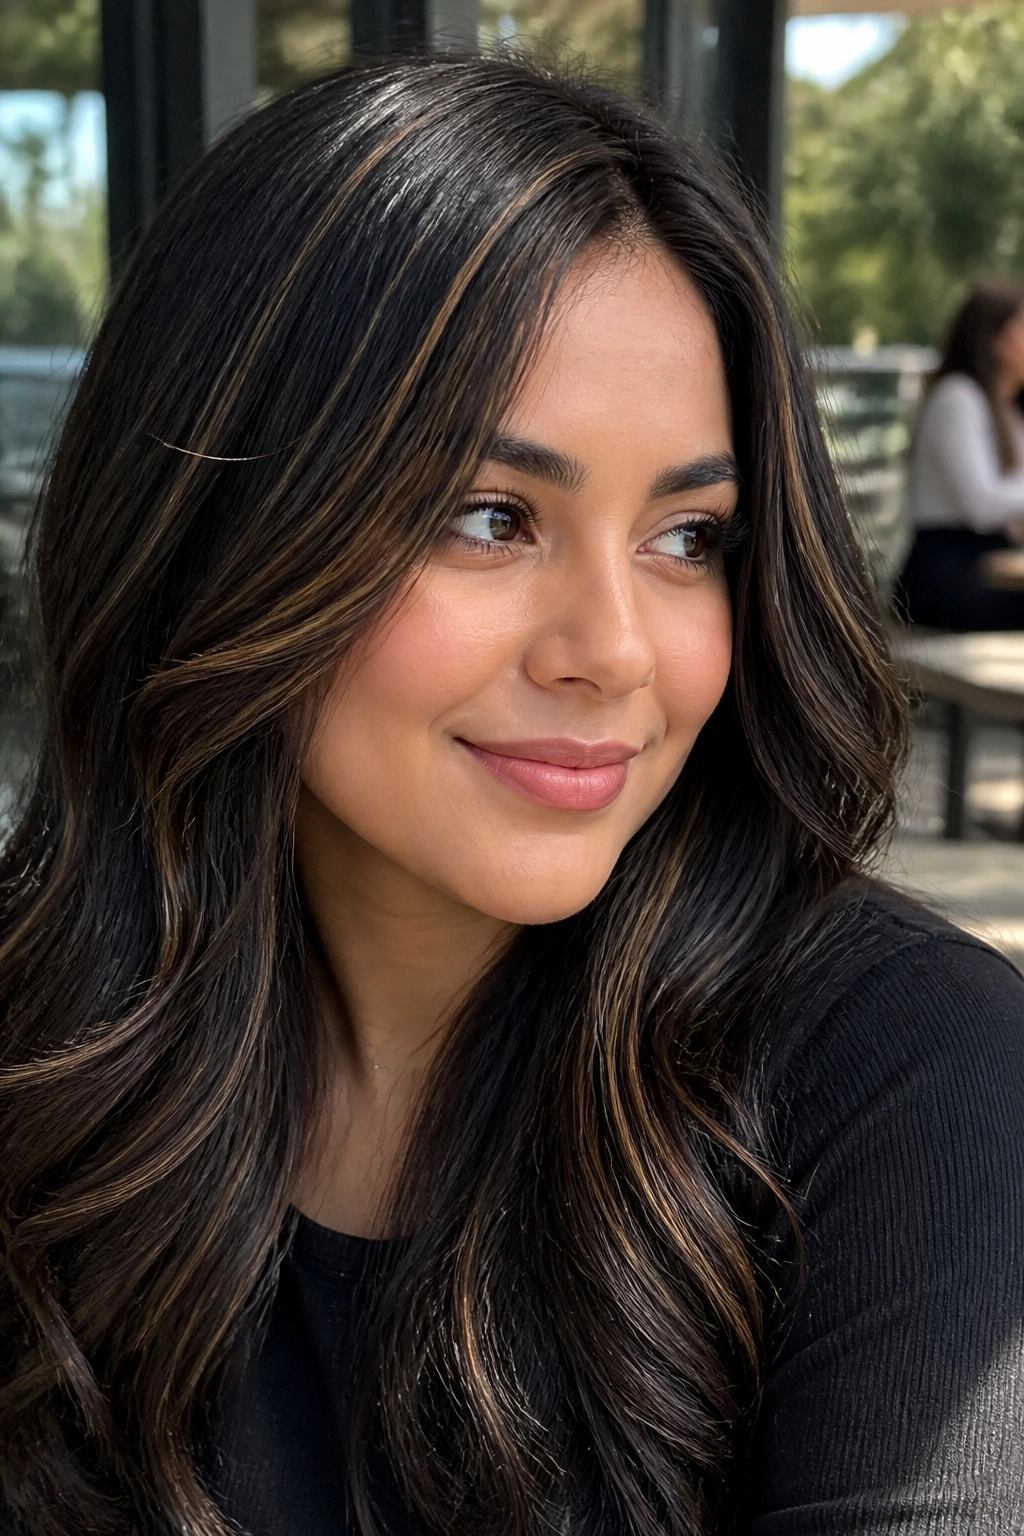
Babylights are tiny, and that’s exactly why they work so well on round faces. Instead of obvious streaks, you get a soft shimmer that breaks up the black base in a hundred small places. The result feels airy, not heavy, which matters when your goal is to avoid adding width around the cheeks.
The nicest versions use a warm caramel that stays close to the base color. Not too gold. Not too orange. The point is dimension, not drama.
What to ask for:
- Very fine foils around the hairline and crown
- Caramel pieces woven through the mid-lengths
- A soft gloss finish to keep the tone shiny
- Extra density near the top, not the sides
Babylights are also good if you wear your hair straight most days. The movement shows up in sunlight, in indoor light, even in the dull stuffy lighting no one likes. And because the pieces are so small, they don’t build a wide color block across the face.
5. Mid-Length Caramel Ribbons Through Long Layers
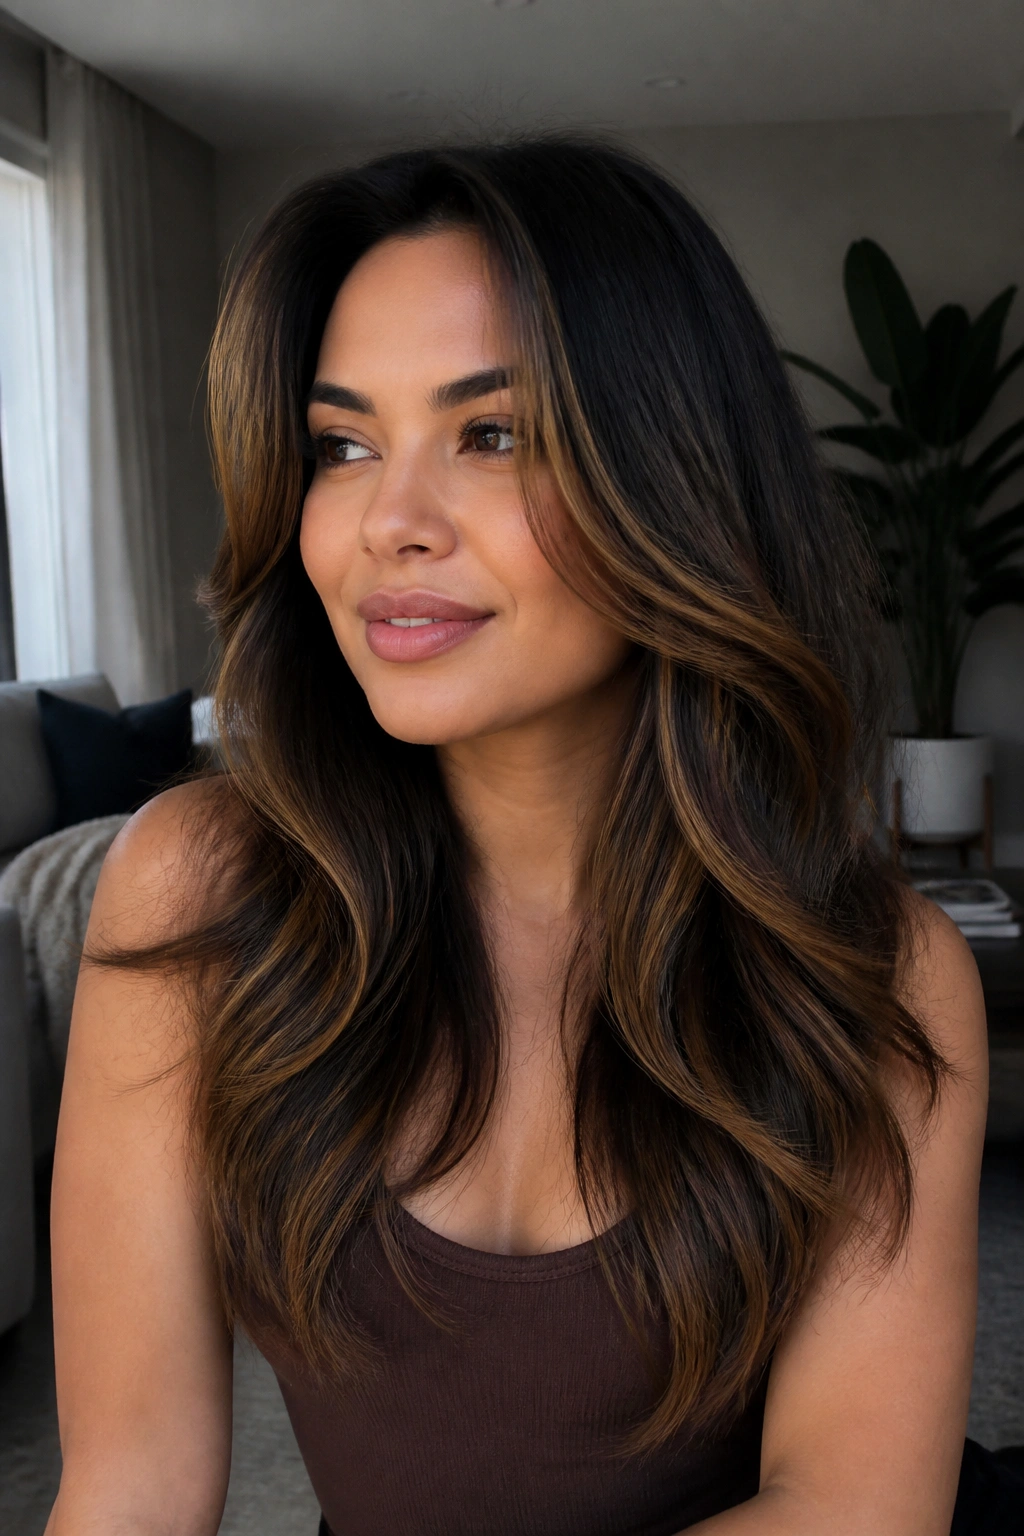
Long layers and caramel highlights are old friends for a reason. When the layers fall below the jaw, the highlights can follow the movement of the cut instead of sitting on top of it like decoration. On a round face, that’s a smart move. It stretches the silhouette and keeps the color from pooling around the cheeks.
This look works best when the caramel ribbons are placed along the layer edges, especially from the cheekbone down. You want the light to travel in long, clean lines. Short zigzags or too many light bits near the roots can make the style feel busy.
I’d keep the contrast moderate here. A deep black base with caramel that’s just warm enough to catch the eye looks more intentional than a high-contrast blond streak. The whole point is flow. Let the layers do the talking.
6. Black-to-Caramel Ombré With a Soft Fade
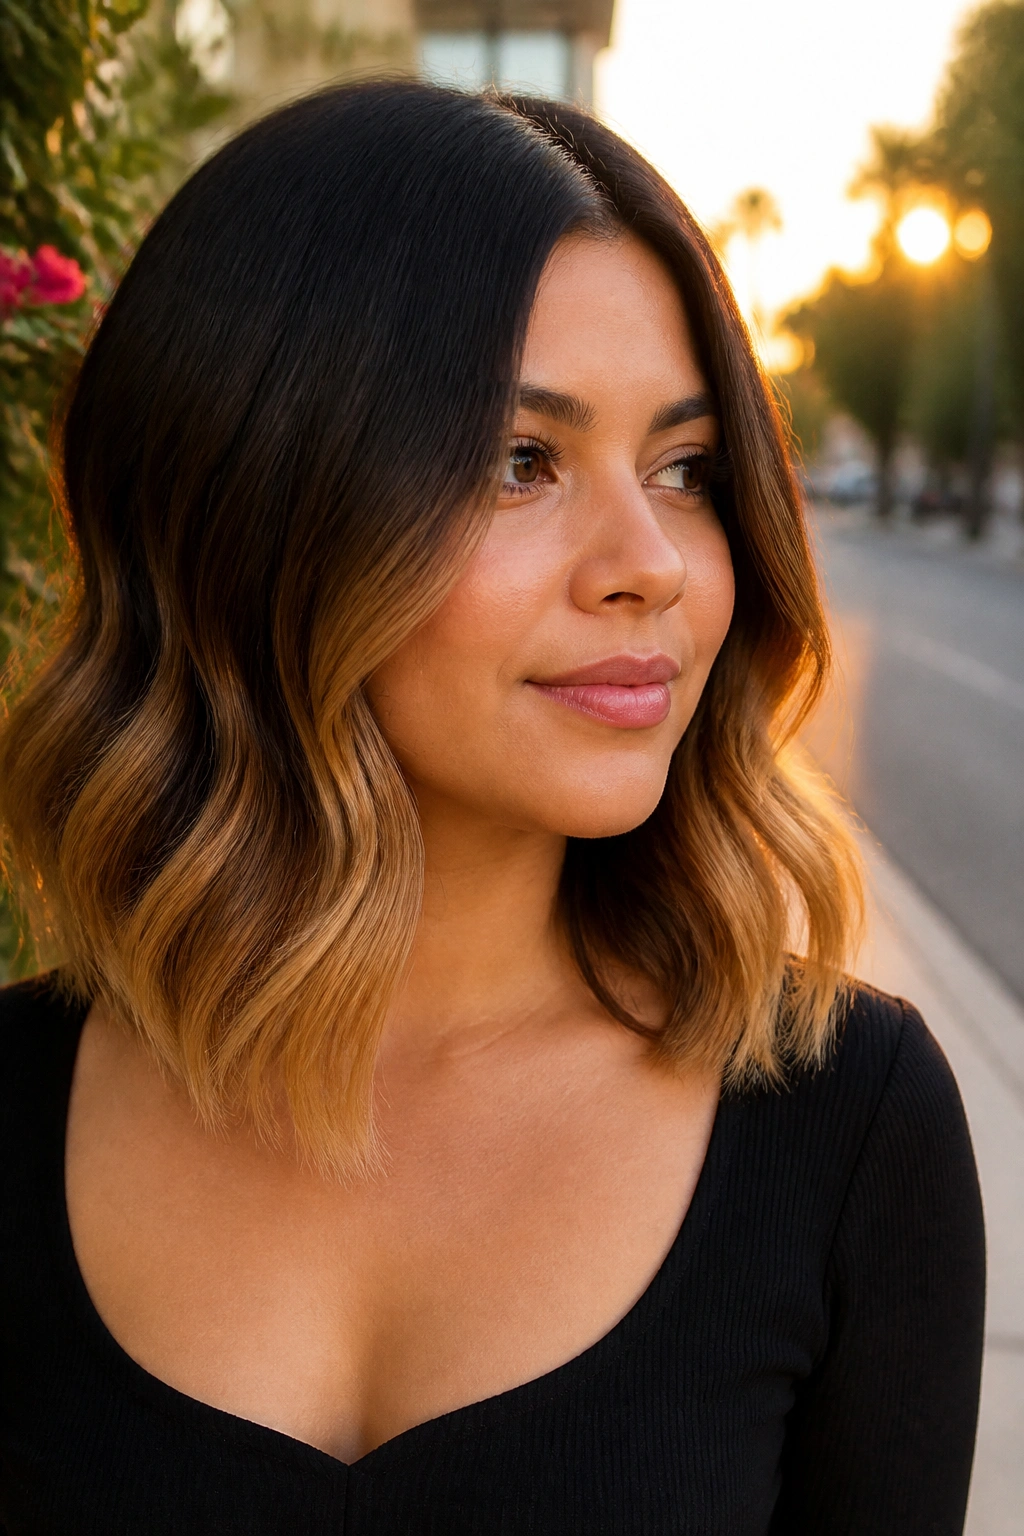
Unlike stripey highlights, ombré keeps the top dark and pushes the light toward the ends, which is a gift for round faces. The darker crown adds length. The lighter bottom half gives you movement. It’s one of the easiest ways to keep black hair feeling fresh without crowding the face with too much brightness.
The fade needs to be soft. A hard line at the midshaft looks dated fast and pulls the eye straight across the head. A gradual blend from black into chocolate, then into caramel, looks smoother and feels more expensive. Keep the transition around the chin to collarbone zone if your hair is medium or long.
This one is especially good if you wear your hair loose and want less upkeep. The grow-out is forgiving. And when you curl the ends, the caramel shows up in a way that makes the hair look fuller, not heavier.
7. Curved Contour Highlights Around the Jawline
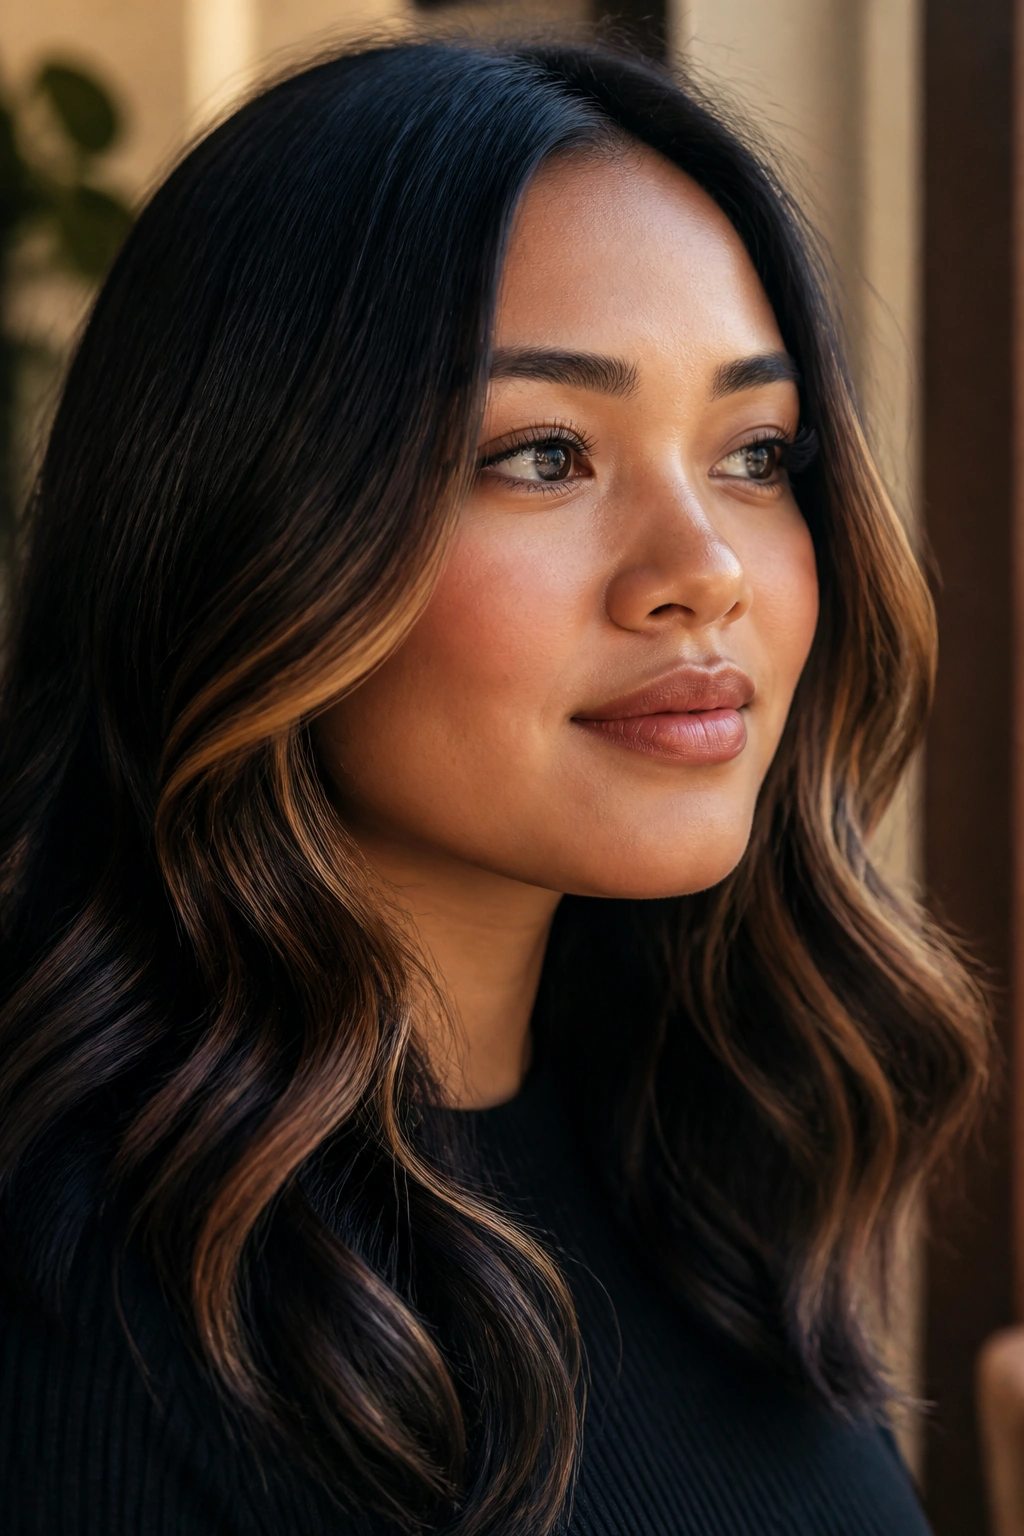
This is one of the smartest placements for round faces, and people overlook it all the time. Instead of painting highlights in straight vertical strips, you curve the caramel around the lower face so it traces the jawline. That shape creates a subtle contour effect. Not makeup contour. Hair contour. And yes, it changes the whole balance of the cut.
What makes it different
The light starts near the outer cheek area, then bends gently toward the jaw and neck. It does not sit flat across the cheeks. It follows the face, which is the whole point. When the color sits in a curved line, the face looks a touch longer and a little more sculpted.
What to watch for
- Don’t let the lightest pieces hit the widest part of the cheeks
- Keep the curve soft, not obvious
- Ask for caramel that blends into the base instead of popping sharply
- A soft blowout or waves makes this placement show up better
If you like color that does its job quietly, this is a strong pick.
8. Peekaboo Caramel Underlayers
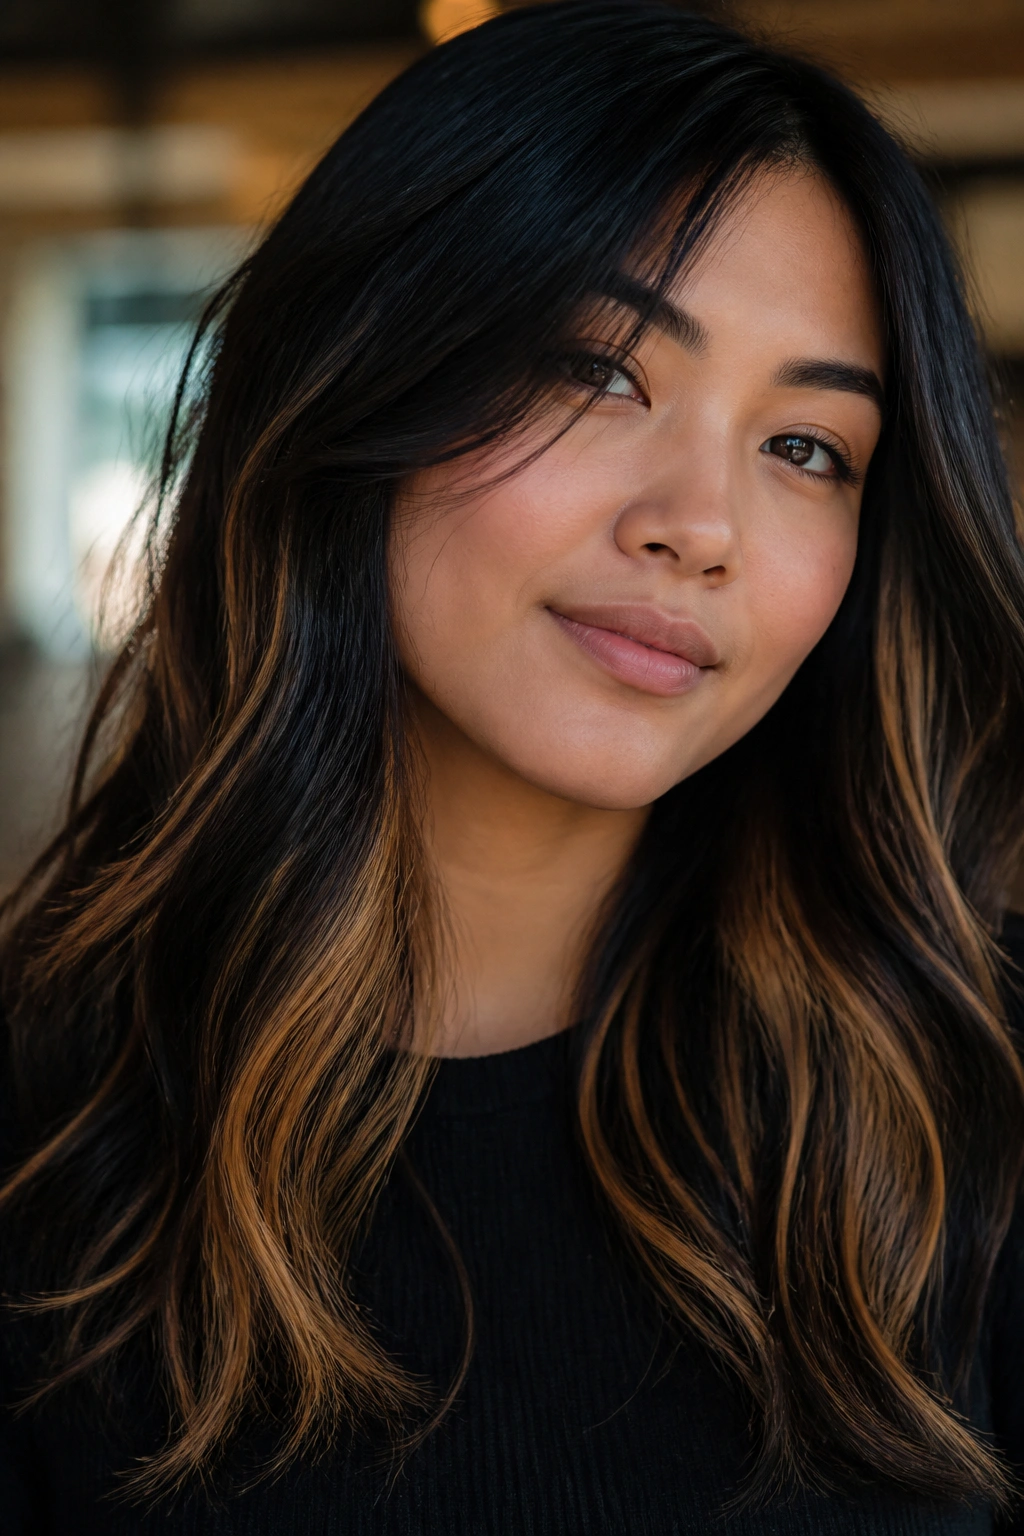
Peekaboo color is for the person who wants fun hair but not all the attention that comes with it. The caramel sits under the top black layer, so you catch flashes of warmth when the hair moves, gets tucked behind the ear, or is worn half-up. On a round face, that hidden placement is useful because it doesn’t add width at the front.
It also works in a more practical way than people expect. If your office or school situation leans conservative, peekaboo highlights are easier to hide. If you wear your hair in a ponytail or bun, they show up right where you want them.
This style looks best on layered bobs, lobs, and medium-length cuts. Curly hair is especially good at revealing the hidden panels in a soft, irregular way. No hard lines. Just a little surprise.
9. Mocha-Caramel Dimension With Low Contrast
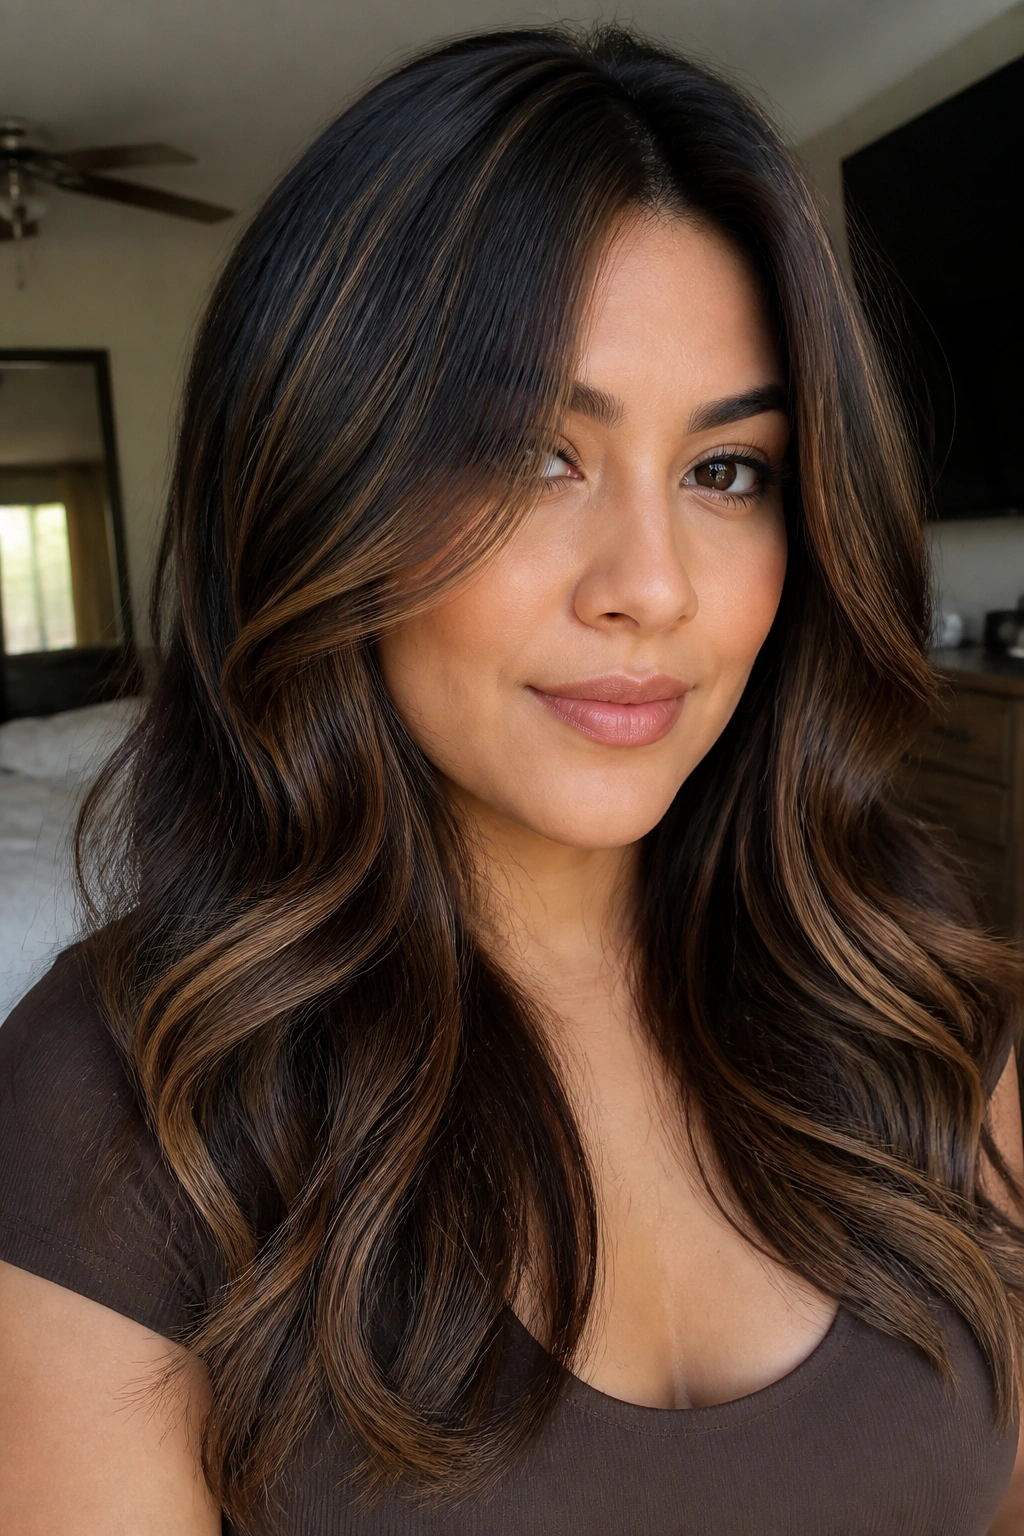
Some people want caramel, but they don’t want the contrast to shout. Fair enough. Mocha-caramel dimension is the answer. The lighter pieces stay close to the black base, so the overall look is softer, richer, and more blended. On round faces, that low contrast keeps the face from looking boxed in by obvious streaks.
The nice thing about this color story is how wearable it feels. It reads polished in daylight and still looks natural under indoor lighting. If the caramel is warmed up just a little, the whole head gets depth. If it’s pushed too light, it loses the point.
I’d ask for soft ribbons instead of thick panels. Think thin, woven movement through the mid-lengths and ends. It’s the kind of look that works on straight hair, wavy hair, and even thicker textures that need a little visual lift.
10. Cinnamon-Caramel Glossed Ends
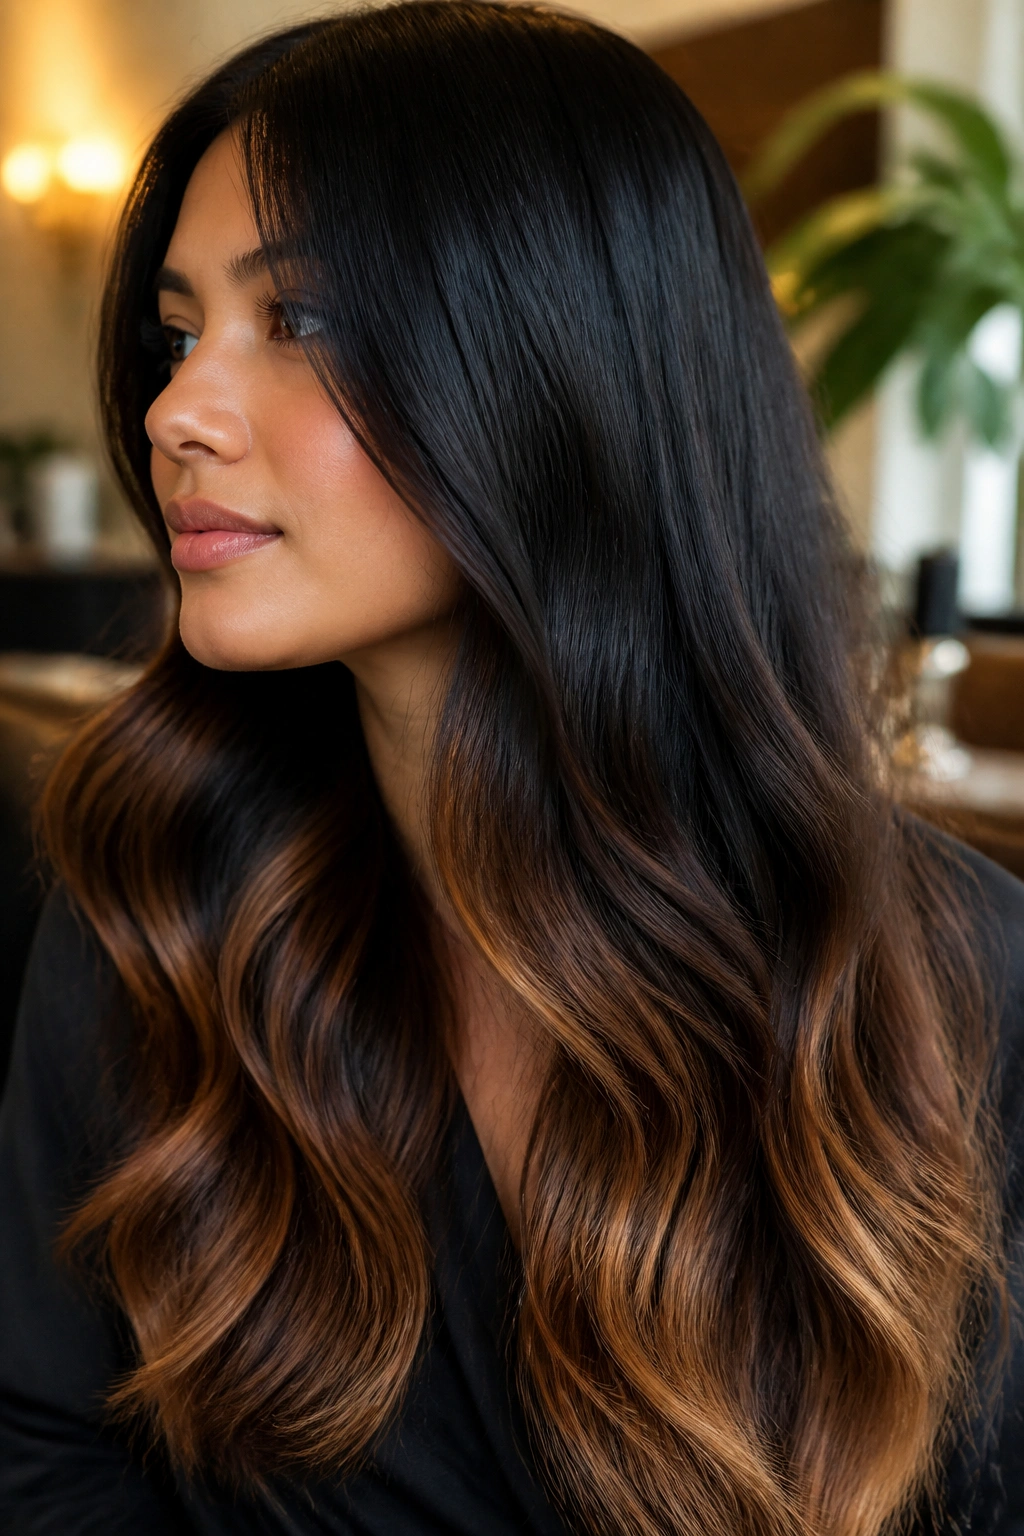
There’s something especially good about caramel that lives mostly at the ends. It keeps the light away from the cheeks and lets the lower part of the hair carry the color. For round faces, that matters. Your eye goes down the length of the hair instead of getting stuck at the face line.
Cinnamon-caramel ends can read warm, shiny, and a little spicy if the tone is handled well. The gloss matters here. A fresh gloss keeps the caramel from turning dull or orange, and it gives the ends that smooth, expensive-looking finish people usually want but don’t always know how to ask for.
This is a nice option if your hair is long enough to show off the fade. The best effect comes when the top stays mostly black and the lower half slowly warms into caramel. That contrast is what gives the hair shape.
11. Wavy Lob With Side-Swept Caramel Panels
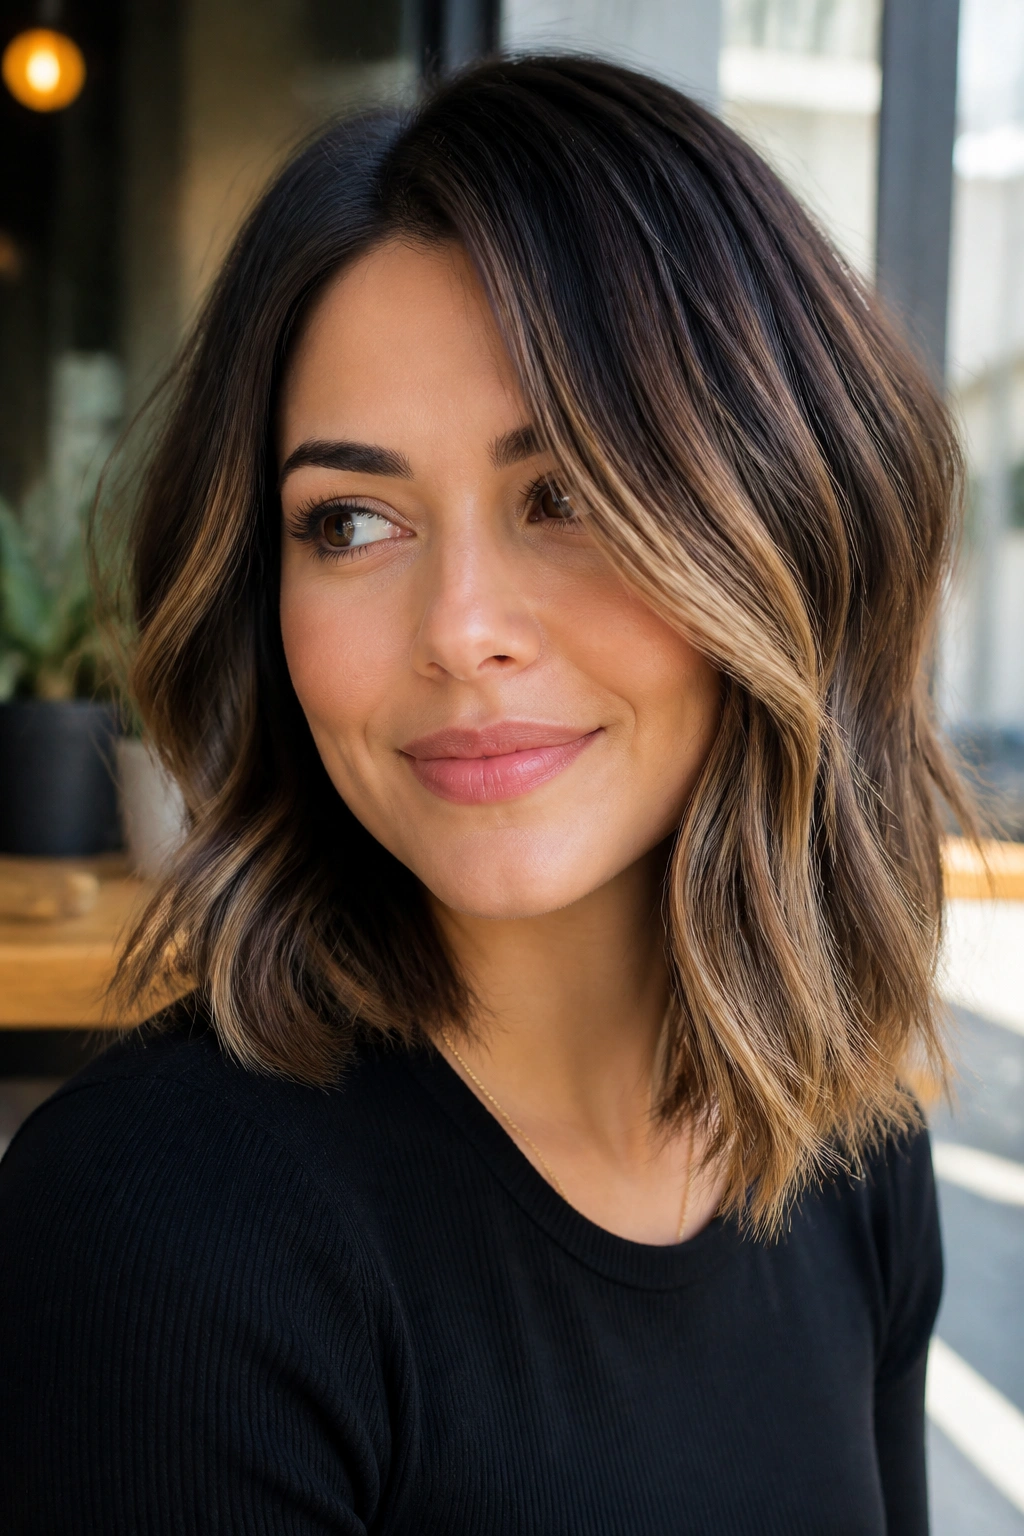
A side part changes everything. Seriously. When you sweep a lob to one side and place caramel panels on the heavier side, the whole cut stops reading round and starts reading longer. The asymmetry breaks up the softness of the face shape, which is why this style feels so flattering.
The panels should fall from just under the cheekbone and continue through the front layers. Keep them broad enough to show in the wave, but not so broad that they create a solid block of color. That middle ground is where this look works.
Best for
- Collarbone-length lobs
- Soft waves or bent ends
- Hair that naturally falls forward
- People who want shape, not a lot of upkeep
This is one of those styles that looks especially good when the hair has a little bend in it. Pin-straight hair can flatten the effect. A loose wave gives the caramel somewhere to live.
12. Micro-Foil Highlights Around the Crown
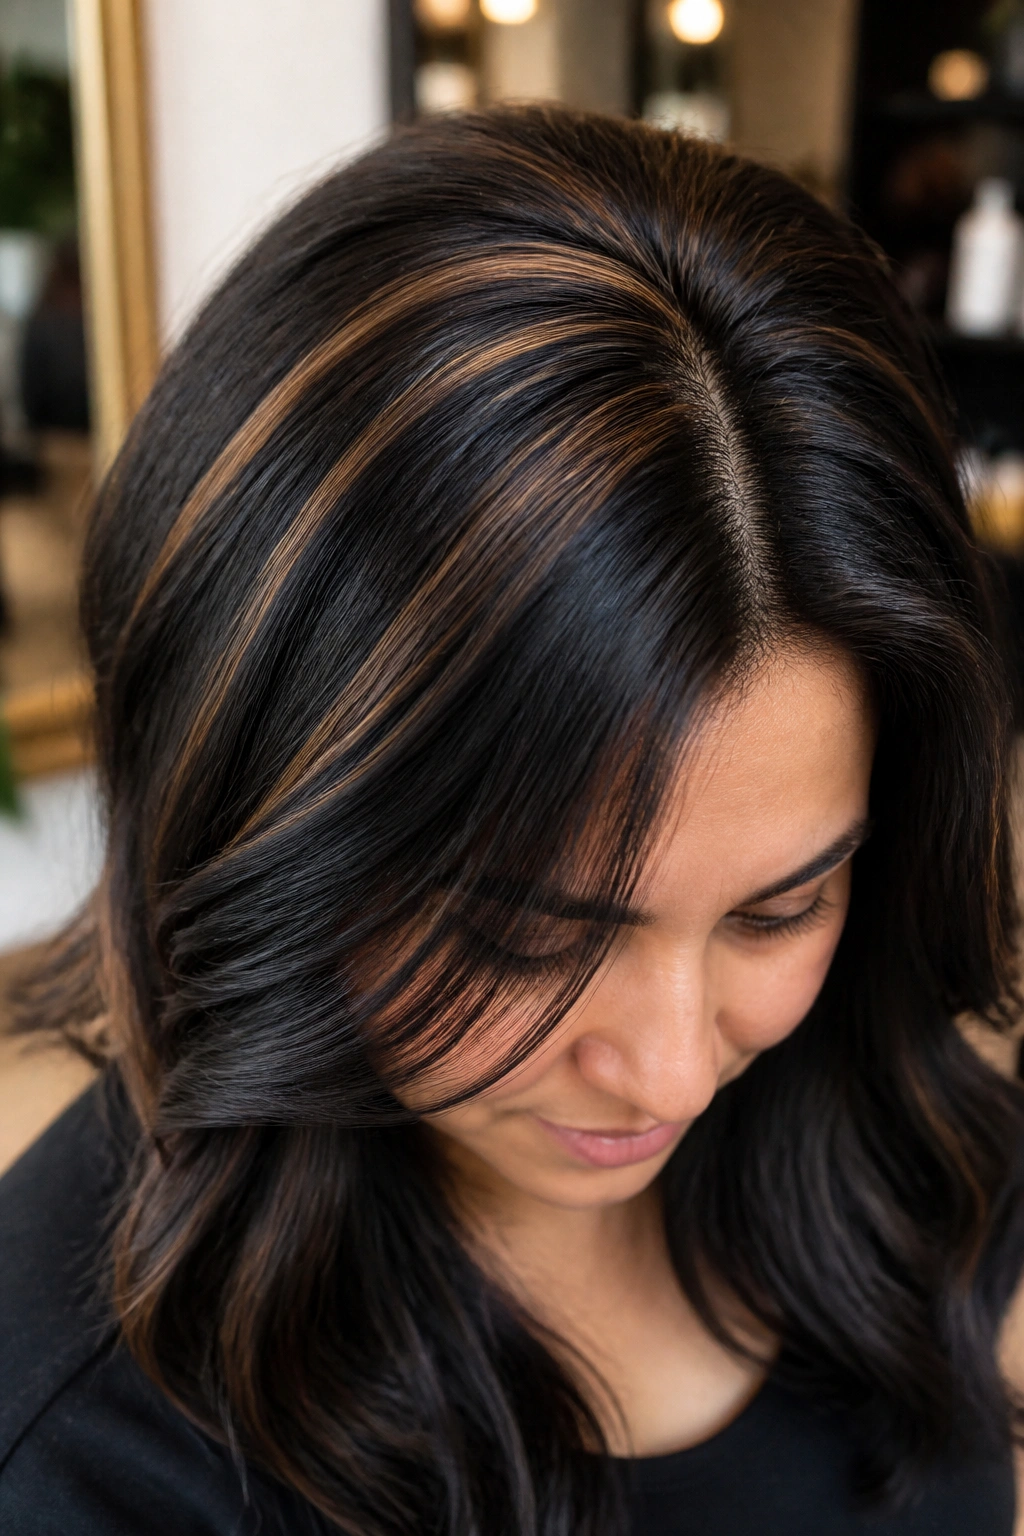
Crown brightness is underrated. A lot of people focus only on the front, but a little lift at the top helps a round face look longer by building height where the eye starts. Micro-foils are tiny, precise highlights placed near the crown and part, and they create that lift in a way that feels clean rather than busy.
How it shapes the face
The root area stays mostly black, which keeps the color grounded. The tiny caramel lights break up the top and add movement where the head needs it most. Because the pieces are so fine, they don’t widen the face. They shift attention upward.
Ask for this
- Very small foils near the part line
- Slightly denser placement at the crown
- A caramel tone that stays warm, not copper
- A light gloss afterward to soften the contrast
This style is especially good if your hair feels flat on top. The color does half the work before you even reach for a blow dryer.
13. Dark Contour Lowlights With Caramel Accents
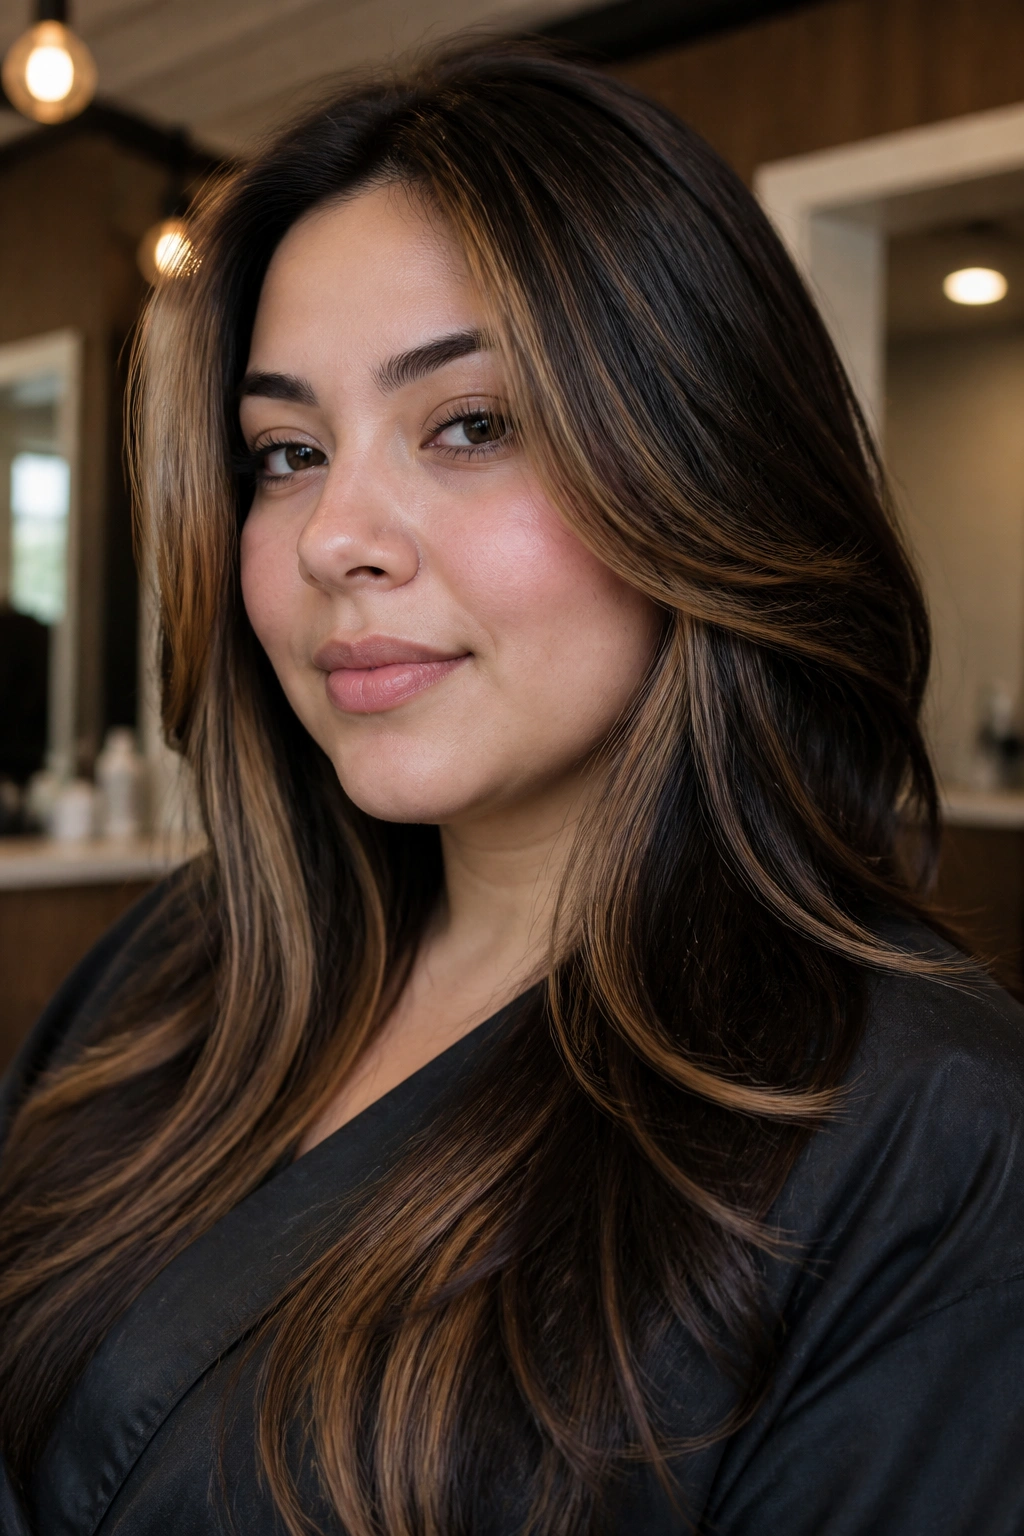
Why bring lowlights into a caramel article? Because contrast is what makes the shape work. Dark contour lowlights placed beside caramel accents create depth around the face, and depth can be just as flattering as brightness. On a round face, the darker strands near the temples and underlayers help narrow the outline a little.
The caramel should sit where you want the eye to go, usually through the front layers and the lower lengths. The lowlights stay close to the black base, so they don’t disappear; they simply sharpen the silhouette. A good colorist uses both colors together, not in equal amounts, but in a way that feels natural.
This look is especially nice if your hair has a lot of volume and can handle movement. It also keeps highlights from looking too flat. Plain brightness can be dull in its own way. Dimension fixes that.
14. Honey Caramel Balayage on Airy Ends
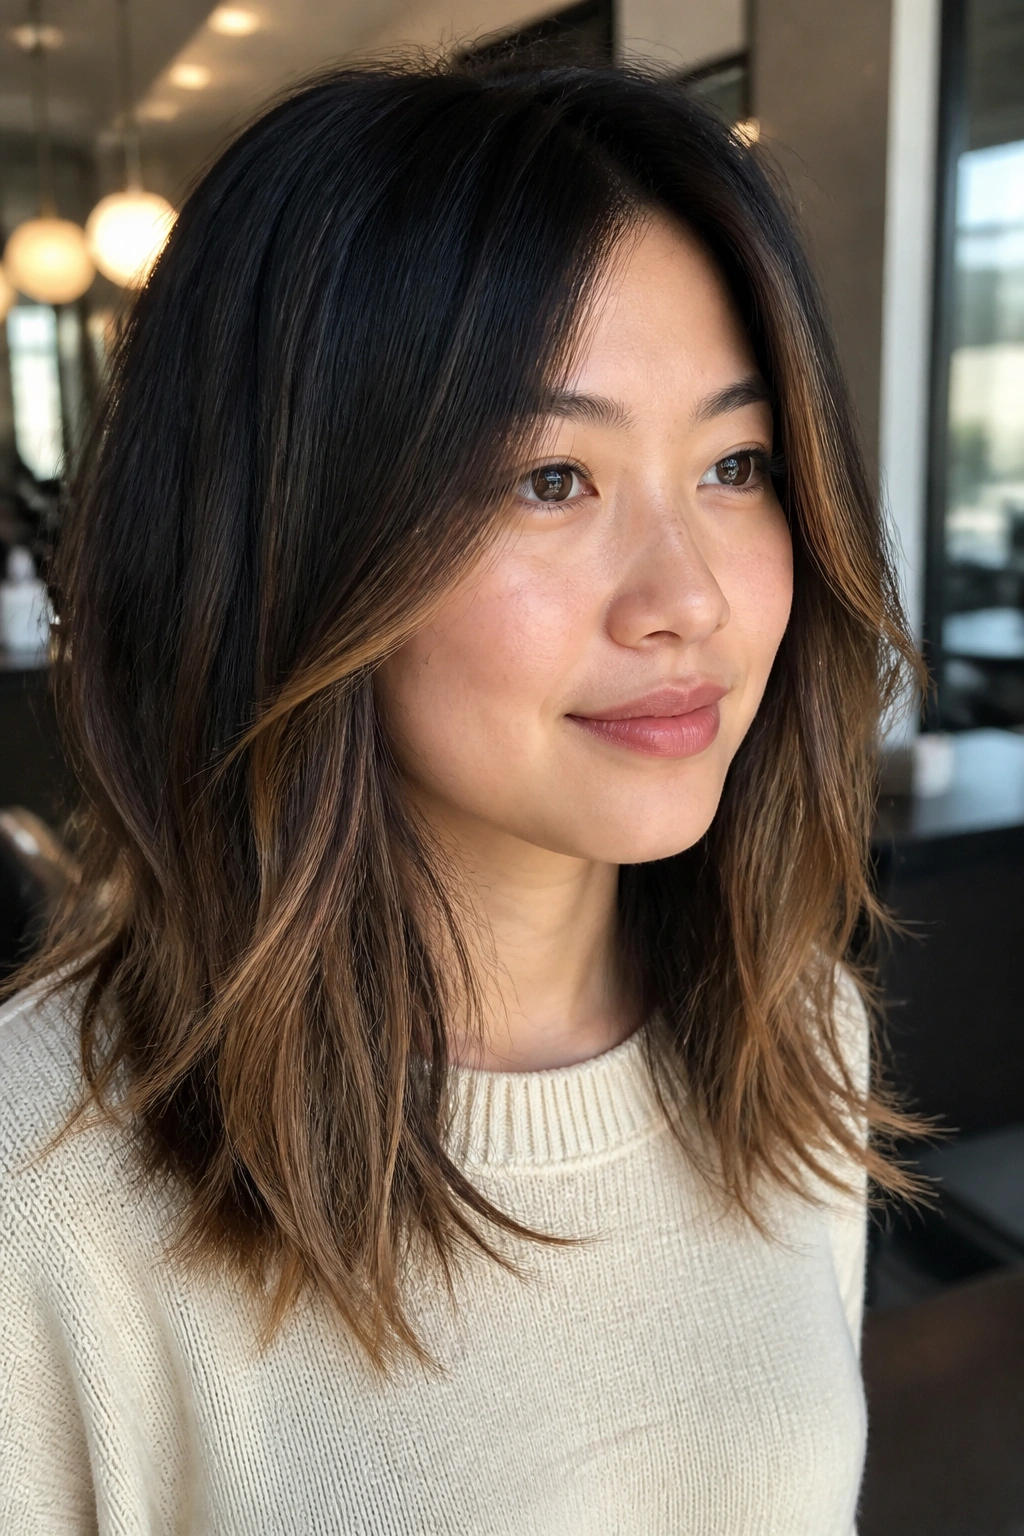
Honey caramel is brighter than mocha, but it still has enough warmth to sit comfortably on black hair. When the balayage is concentrated on airy ends, the face stays visually open and the color gets room to breathe. That’s good news for round faces, because the lighter tone pulls the eye downward and outward in a soft line.
The ends should look feathery, not thick. If the color is packed in too densely, the lower half of the hair can feel heavy. A softer hand keeps it moving. You want the light pieces to feel scattered, like sunlit threads, not like one big painted block.
A few things to ask for
- Honey caramel rather than pale gold
- Loose balayage strokes through the lower third
- A face-framing section that stays narrow near the cheeks
- A finish with shine, not dryness
This one looks especially good on wavy hair and on cuts that skim the shoulders.
15. Sliced Highlights Through Sleek Black Hair
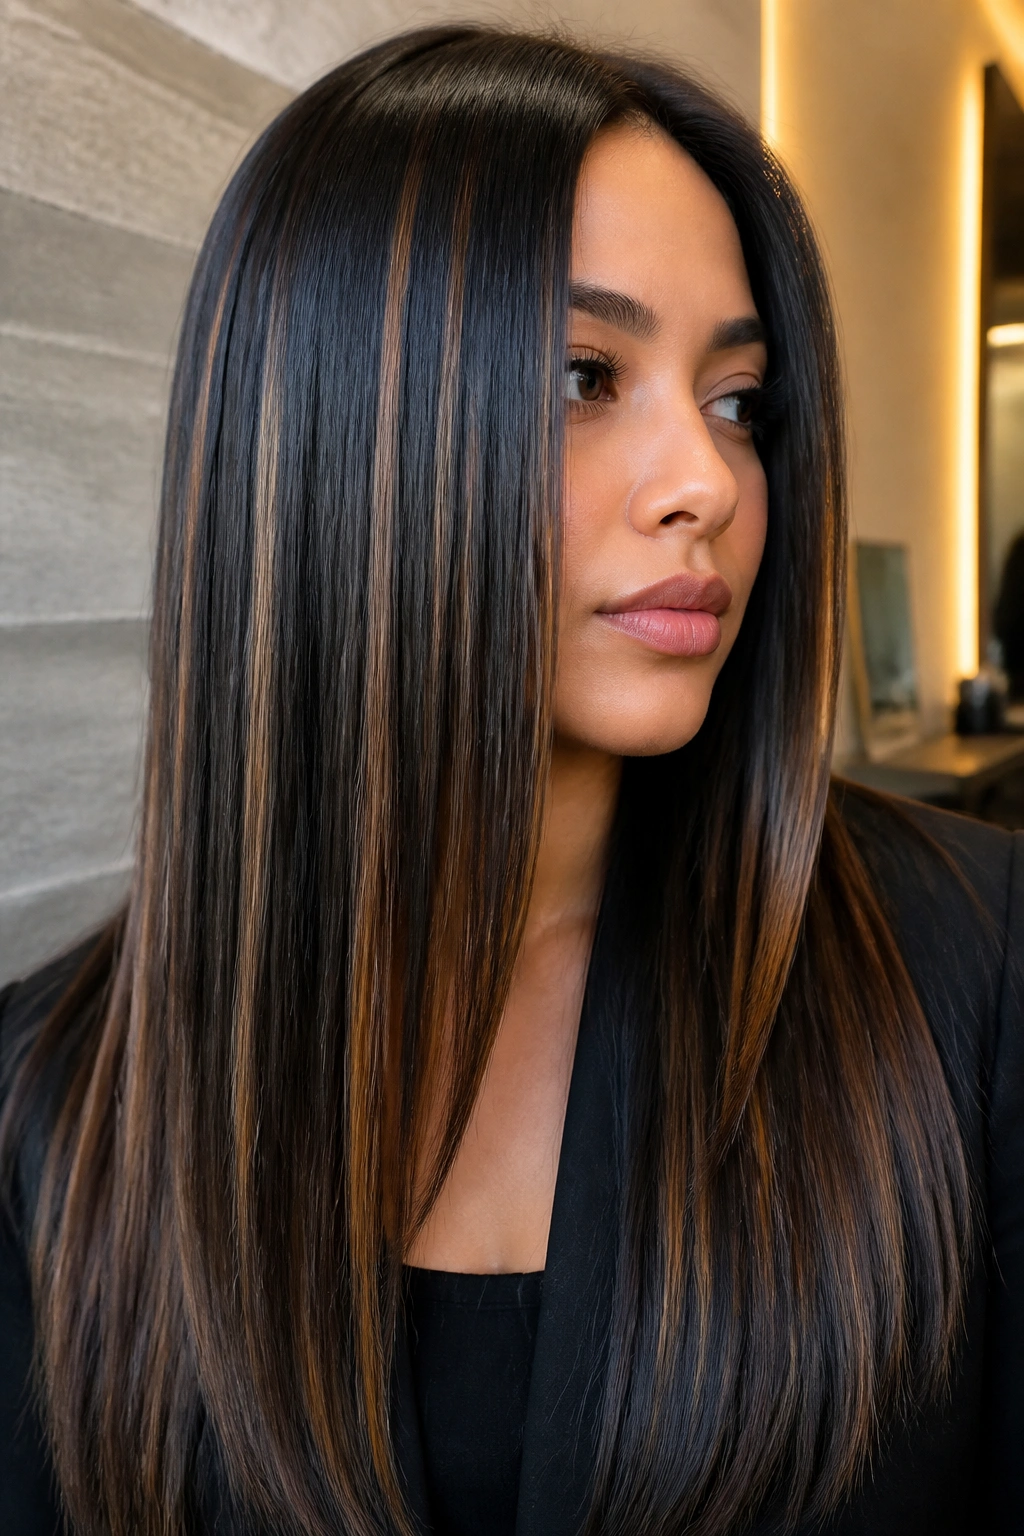
Sliced highlights are bolder than babylights, and that’s the point. Instead of tiny woven pieces, you get clean ribbons of caramel that show up clearly in straightened hair. For round faces, the vertical shape of those slices helps lengthen the silhouette, especially when the pieces run from above the cheekbone down through the lengths.
The key is restraint. Too many slices, too wide, and the hair turns into a stripe pattern that fights the face. A few well-placed panels create movement and shine. Put them where the light naturally catches as the hair moves, not all over the head.
This style works best if you like a sleek blowout or a flat-ironed finish. The smooth surface lets the caramel line up neatly, which gives the face a longer outline. It’s a sharper look than balayage, and I think that’s exactly why some people love it.
16. Curly Halo Caramel Highlights
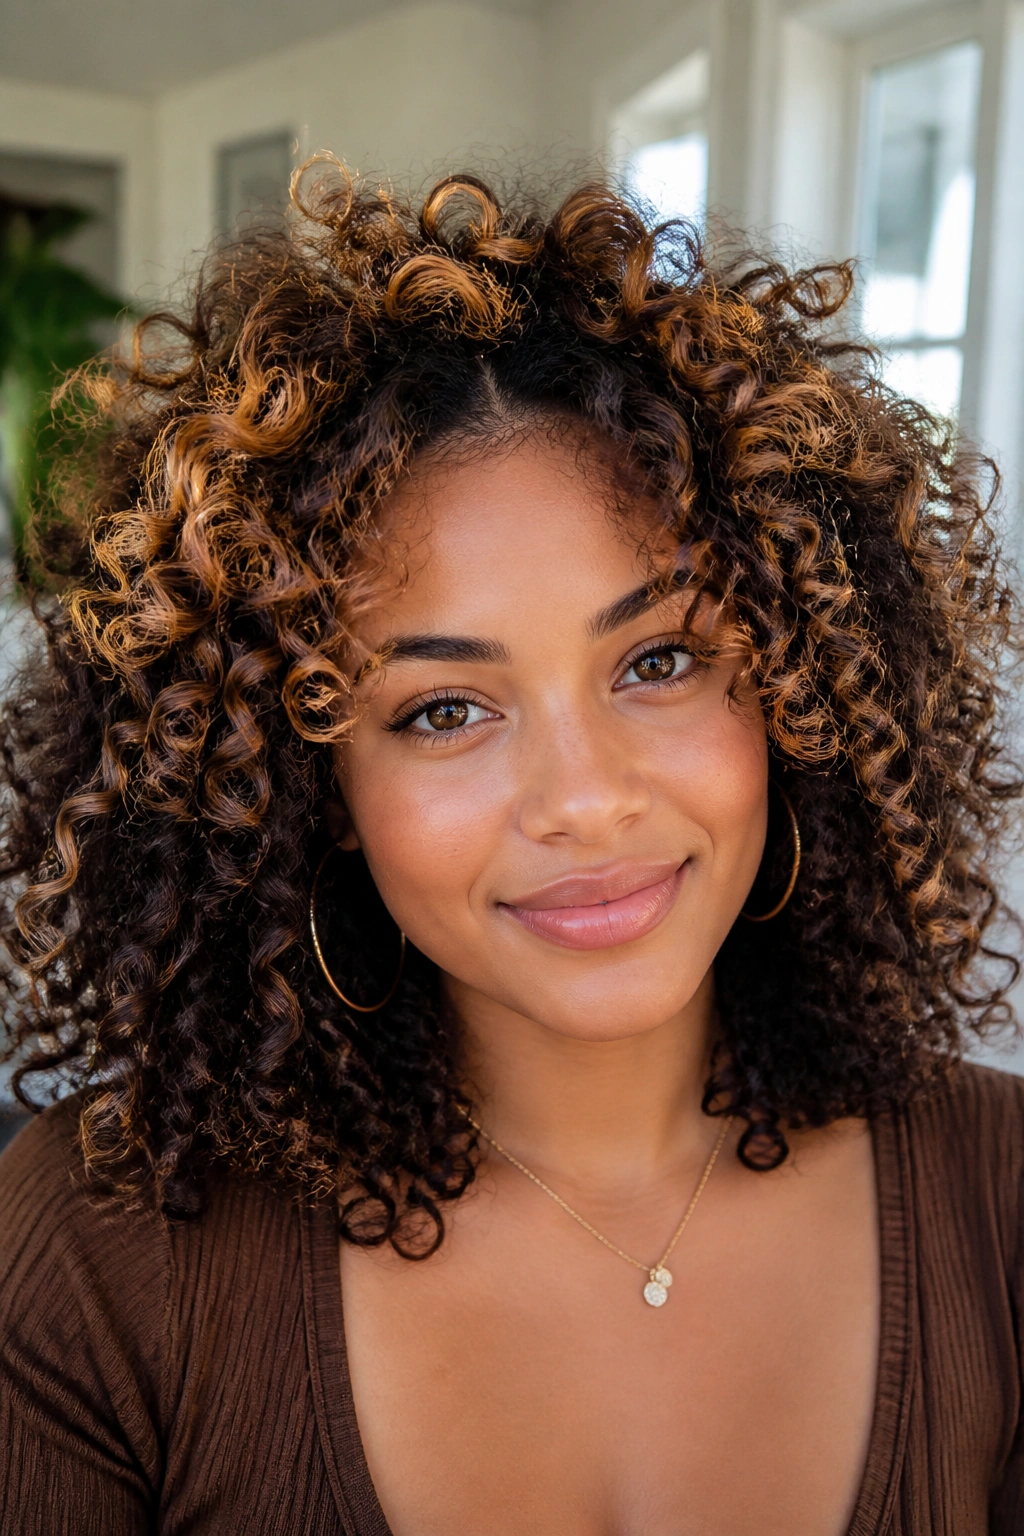
Curly hair needs a different approach, and round faces with curls can look gorgeous when the highlight pattern is lifted toward the upper layers. A curly halo puts caramel around the outer ring of curls, so the brightness frames the face without sitting in a wide band across the cheeks. That shape matters.
How it shapes the silhouette
The color should live on the surface curls, around the crown, and in the front spirals that fall past the cheekbone. That keeps the face open and gives the curls a brighter outline. If you spread the caramel too evenly through the middle, the hair can look broad instead of tall.
What to ask for
- Curly-safe placement that follows the curl pattern
- Caramel on the outer curls and top layers
- Softer light around the front than through the sides
- A gloss that keeps the ends from looking dry
This is one of my favorites because it works with the hair’s own shape. It doesn’t try to force curls into a straight-hair highlight pattern. That’s where a lot of bad color work goes off the rails.
17. Espresso Base With Butterscotch Veils
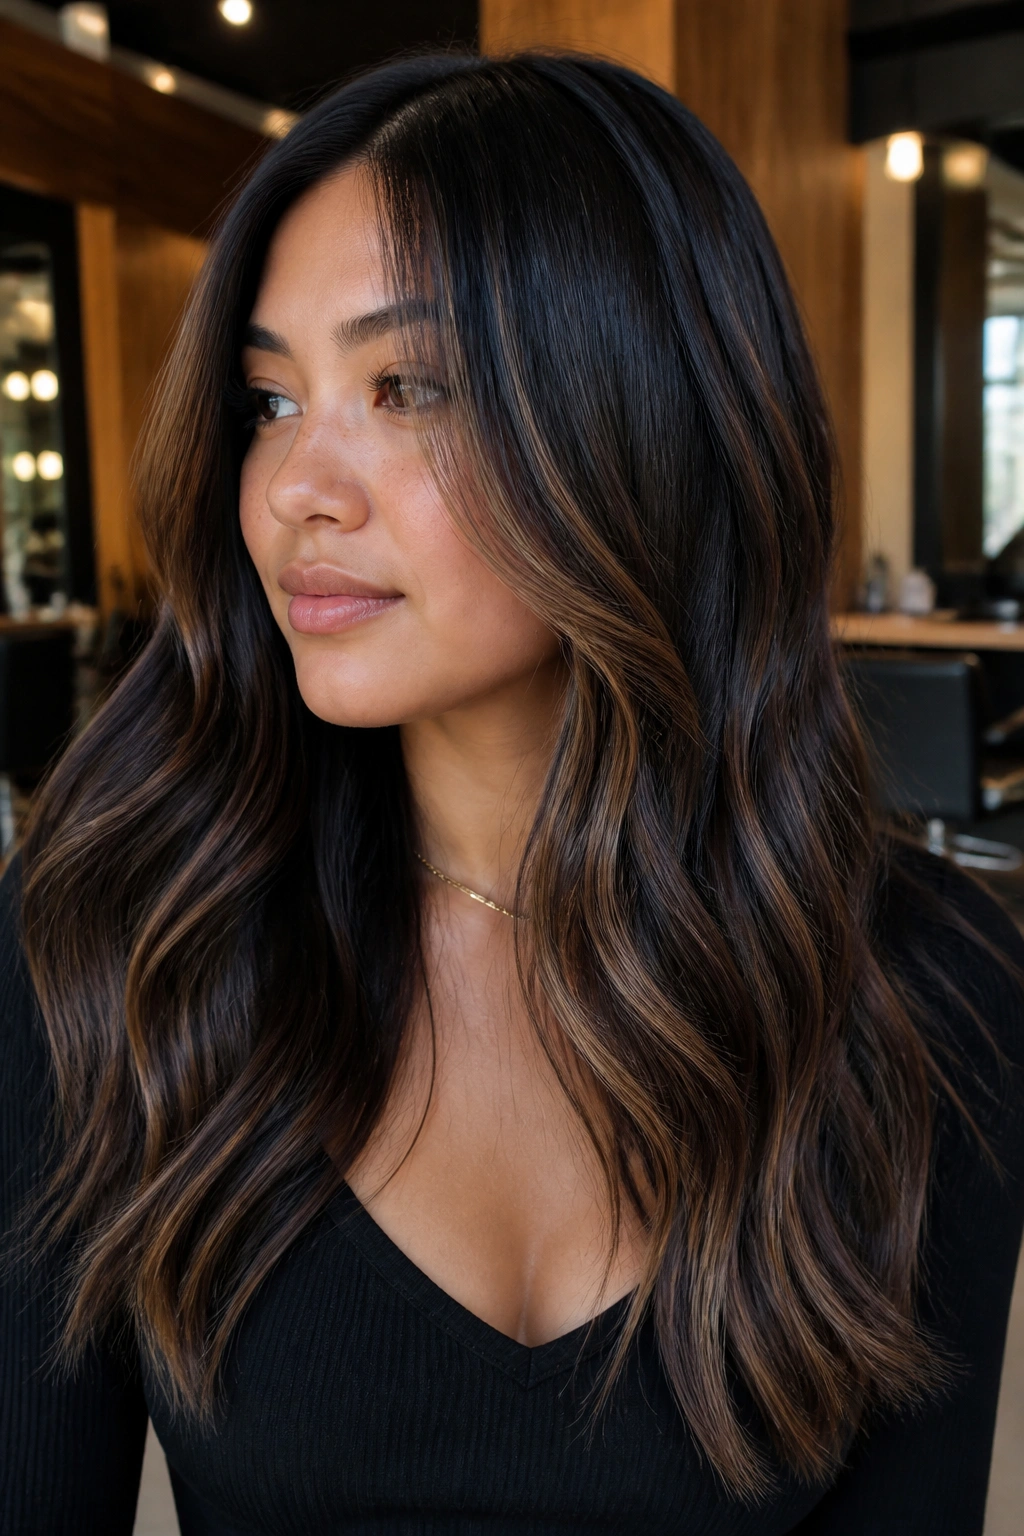
This one is for people who want a little drama. The espresso base stays dark and rich, while thin butterscotch veils peek through at the front and along the lengths. The result feels deeper than a standard caramel look, and on a round face that depth can be useful. Darker sides make the face seem narrower. The lighter veils stop the hair from looking flat.
The veils should be thin enough that you notice them as movement, not as stripes. I’d keep the brightest pieces away from the cheeks and lean into the lower half of the hair. A side part helps, but it’s not mandatory. What matters more is softness at the edges.
This style is a good pick if you wear dark makeup, gold jewelry, or sharper clothes. It has a little edge. Not harsh. Just enough to keep the caramel from feeling too sweet.
18. Nape-Only Caramel Peek-Through
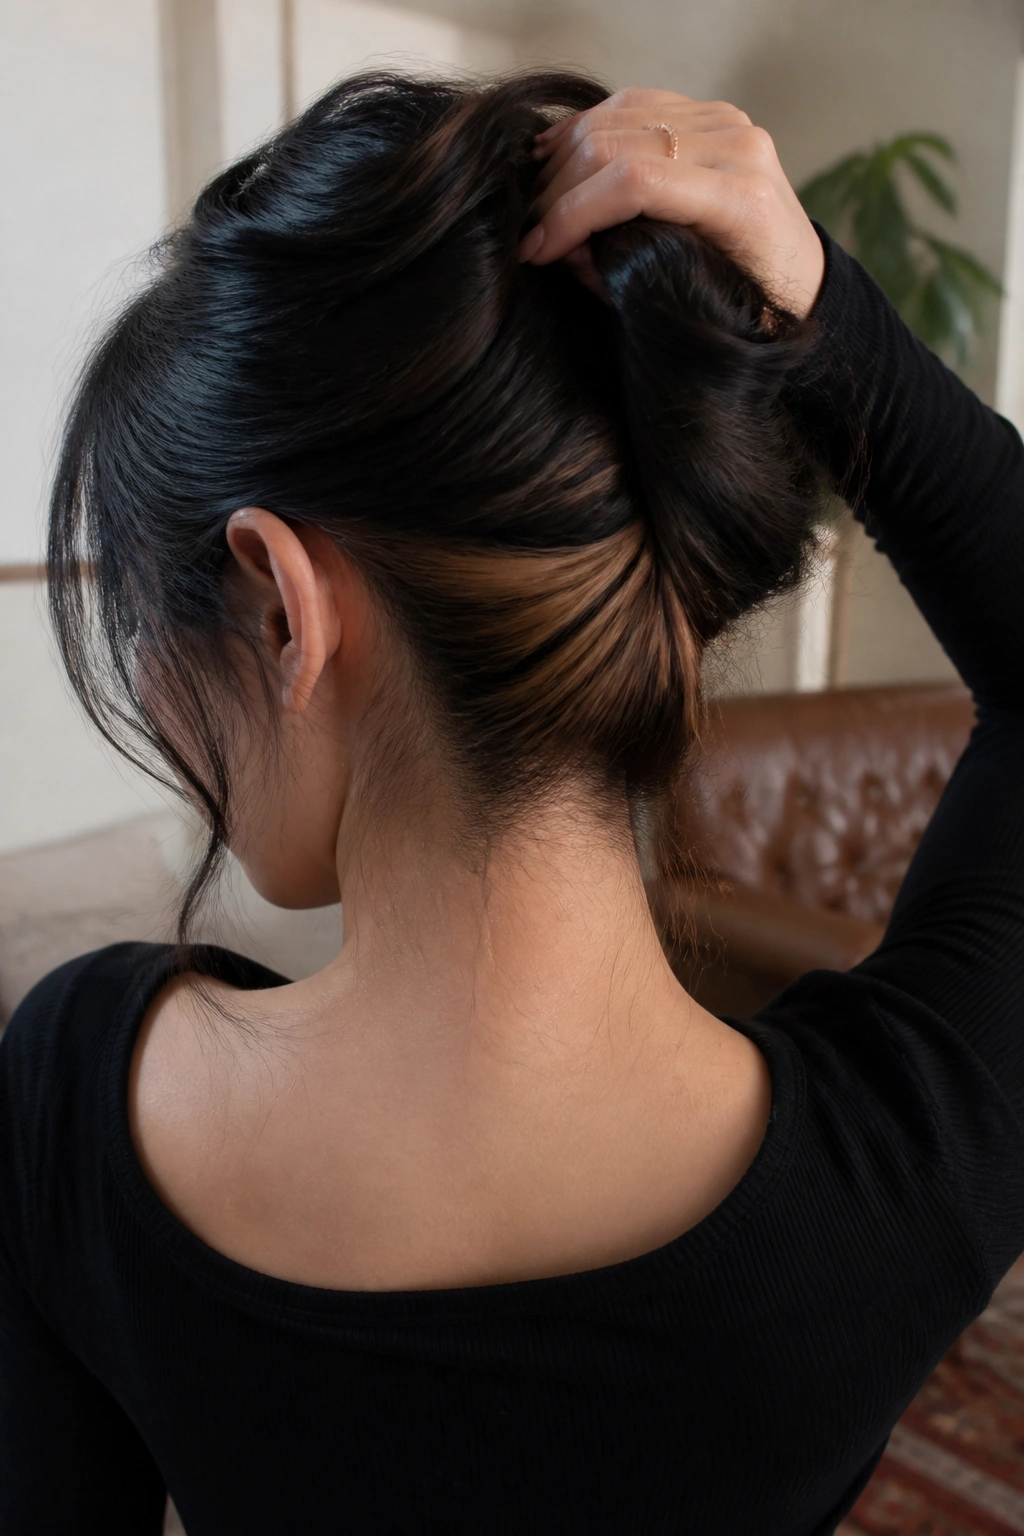
Hidden color at the nape sounds minor until you see how much it changes the way the hair moves. On round faces, nape-only caramel peek-throughs are clever because they shift the brightness to the back and lower half of the style. The front stays mostly black, so the face keeps its length.
This look is especially useful if you wear buns, half-up styles, or ponytails. The caramel flashes out when the hair moves, then disappears again. That little moment of contrast makes the whole style feel interesting. It also keeps the maintenance easy, because the color is tucked away from the most visible part of the grow-out.
Best moments to show it off:
- Soft twists
- Low ponytails
- Loose buns with a few face pieces out
- Wavy hair worn over one shoulder
If you want something subtle but not boring, this is a very good place to land.
19. Bronde-Lean Caramel Ribbons
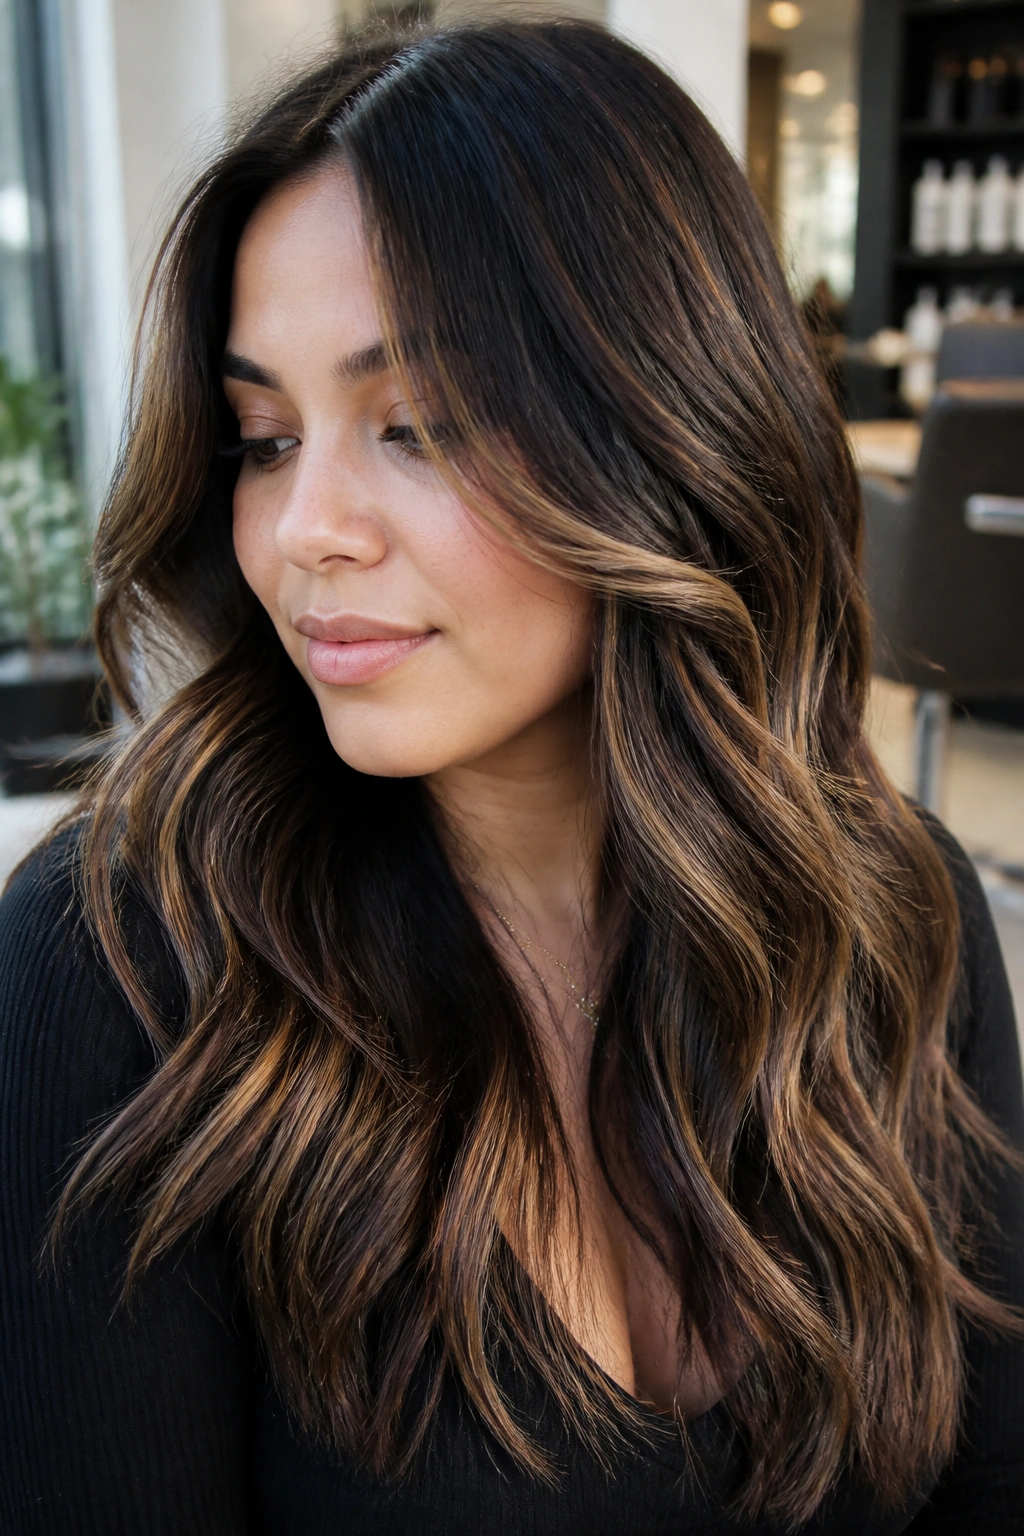
Bronde sounds like a simple word, but on black hair it means something specific: caramel ribbons softened by brown depth so the light doesn’t jump too hard. For round faces, that softer contrast is a gift. It keeps the shape long and clean, and it avoids the blunt look that stronger highlights can create around the cheeks.
The ribbons should be warm, not yellow. Think toasted almond, toffee, or soft amber, depending on how much lift your hair can handle. If the pieces are too pale, the look loses its smoothness. If they’re too dark, you miss the point of having highlights at all.
This is a smart choice if you want something wearable in almost any setting. It doesn’t shout. It just makes the hair look fuller and more finished. And on black bases, that subtlety can be a lot more flattering than louder contrast.
20. Smoky Caramel Streaks With a Sleek Finish
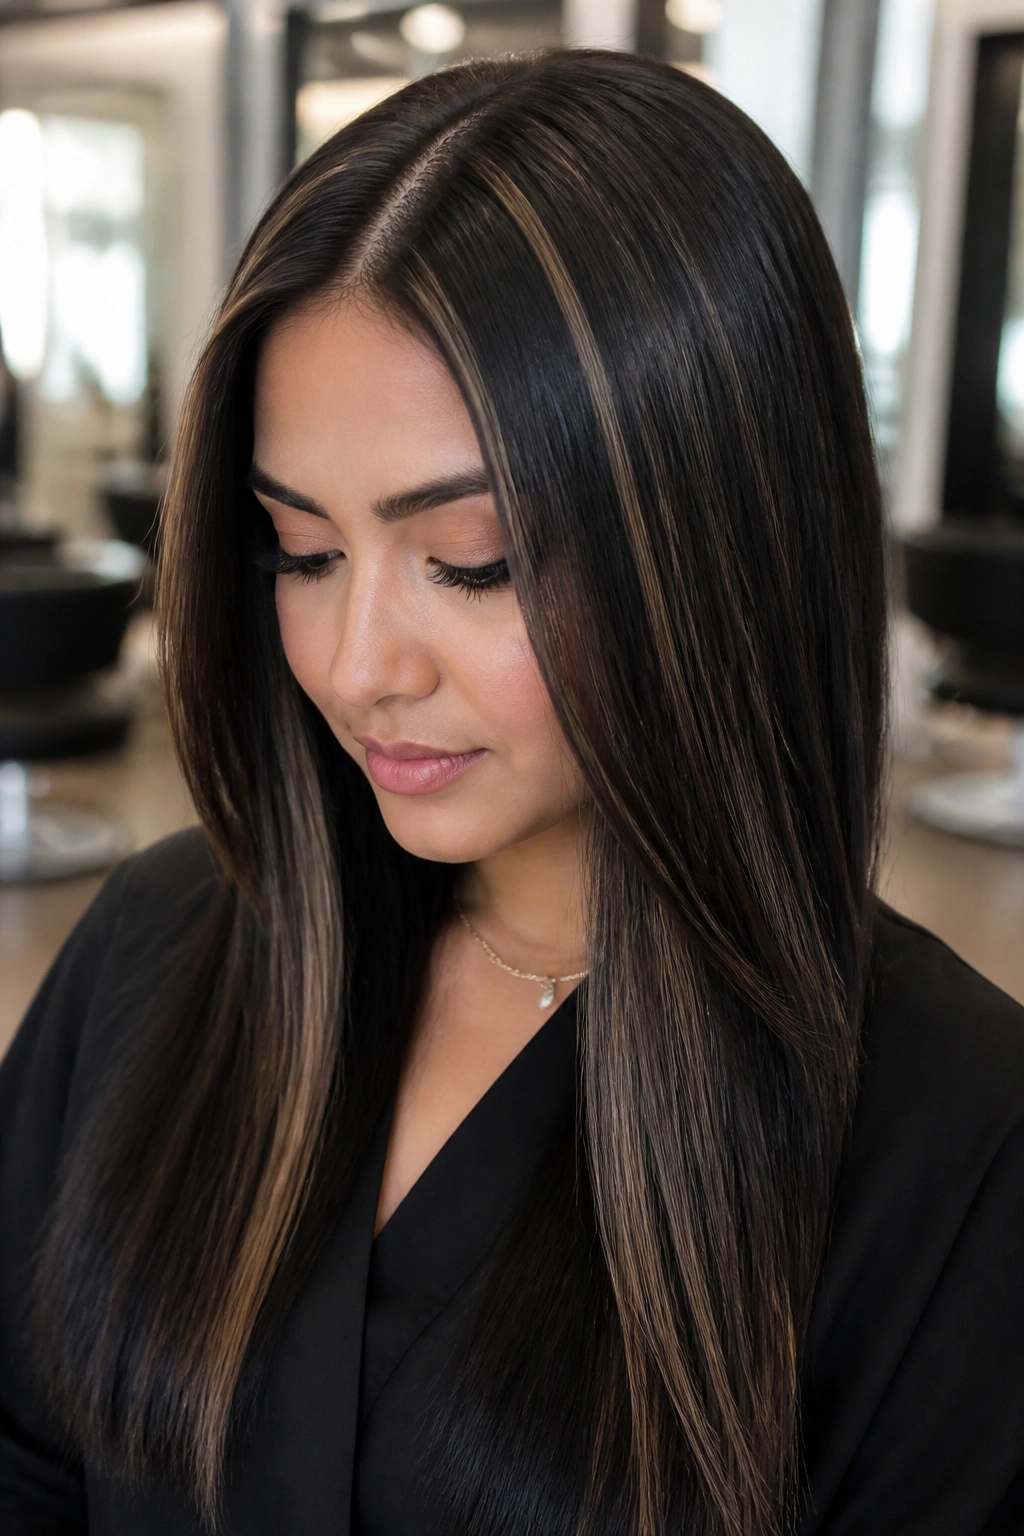
Smoky caramel is the version I’d choose for someone who likes contrast but hates warmth that turns orange. The shade sits in that middle place between brown and gold, with a slightly muted edge that looks clean on black hair. For round faces, sleek styling makes this placement even better because the vertical lines help stretch the face visually.
The streaks should be fine and tapered, not wide and blunt. A center part can work if the pieces are balanced, but a soft off-center part usually gives more shape. The finish matters as much as the color itself. Smooth, shiny hair makes the streaks look deliberate. Frizzy ends make them look messy.
This is a strong option if you like a sharper, more polished result. It has enough edge to feel modern, but the smoky tone keeps it from looking harsh. That balance is rare, and worth chasing.
Final Thoughts
The prettiest black caramel highlights for round faces usually do one thing well: they create length. Not fake length. Real visual length, built through placement, contrast, and a little restraint. A few pieces in the right spot can change the way your face reads far more than a whole head of random brightness.
If you’re booking a color appointment, the simplest instruction is often the best one: keep the lightest caramel away from the widest part of the cheeks, and let the color travel downward. That one sentence saves a lot of awkward grow-outs and a lot of unnecessary bulk around the face.
And if you’re stuck between two looks, choose the one that feels more vertical. Hair can be generous like that. It can frame, slim, soften, and shine—all at once—when the color is placed with a little care.
