



Adding bright white highlights to dark brown hair is one of the most striking color combinations you can choose. It isn’t subtle, and it isn’t easy to achieve, but when done well, the contrast between deep, espresso-colored locks and icy, platinum-white ribbons is unmatched. You are essentially working with the full spectrum of light and dark, creating a high-fashion look that commands attention.
However, moving from natural dark brown to a crisp, clean white is a technical challenge. It requires patience, multiple sessions, and a commitment to hair health that many people underestimate. If you are ready to jump into the world of high-contrast color, you need to understand the techniques that actually make this work without turning your hair into straw.
1. Chunky Face-Framing Money Piece
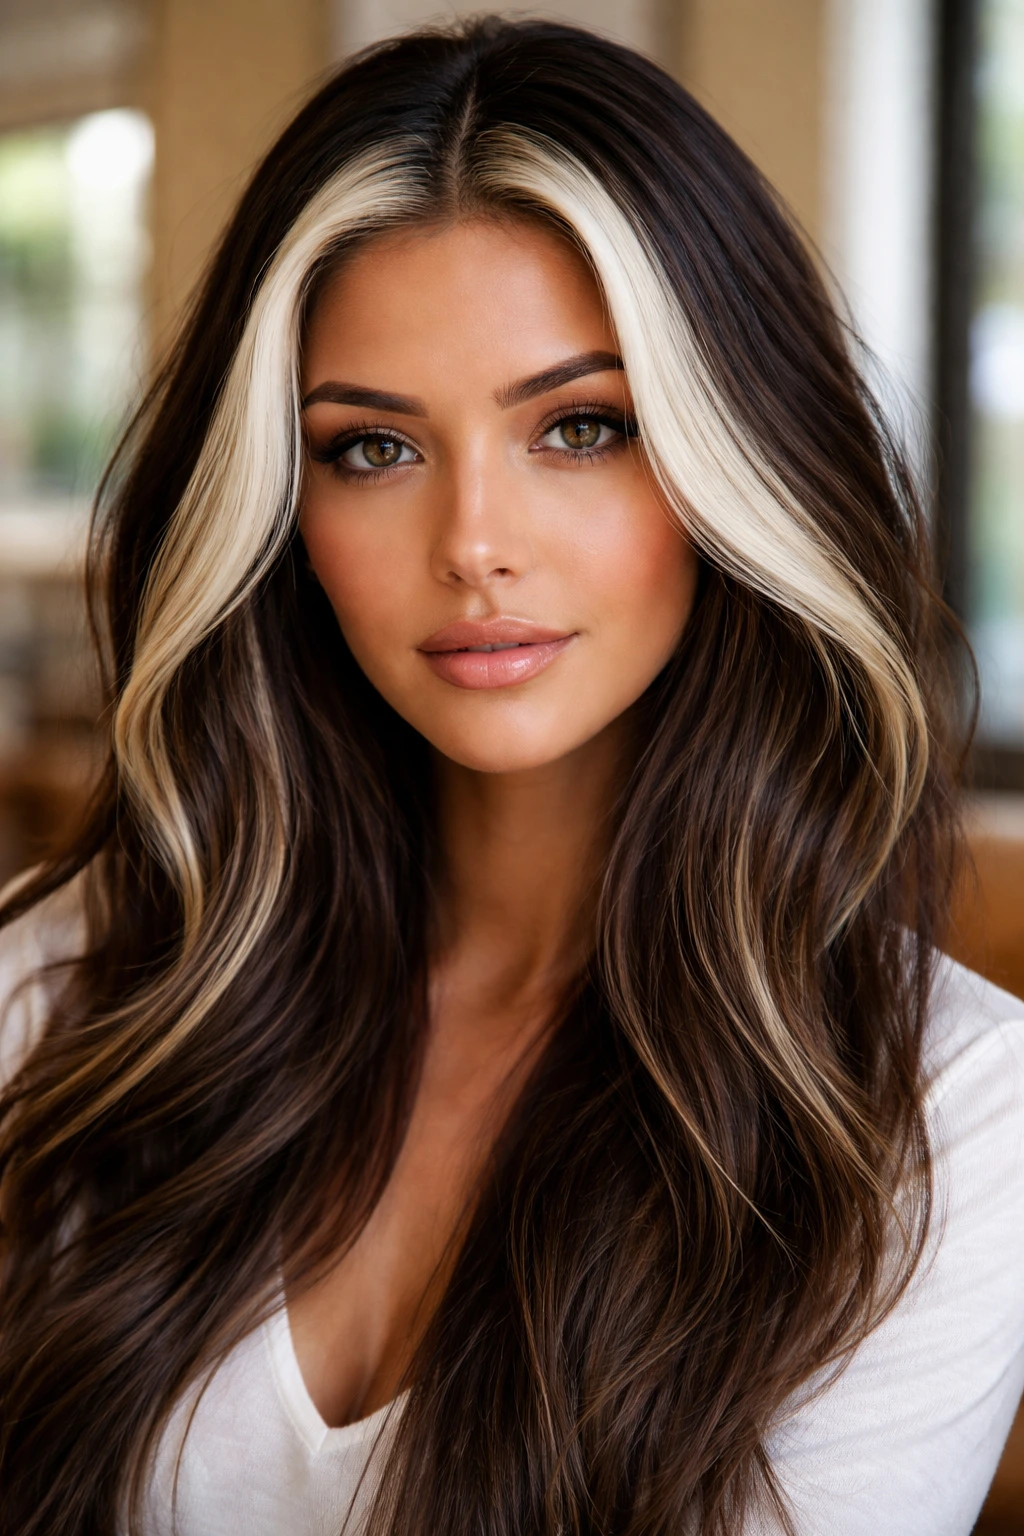
This style is all about impact. By isolating two thick sections of hair right at the hairline and lifting them to a near-white level, you create an instant focal point that draws eyes directly to your face. It is a bold, nineties-inspired look that has remained a staple because it works effectively to brighten the complexion.
Why This Style Succeeds
The “money piece” technique relies on saturation. Because you are bleaching a concentrated area, you can control the lift more precisely than you can with all-over color. If you have dark hair, you need a high-lift bleach process, usually followed by an aggressive purple-based toner to neutralize the inevitable yellow undertones that surface during the lift.
How to Maintain the Brightness
- The Violet Shampoo Rule: This section is prone to turning brassy faster than the rest of your hair. Use a pigmented purple shampoo directly on this piece once a week.
- Tone Often: Book a “glaze” appointment between major color services to keep the white sharp.
- Bond Builders: Because this area is bleached heavily, use a bond-building treatment every time you wash.
Pro tip: Ask your stylist to “tease” the very roots of the face-frame pieces. This creates a soft transition where the white meets your natural root, preventing a harsh, artificial block of color.
2. Icy Babylights
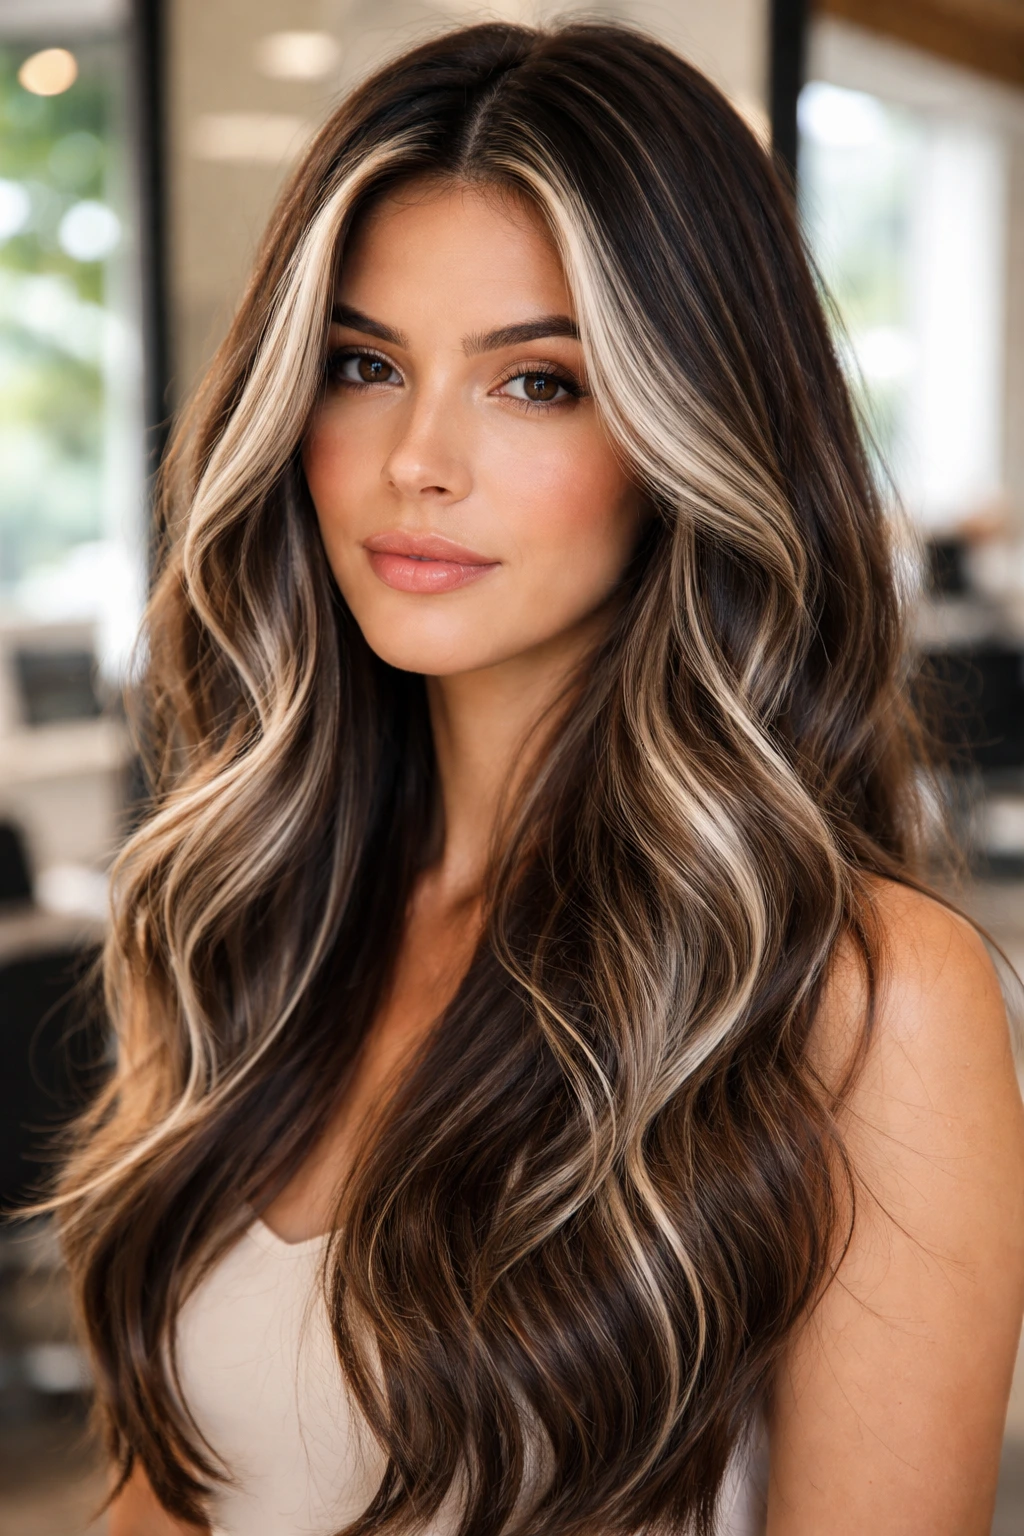
If you prefer a natural, sun-kissed appearance but still want that high-contrast white finish, babylights are the solution. This technique involves weaving extremely fine sections of hair—barely a few strands at a time—and painting them with bleach. It creates a blended look where the white sparkles against your brown base rather than sitting on top of it.
The Technical Challenge
Doing babylights on dark hair is a labor-intensive process. A stylist must weave through the hair with precision, ensuring that the lightened strands are thin enough to blend seamlessly. If the weaves are too thick, you end up with stripes, which is the exact opposite of the refined, expensive look you are going for.
What to Expect at the Salon
Plan for a longer appointment. Babylights require meticulous foil placement. When the foils are removed and the hair is rinsed, the result should look like you have been spending a lot of time in the sun, but with a cooler, more platinum edge. It is arguably the most low-maintenance way to wear white highlights because as your hair grows out, the regrowth line is softened by the natural blending of the fine weaves.
3. Platinum Balayage
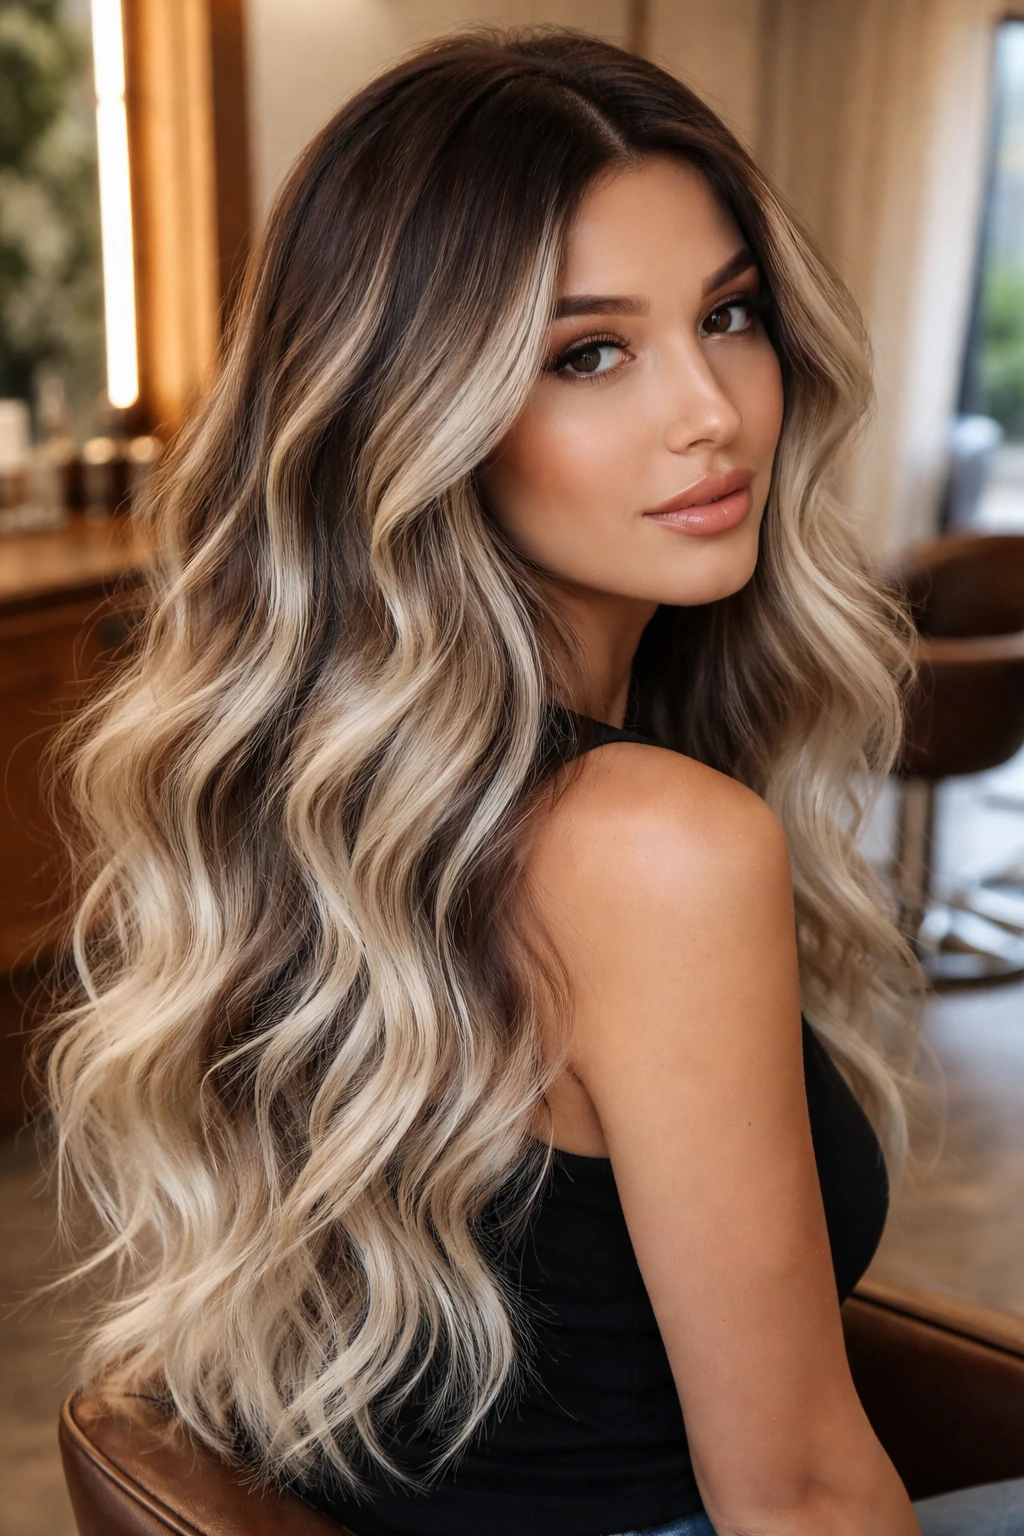
Balayage is typically associated with caramel or honey tones, but it can absolutely be done with a platinum-white shade. The key is in the hand-painting technique. Instead of foils, your stylist will use a paddle and brush to paint the bleach onto the mid-lengths and ends of your hair, creating a seamless gradient from your dark root to bright white tips.
Why It Works for Texture
This method is fantastic if you have wavy or curly hair. Because the placement of the bleach is irregular, it follows the natural bend of your hair, creating a dimensional look that doesn’t feel “constructed.” It mimics the way light naturally hits the hair, even if the color itself is dramatic.
Key Considerations
- The Lift: You will likely need more than one session if your brown is very dark.
- The Gradient: Ensure your stylist knows you want “white,” not “gold.” They need to use a clay-based lightener that lifts effectively but won’t swell and bleed into the surrounding hair.
4. Root Smudge with White Highlights
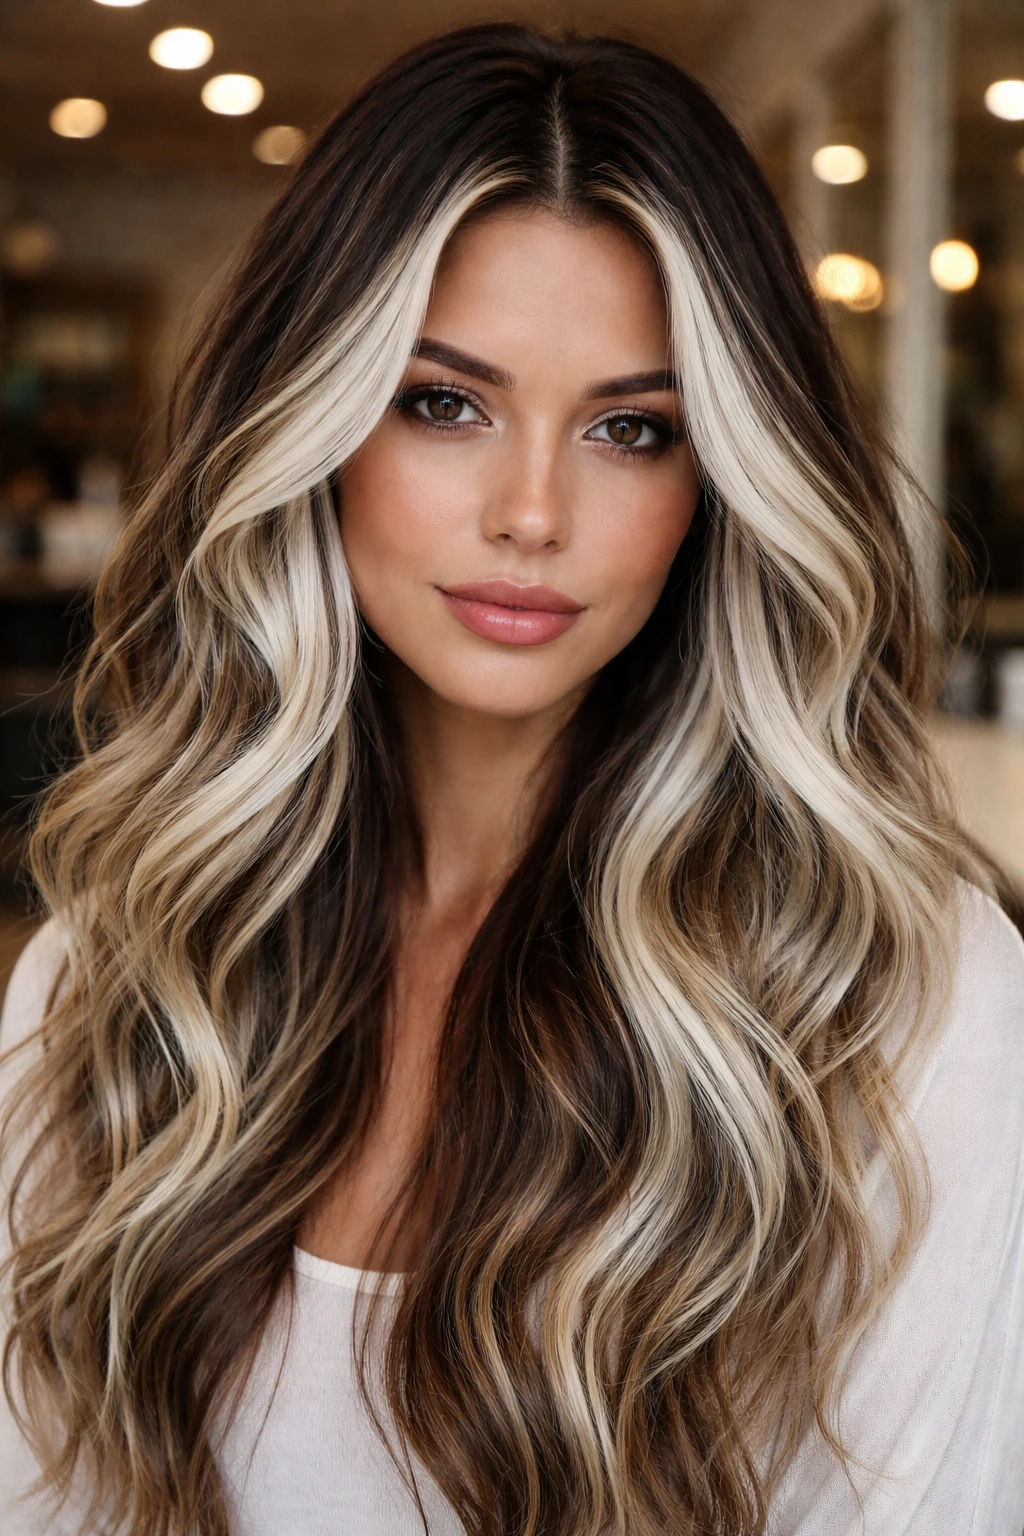
Sometimes the most effective way to wear white highlights is to introduce a “root smudge” or “root melt” in the same service. After the white highlights are placed, the stylist applies a darker gloss to the roots, slightly blurring the line where the bleach meets your natural hair color.
The Benefit of the Root Melt
The primary issue with white highlights on dark hair is the “regrowth effect.” As soon as your hair grows a quarter of an inch, the contrast can look messy. A root smudge blends that regrowth into the highlights, making the transition look purposeful and soft. It buys you weeks of extra time between salon visits.
Styling for the Root Melt
Because this technique creates a seamless transition, it works beautifully with textured waves. The blend of the dark root and the bright white highlights creates an optical illusion of thickness and depth. It is one of the most requested looks for people who want high-contrast hair but hate the high-maintenance upkeep of traditional foils.
5. Ash White Teasy-lights
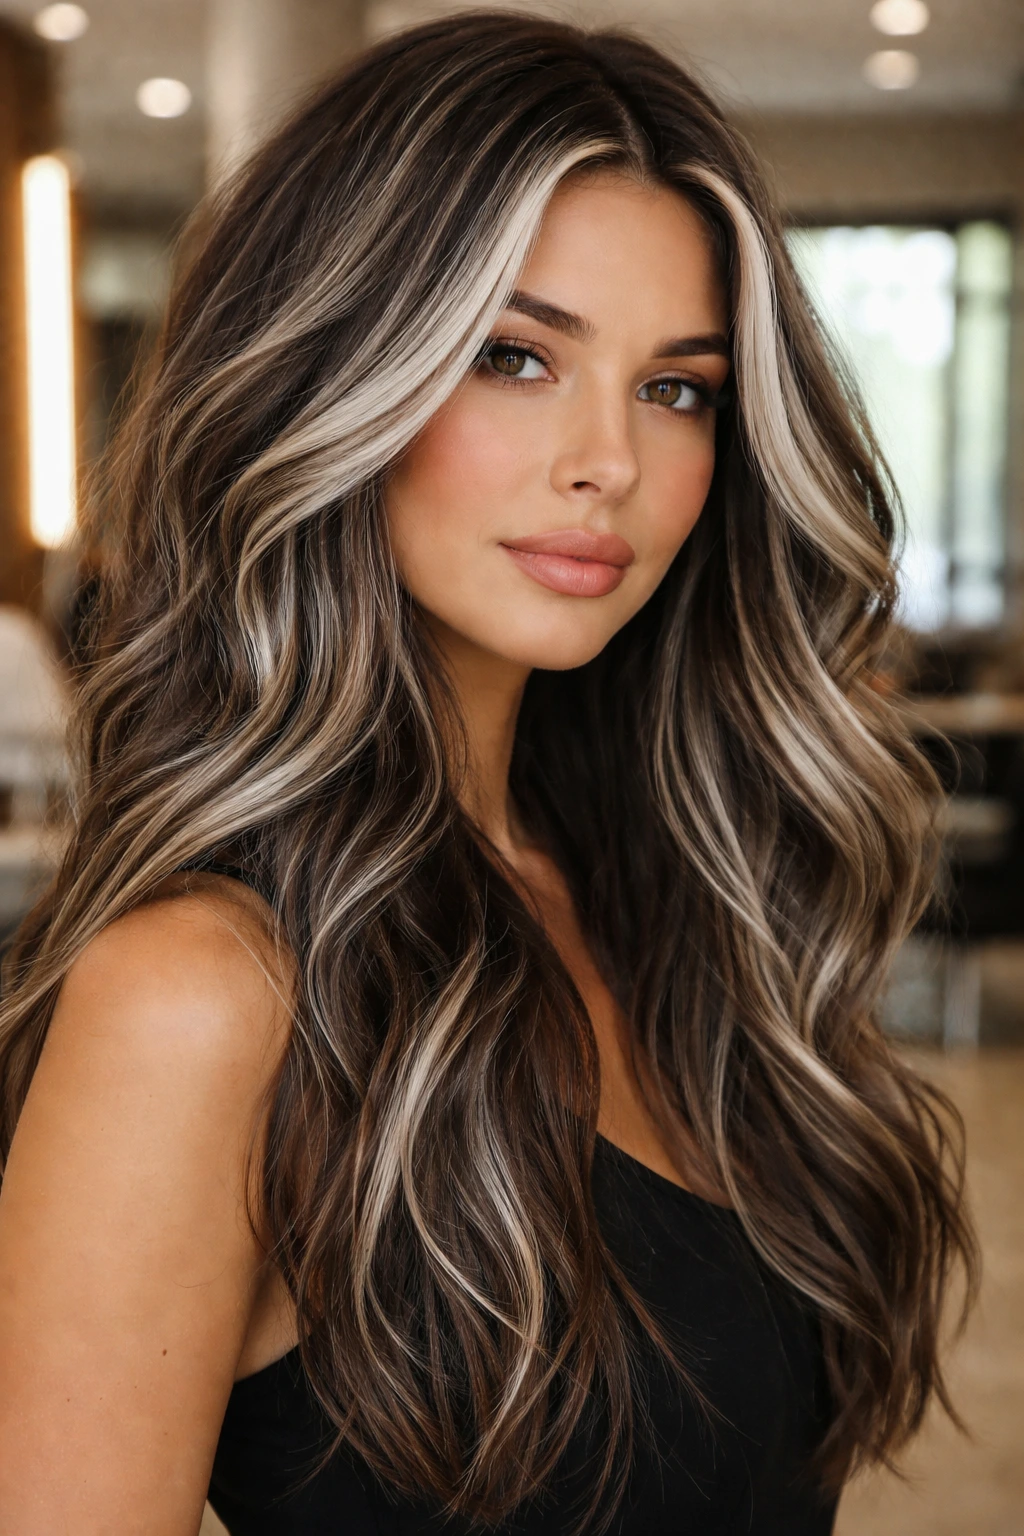
“Teasy-lights” are essentially a hybrid between balayage and foil highlights. The stylist teases the hair back toward the root before applying bleach, which creates a soft, diffused highlight that doesn’t have a distinct start or stop point. When you use this technique with a white toner, you get a cool, ash-white result that feels sophisticated and modern.
Why They Feel Different
Unlike traditional foil highlights, which can sometimes result in a stripey appearance if not done perfectly, teasy-lights are almost impossible to mess up. The tease acts as a natural buffer, so even if the bleach application isn’t uniform, the final result looks intentional and “lived-in.”
Managing the Tone
Ash-white is notoriously difficult to keep fresh. It loves to pull yellow after a few washes. You should invest in a high-quality, professional-grade toner and keep a violet-based shampoo in your shower routine. Do not rely on drugstore brands—they often contain sulfates that strip away the toner almost immediately.
6. High-Contrast Ribbons
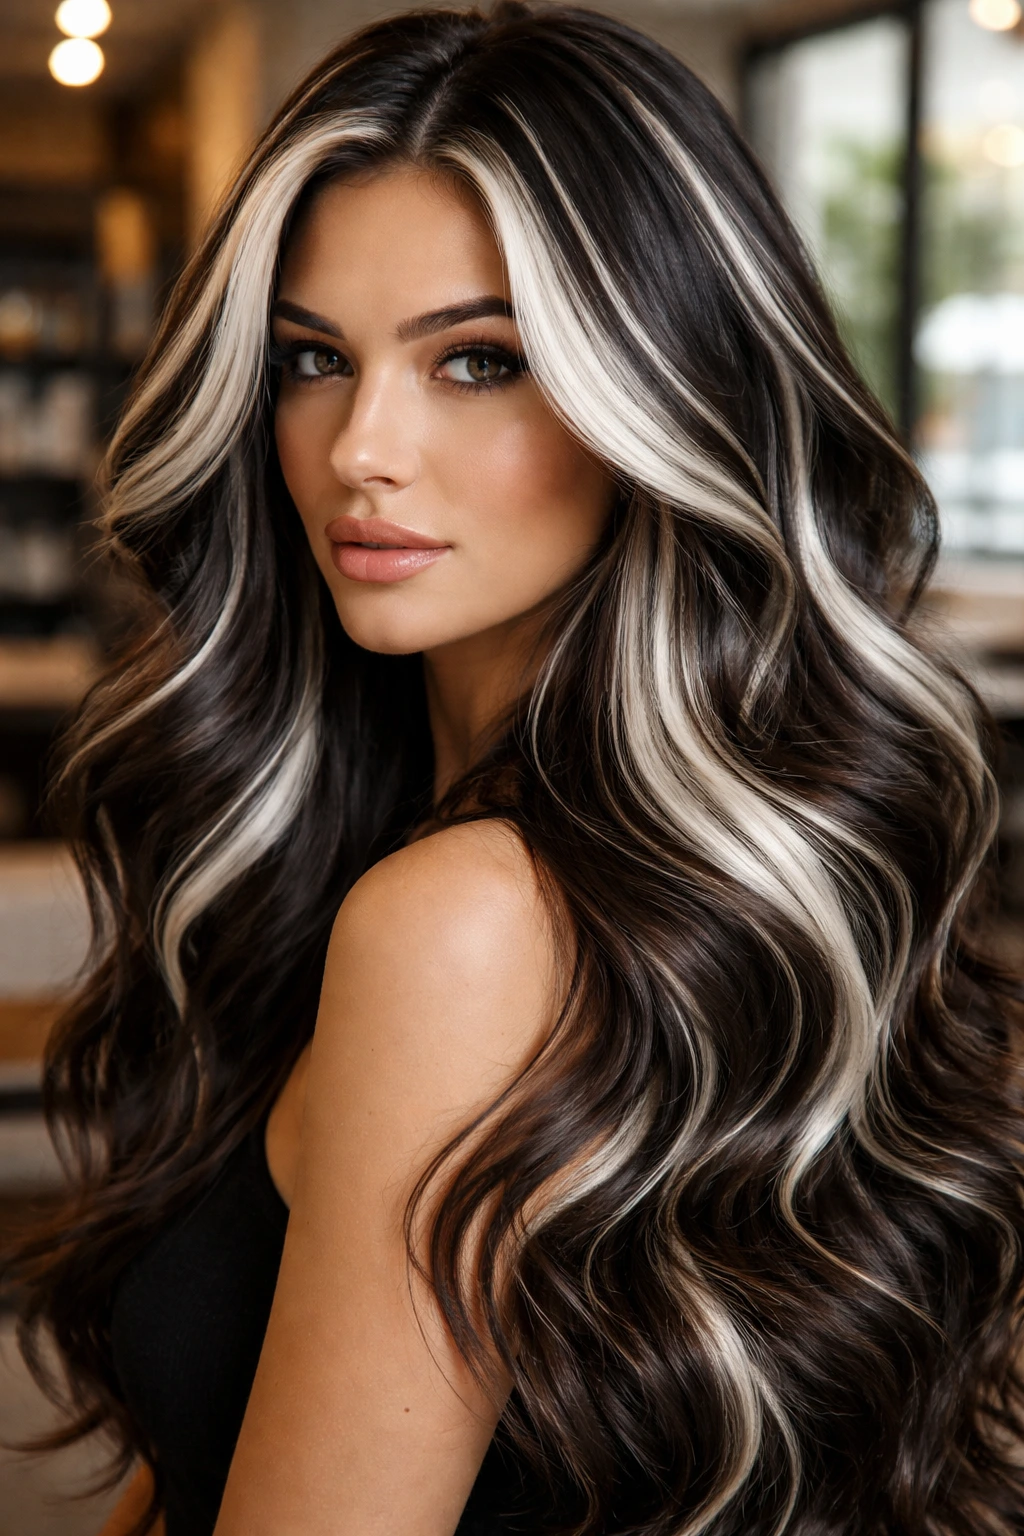
This look is not for the faint of heart. Instead of blending the highlights, you are deliberately keeping them thick and distinct. This creates a “ribbon” effect where your dark hair and the white highlights exist side-by-side without being fully integrated. It is a bold, graphic look that stands out in a crowd.
Getting the Look
You need a stylist who is comfortable with heavy foiling. This style requires more bleach usage than babylights, so the health of your hair is paramount. If your hair is already compromised, talk to your colorist about using a bond-protector additive during the bleaching process. It allows for a more intense lift without as much structural damage.
Maintaining the Definition
- Minimal Brushing: Because you have distinct sections of bleached hair, brushing aggressively can cause breakage. Use a wide-tooth comb or a dedicated detangling brush.
- Styling: These ribbons look best when the hair is styled with a curling iron to accentuate the contrast between the dark and light strands.
7. Silver-White Peek-a-boo
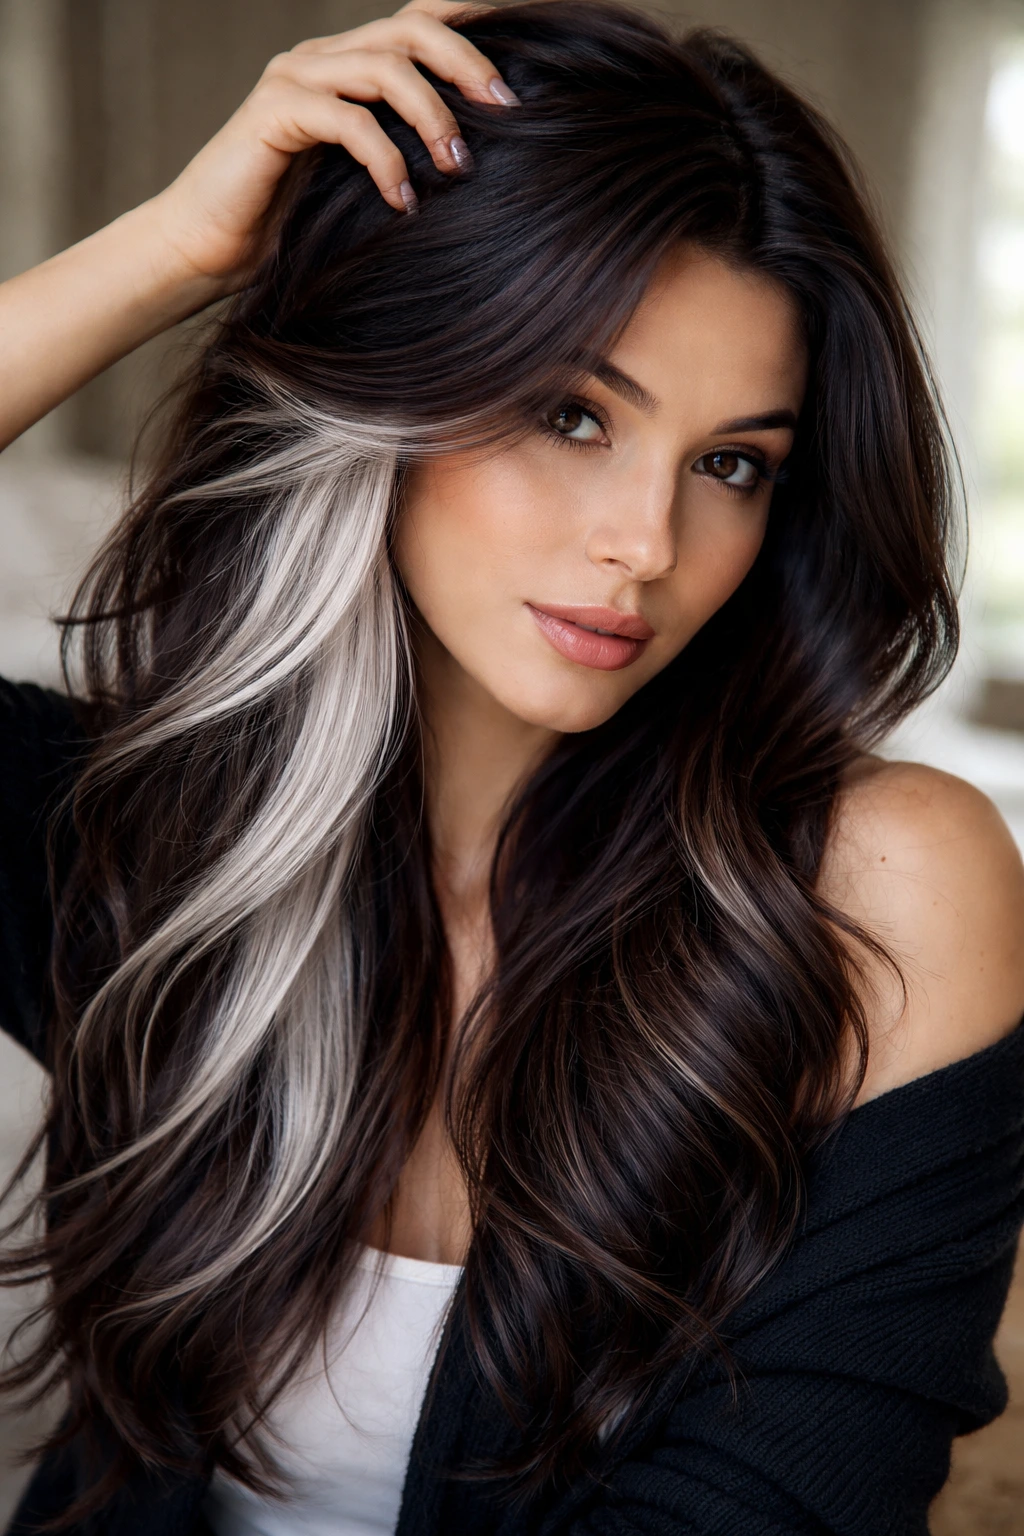
Peek-a-boo highlights are placed on the under-layers of the hair, meaning you only see them when you pull your hair back, braid it, or move it around. When you use a silver-white color for this, the effect is subtle but surprising. It’s a great way to experiment with a high-lift color without committing to having it on the top layer of your hair.
The Appeal of the Under-layer
By keeping the top layer of your hair its natural dark brown, you protect a significant portion of your head from chemical processing. This allows you to maintain the integrity of your hair while still enjoying the drama of platinum white. It is the perfect entry-point for someone who is nervous about bleach damage.
How to Style It
- Half-Up, Half-Down: This style shows off the peek-a-boo color best.
- Braids: Dutch braids or messy fishtails look incredible because the white and dark strands weave together, showing off the complexity of the color.
8. Cool Toned Face-Frame
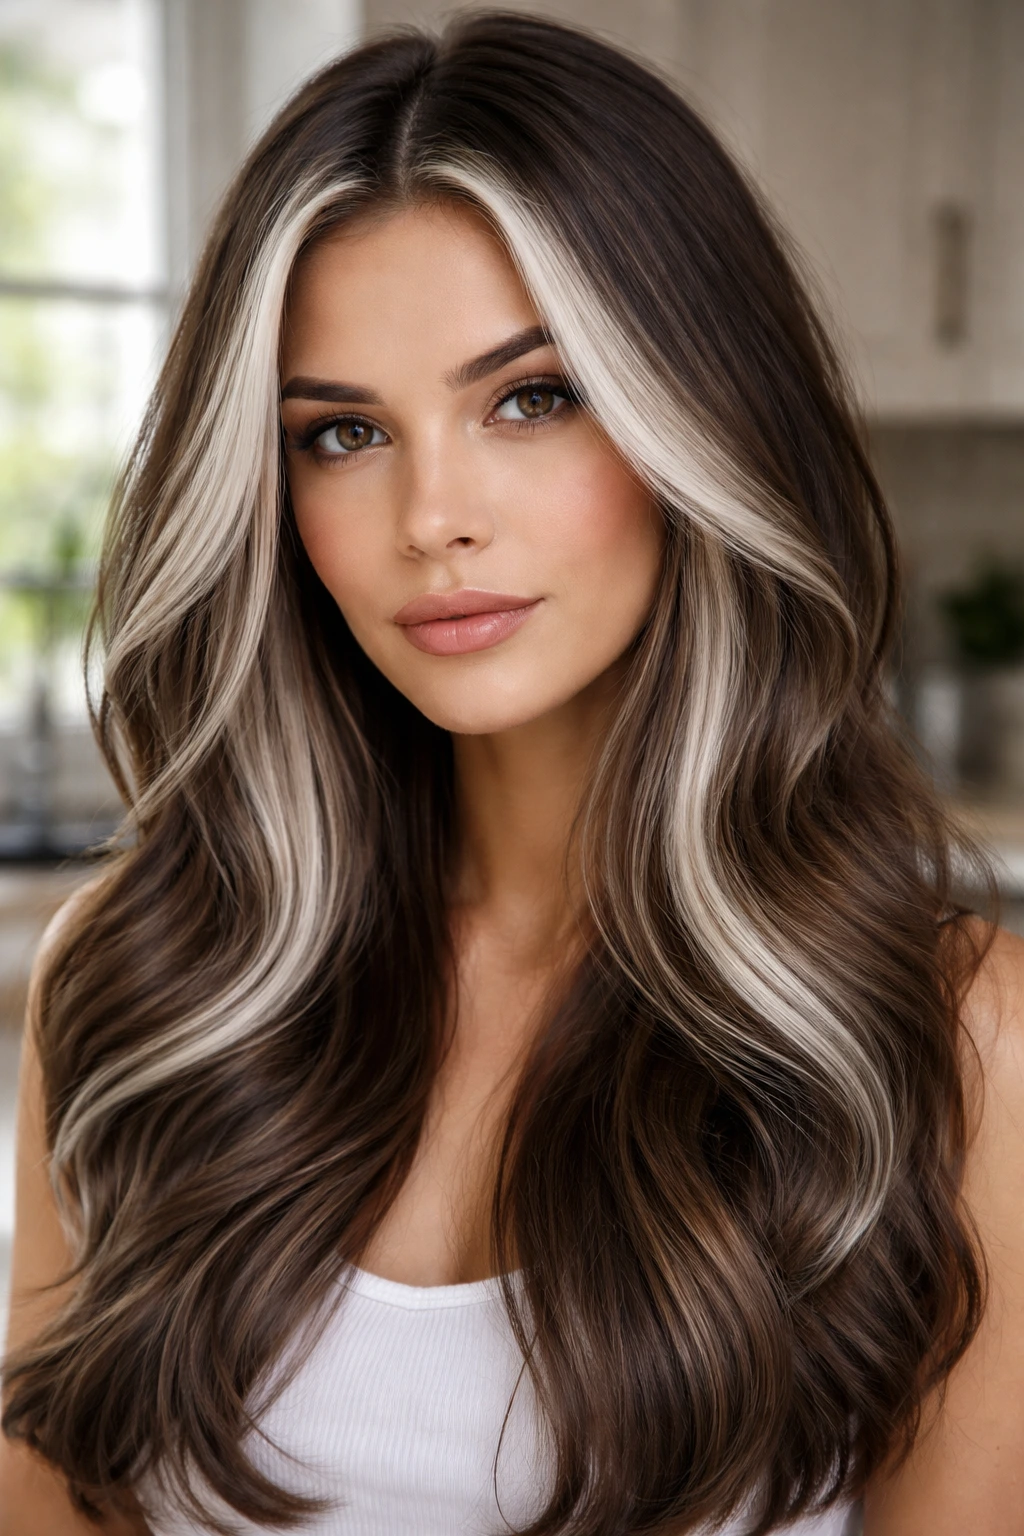
While some people like a warm, creamy white, others prefer a true, icy, cool-toned white. This section focuses on the specific toner choice. If you have cool-toned dark brown hair, you need a cool-toned white highlight to match. A warm highlight on cool dark hair often looks jarring and unnatural.
Understanding Undertones
You have to match the “temperature” of your highlights to your natural hair color. If your brown hair is an “ash brown,” your white highlight needs to be a “cool platinum” or “silver white.” If your hair is a “chocolate brown” (warm), a “creamy pearl” or “champagne white” will look better.
The Importance of the Gloss
The gloss or toner is what determines the final look. Never leave the salon without having a gloss applied to your highlights. It seals the cuticle, adds shine, and provides the actual color. Without it, your highlights are just raw, bleached hair, which is porous, dull, and prone to breakage.
9. White-Blonde Ombre
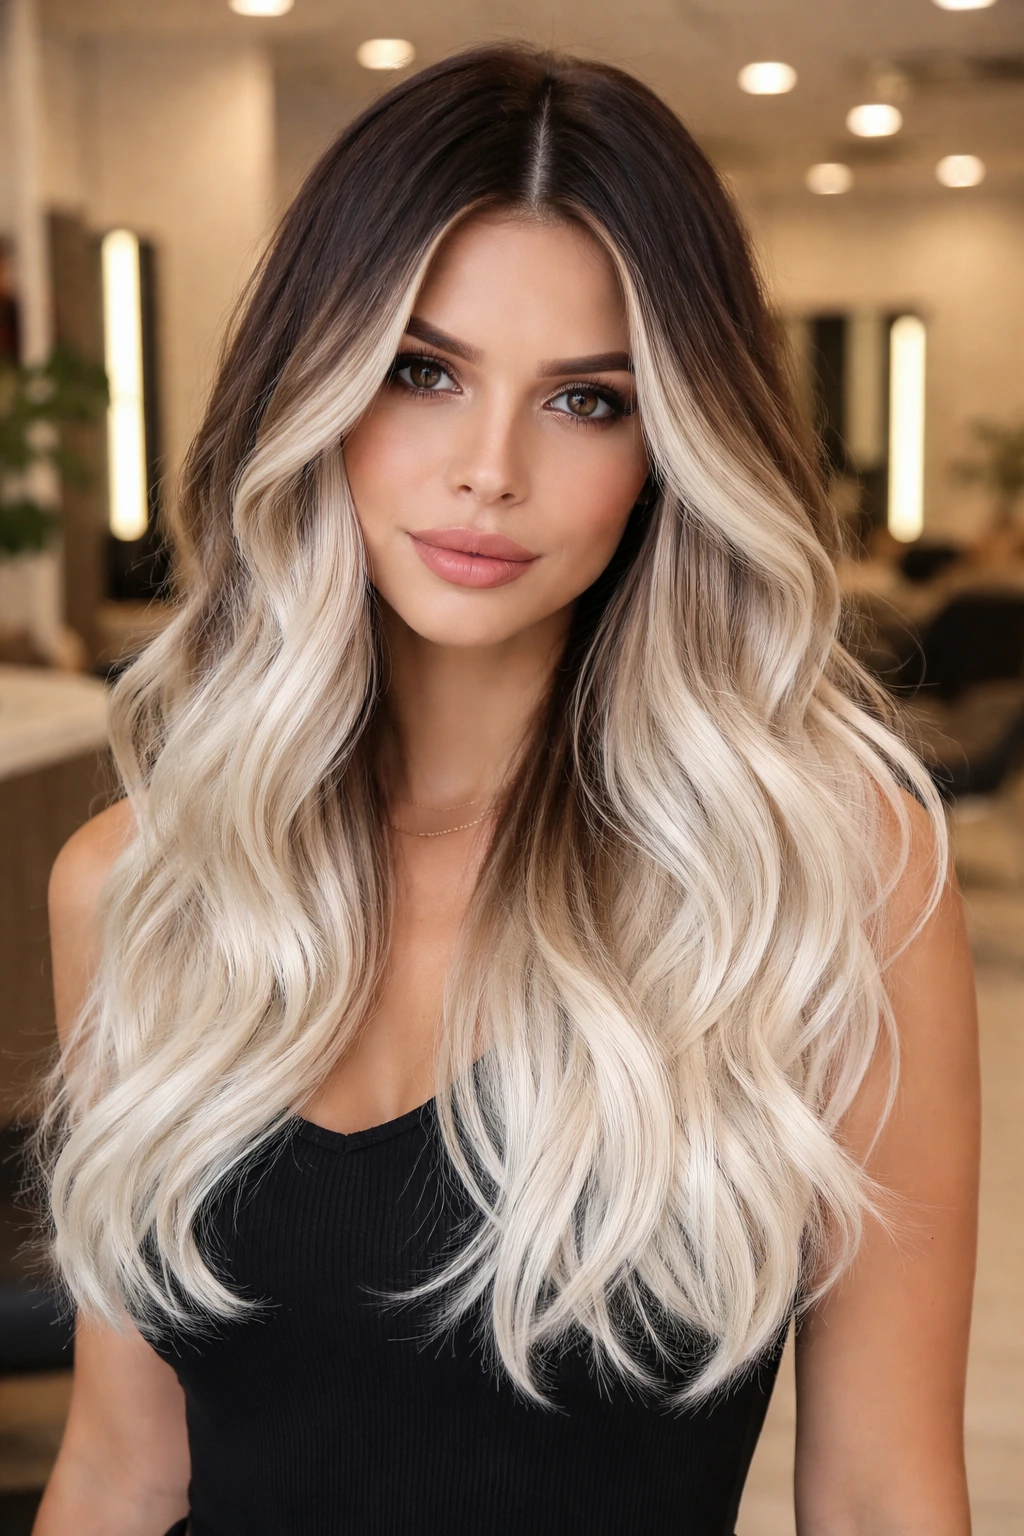
An ombre look transitions from dark to light, but the white-blonde version creates a dramatic shift. Imagine your hair being dark at the roots and mid-lengths, and then abruptly turning into a crisp, bright white at the ends. It is a high-contrast style that requires a confident cut to pull off.
Is Your Hair Ready?
Ombre requires bleaching the ends of your hair, which are often the oldest and most fragile parts. If you have been using heat tools on your ends for years, they might not be able to handle the lift required to get to white. A professional stylist will do a “strand test”—bleaching a small, hidden piece of hair—to see if your ends will survive the process.
Maintenance and Cutting
Because the ends are bleached to the max, they will inevitably get dry. Plan on getting a trim every 6 to 8 weeks. Removing the damaged, bleached ends keeps the white-blonde ombre looking healthy and vibrant rather than thin and frizzy.
10. Dimensional Low-Light Integration
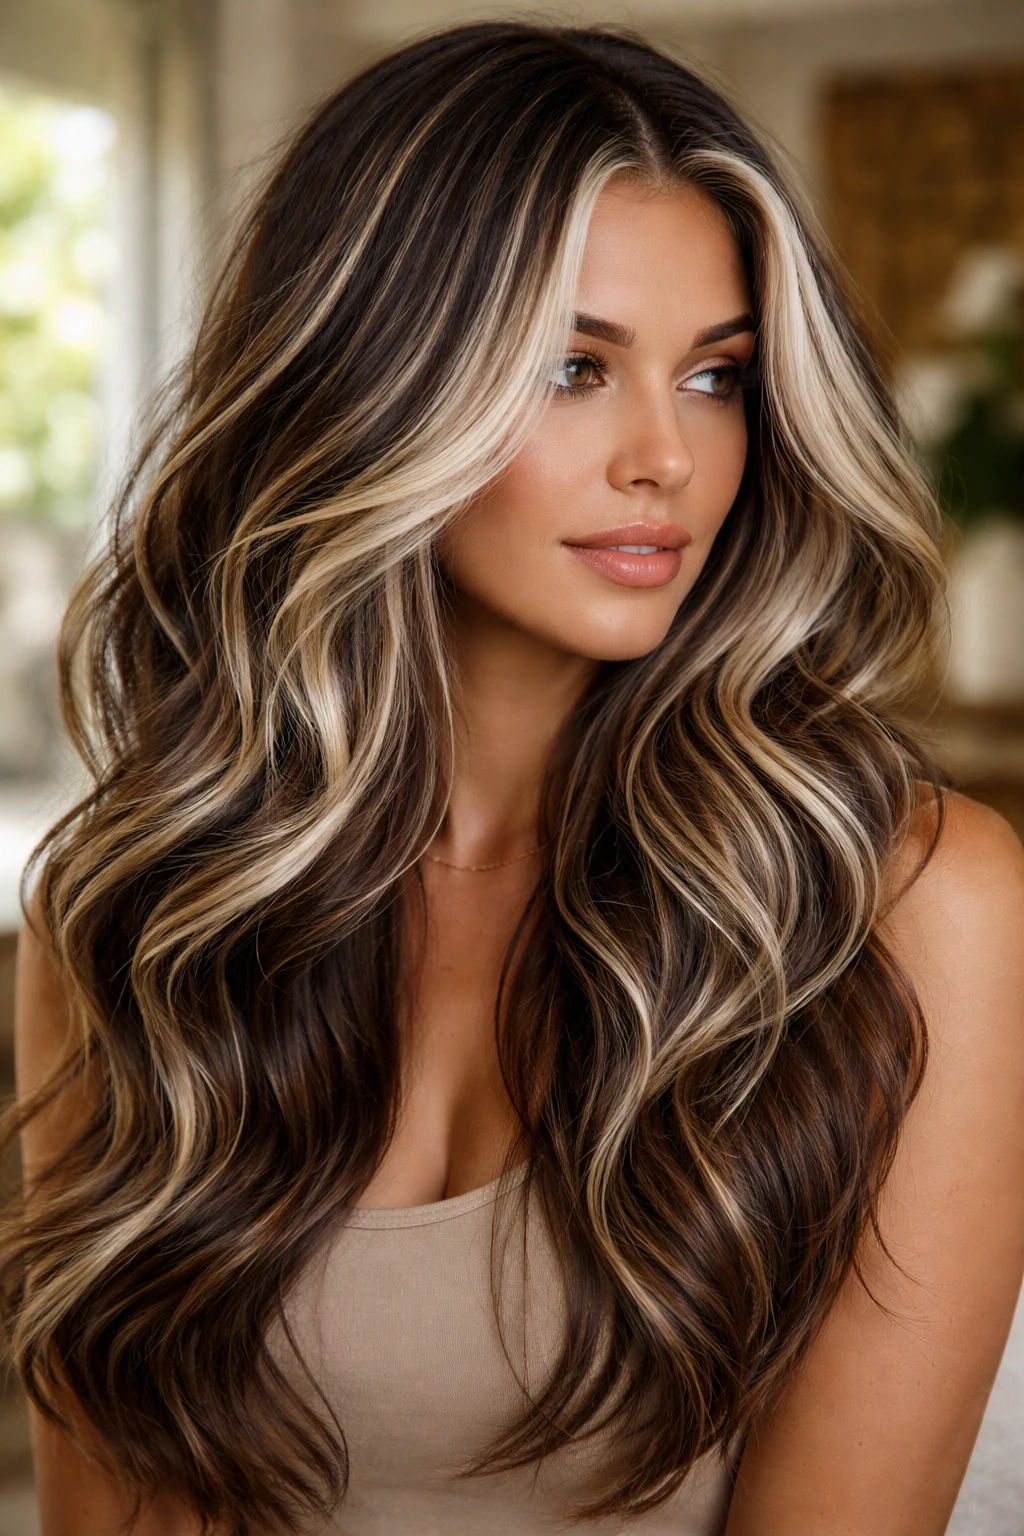
Sometimes, to make white highlights look better on brown hair, you actually need to add more dark hair back in. This is called low-lighting. By weaving in dark brown ribbons alongside the white highlights, you create dimension. It stops the hair from looking like a flat, single-tone block and gives it depth.
Why Dimension Matters
Without low-lights, a head full of white highlights can look like a helmet of color. By re-introducing your natural brown or a slightly darker shade, the white highlights “pop” more. It is a counterintuitive approach—adding dark color to make the light color look brighter—but it works every single time.
The Visual Effect
This creates a sophisticated, multi-tonal look. When you walk in sunlight, the white will catch the light, while the dark low-lights will provide the shadow, making your hair look thicker and healthier than it actually is.
11. White Highlights on a Pixie Cut
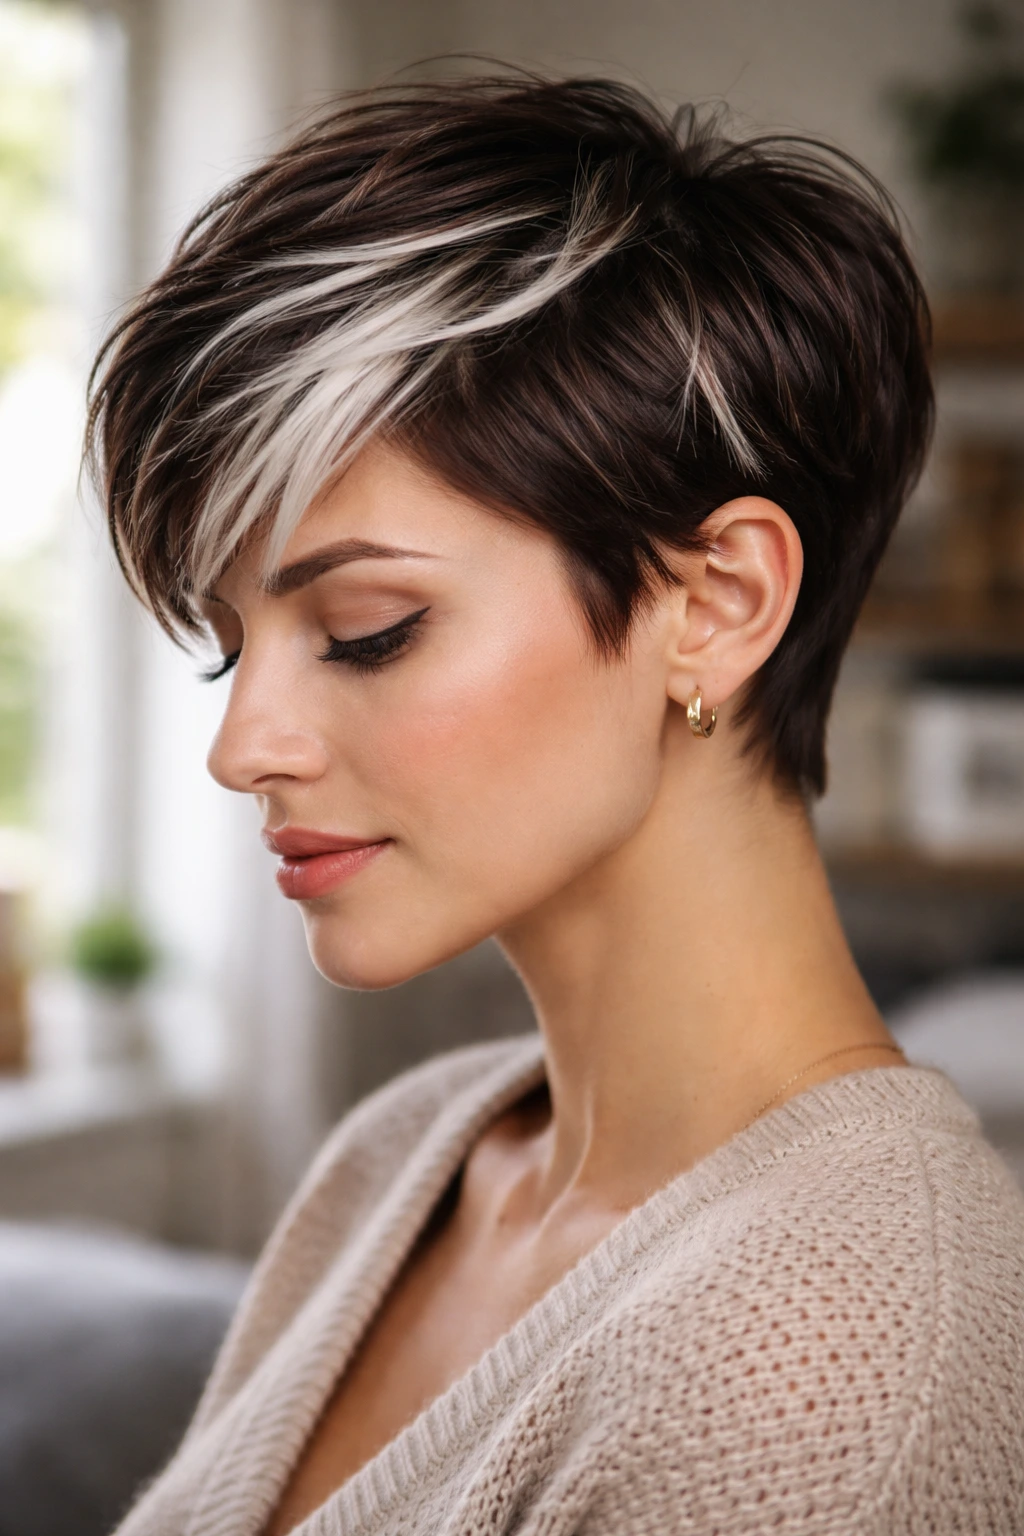
A short pixie cut is the perfect canvas for white highlights. Because there is less hair, you can go extremely bold without worrying about the maintenance of long, bleached lengths. White highlights on a dark pixie cut look edgy, modern, and very easy to manage.
The Advantage of Short Hair
You can essentially “reset” your hair color more frequently. If the bleached sections get damaged, they grow out quickly, and you can just cut them off. You aren’t tied to years of hair growth if you decide the platinum look isn’t for you.
Styling the Look
- Texturizing Spray: Use a matte texturizing spray to define the white pieces. It makes the color look like a deliberate style choice rather than just highlights.
- Minimal Maintenance: You will need to touch up the roots more often than someone with long hair, but the actual appointment time is short.
12. Platinum Ends on Long Layers
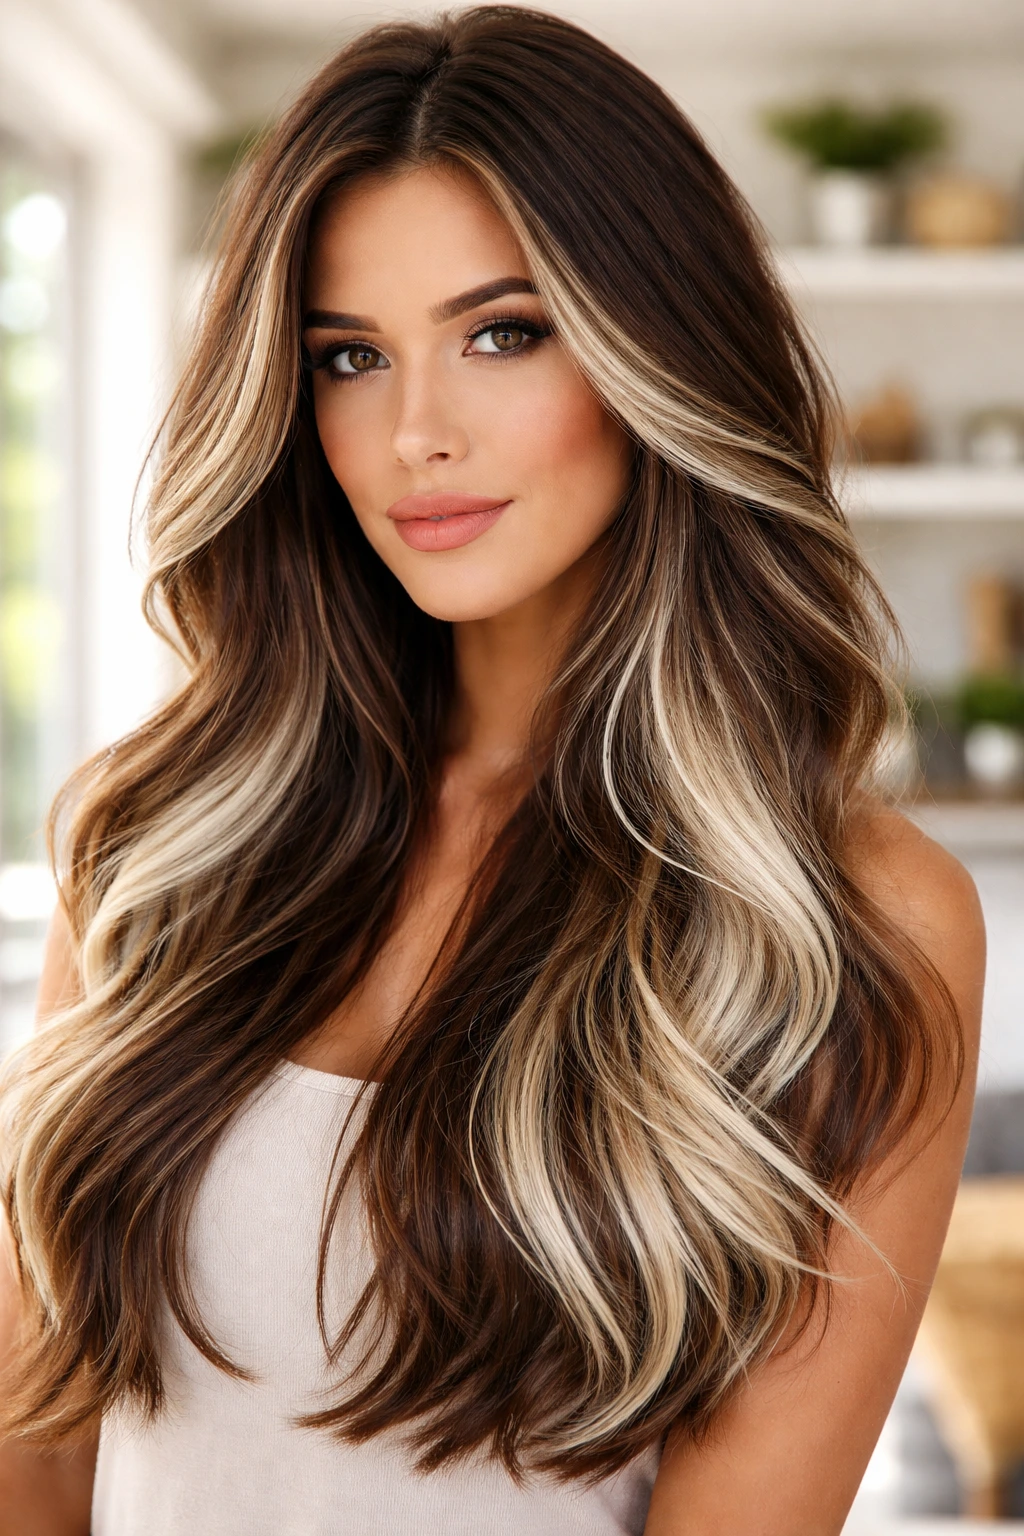
If you have long, layered hair, you can place white highlights specifically on the ends of your layers. This mimics the way hair naturally lightens in the sun but takes it to the extreme. When you curl your hair, these white-tipped layers become very visible, adding a sense of movement and volume.
Why Layers Are Important
Layers act as a guide for the highlight placement. By coloring just the ends of the layers, you are emphasizing the cut. This is a classic “effortless” look. It doesn’t look like you spent six hours in a salon chair, even though you probably did.
The “Flick” Technique
Ask your stylist to use a “flick” technique where they start the bleach slightly further down on the layer and flick the brush upward. This ensures that the bleach doesn’t create a straight, horizontal line, which is the biggest mistake in DIY or unskilled coloring.
13. Heavy Crown Highlights
This style focuses the white highlights on the top section of the head (the crown). The under-layers remain mostly dark. This is a great choice if you usually wear your hair down and want a bright, high-impact look around your face and head, without the maintenance of highlighting the hair at the nape of your neck.
Managing the Contrast
The transition between the heavy white crown and the dark under-layers needs to be blended. This is usually done with a balayage technique or a root smudge to ensure the white doesn’t look like a cap.
Why It Works
It’s an efficient way to get a lot of brightness with less chemical exposure. You are focusing the product exactly where it is most visible, which is a smart strategy for hair health.
14. Subtle Halo Highlights
A “halo” highlight places the light color in a ring around the head, just below the surface layer. When you wear your hair in a ponytail or half-up style, you see a ring of white brightness, but when the hair is down, it’s a peek-a-boo effect. It is understated and elegant.
Achieving the Halo
The sectioning here is specific. Your stylist needs to section off a halo-shaped piece of hair around the crown and nape, leaving the “veil” of hair on top natural. The foils are placed in this ring. It provides a soft, glowing effect that isn’t as aggressive as traditional highlights.
The Wearability Factor
This is one of the most professional-friendly ways to do high-contrast color. You can pull your hair back into a bun for a meeting and hide the intensity, then let it down and shake it out for the evening.
15. Smokey Grey-White Blend
Not all white highlights have to be bright, stark white. You can opt for a smokey, grey-white blend. This is achieved by toning the highlights with a metallic, cool-grey gloss. It looks incredibly chic against dark brown hair and feels more intentional than a generic blonde highlight.
The Aesthetic
This look leans into the “silver” trend. It is sophisticated and looks amazing with monochromatic clothing. It’s less about “bright blonde” and more about “polished metallic.”
Toning Is Everything
This look requires a specific toner. If you use a standard purple shampoo, you might turn the grey-white into a weird lilac. Talk to your stylist about specifically using grey or silver toners to maintain the “smokey” effect rather than just brightening it.
16. Winter White Streaks
Think of these as “frosting” for your hair. These are very specific, thicker ribbons of white that mimic the look of frost on dark branches. It’s a very stylized, editorial look. You usually see this with a middle part, where the streaks create a symmetrical frame for the face.
The Stylized Approach
This isn’t about natural-looking highlights; it’s about art. You want the streaks to be visible and distinct. It works well with sleek, straight hair where the lines of color can be clearly seen.
Daily Care
Because this look relies on the precision of the streak, keep your hair straight or gently waved. If you go for a messy, beachy texture, the streaks might get lost and just look like standard highlights.
17. Textured Shag with White Accents
The shag haircut is all about texture, layers, and movement. Adding white highlights to this style is a no-brainer. The white pieces catch the layers of the shag, highlighting the choppy nature of the cut. It’s a rock-and-roll aesthetic that feels effortless.
Why the Cut Matters
A shag has shorter layers on top. Bleaching these shorter, choppy layers adds immense visual volume. You aren’t just changing the color; you are changing the entire shape and perception of the haircut.
Styling Tip
Use a salt spray or a dry texturizing spray on your white pieces. This separates the hair and lets the white catch the light, which is exactly what makes the shag cut look so dynamic.
18. Micro-Highlights for Texture
If your brown hair is quite fine, chunky highlights might overwhelm it. Micro-highlights (super fine weaves) scattered throughout the head create a “salt-and-pepper” effect but with white instead of grey. It adds incredible texture and makes fine hair look much thicker.
The Science of the Weave
By isolating thousands of tiny hairs and lightening them, you are changing the internal structure of those specific strands. Bleached hair is thicker and rougher than natural hair. By spreading this effect across your head, you are essentially “fluffing up” your hair, giving it more grip and volume.
Who Should Avoid This?
If your hair is already very damaged, avoid micro-highlights. The volume of foils needed can be overwhelming for fragile hair. Stick to larger, less frequent highlights to minimize the amount of chemical processing.
19. White Tips
This is the modern, elevated version of the nineties frosted tips. It focuses strictly on the very bottom 2-3 inches of the hair. It’s a dip-dye effect, but because it’s done with professional bleach and toner, it doesn’t look like a home kit.
The Precision Factor
The line of demarcation between the dark brown and the white tips should be soft, not a blunt, horizontal line. Ask for a “smudged” transition where the stylist brushes the bleach up slightly in irregular strokes to blur the line.
Versatility
This style is great if you like to wear your hair in updos or buns. The contrast between your dark roots/mid-lengths and the bright white ends looks purposeful and fun.
20. Under-Layer Brightness
This is a bold technique where the entire nape section and the hair behind the ears are bleached to a white blonde. The top layer of your hair remains your natural dark brown. When you wear your hair down, you only get hints of the color, but when you toss your hair or braid it, the brightness is revealed.
The “Surprise” Factor
This is often called a “peek-a-boo” or “under-light” technique. It’s perfect if you want to be dramatic but have a job or lifestyle that requires a more conservative look. You have the best of both worlds.
The Maintenance
The nape area is actually the most prone to tangling, especially when bleached. Keep this area deeply conditioned. If it mats, it will break. Use a leave-in detangler spray every single day on the back of your neck.
21. Soft White Face-Framing Waves
This style blends the face-framing technique with soft, wavy styling. The white highlights are not solid chunks; they are soft, woven sections that focus on the front of the face. When the hair is waved with a large-barrel iron, the white catches the crest of the waves, creating a glowing effect.
Achieving the Softness
The key is to avoid “banding” at the root. Your colorist should apply the lightener in a “V” shape or a feathered pattern. This creates a soft transition rather than a hard line.
Styling the Wave
Don’t use a curling iron that is too small. Use a 1.5-inch or 2-inch barrel. This creates loose, soft waves that showcase the white highlights without looking like ringlets. It keeps the look modern and expensive-feeling.
22. Platinum Streak Bangs
If you have bangs (fringe), you have a unique opportunity. Placing platinum white streaks only on the bangs is a very high-fashion, statement look. It draws immediate attention to the eyes and is incredibly striking against a dark brown base.
Why Bangs Are Unique
Because bangs are cut so they fall across the forehead, you don’t need a lot of foil work. It is a quick service. However, it requires a very precise cut. If your bangs aren’t trimmed perfectly, the white color will highlight every little imperfection in the scissor work.
Daily Upkeep
Bangs touch your forehead, which is the oiliest part of your face. This means the white highlights in your bangs will get greasy and yellow faster than the rest of your hair. Use a dry shampoo specifically designed for oily roots on your bangs daily to keep that white bright.
23. Spaced-out Ribbons
Instead of a uniform pattern of highlights, ask for “spaced-out” ribbons. The stylist places a few thick, white highlights in random patterns throughout the hair. It looks like you’ve been struck by lightning in the best way possible.
The Artistic Approach
This is about intuition. The stylist should place the highlights where the light would naturally hit your head. It’s a custom, bespoke service. You cannot use a generic foil template for this.
Who This Is For
This is perfect for the person who hates the “uniform” look of traditional highlights. It’s messy, it’s rebellious, and it’s very low maintenance because there is no root line to worry about.
24. White-on-Brunette Weave
This is the classic, professional highlight application. It is the most standard technique, which means most stylists are excellent at it. It provides a balanced, distributed look that works on almost any hair texture and haircut.
The Technique
The stylist uses a rat-tail comb to weave sections of hair. The “weaved out” hair stays brown, and the “kept in” hair is bleached. It’s simple, effective, and reliable.
Consistency
Because this is a standard technique, you can get it done anywhere, and it’s easier to find a stylist who specializes in it. It’s less “trendy” than the money-piece or the root-smudge, but it’s a timeless classic for a reason.
25. Sun-Kissed but Icy Tips
This is a variation of the ombre, but much more subtle. The white is concentrated only on the tips, and it is blended upward into the brown with very faint, thin streaks. It looks like you spent the summer on a glacier.
The Balance
You need enough brown on the ends to provide a background for the white. If you go too white, too high up, it becomes an ombre. If you keep the white restricted to the ends and use very fine streaks, it’s a “sun-kissed” effect.
Why It Works
It’s incredibly flattering. It brings lightness to the face without requiring the commitment of bleaching the hair near your roots. It’s the easiest way to wear white highlights if you have very dark, virgin hair.
26. Platinum Face-Framing with Dark Roots
This is a deliberate style choice: platinum white around the face, natural dark brown roots throughout the rest of the head. It creates a stark, beautiful contrast that looks intentional and edgy.
The Commitment
You need to be prepared for the maintenance of the face frame. As your dark hair grows out, that white money-piece will look yellow very quickly. You will need a root touch-up on that specific section every 4 weeks.
Styling
This style looks best when the dark roots are visible. Don’t try to hide them. Wear your hair in a way that emphasizes the contrast—maybe a sleek ponytail or a sharp middle part.
27. Cool-Toned White Dimension
This style uses two different shades of white: a “bright white” and a “soft silver white.” By alternating these two tones, you create dimension. It prevents the highlights from looking flat or wig-like.
The Multi-Tonal Effect
It’s a subtle trick. To the naked eye, it just looks like “white,” but there is depth because of the slight variation in temperature between the bright white and the silver white.
Who Should Try It?
Anyone who has tried standard white highlights and felt they looked “flat” or “fake.” This adds the complexity that makes hair look natural, even when it is a high-fashion, unnatural color.
28. Pearl White Accents
Instead of solid stripes, ask for pearl white “accents.” These are tiny, barely-there flashes of white. It’s almost like jewelry for your hair. You can only see them when the light hits your hair just right.
The “Hidden” Look
This is great if you have very dark, coarse hair that is difficult to lift. You don’t need to bleach the hair to a transparent, 10-level white. You can stop at a pale yellow-white (pearl) and tone it. It’s less damaging and easier to achieve.
Why It Works
It’s sophisticated, understated, and incredibly expensive-looking. It’s a “if you know, you know” kind of hair color. It’s elegant and doesn’t scream for attention, but rather glows with it.
Final Thoughts
Achieving white highlights on brown hair is a journey, not a destination. You are chemically altering your hair to reach the lightest possible shade, which inherently carries risk. The success of these looks depends entirely on the health of your hair, the quality of the toner used, and your commitment to maintenance at home.
Never rush the process. If your stylist says you need two sessions to reach a healthy white, listen to them. Trying to force dark hair to white in a single appointment often results in orange, brassy, damaged hair that breaks. Be patient, invest in the right purple shampoos and bond-building treatments, and enjoy the high-contrast look that comes with the territory.
