



School mornings expose every weak hair tie. So do playground swings, dance class, windy sidewalks, and that one hand that keeps reaching up to fuss with the ponytail you spent six minutes making.
The best hairstyles for girls are the ones that match the hair in front of you, not the one you wish you had. Fine hair needs a lighter touch. Thick hair needs stronger sections and better pins. Curly hair often looks better when you work with the shape instead of fighting it flat.
A spray bottle, a rat-tail comb, a pack of clear elastics, a handful of bobby pins, and one good brush can carry a lot of weight. Ribbon helps. A satin scrunchie helps. So does knowing when to stop smoothing and let a style look a little lived-in.
1. Classic High Ponytail
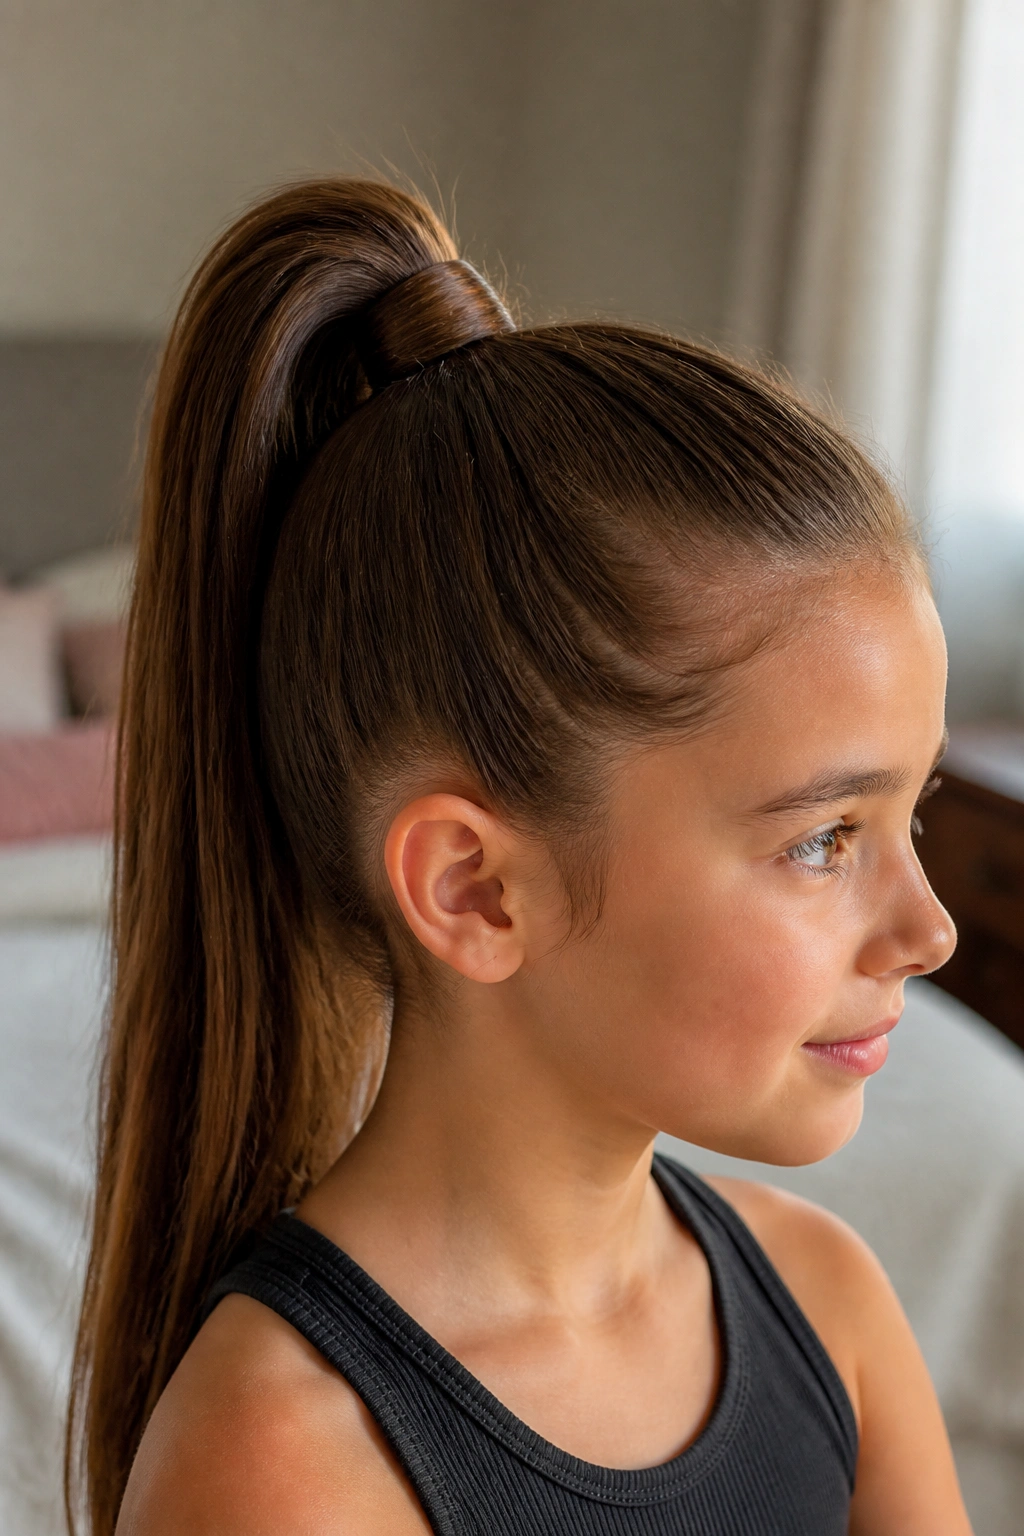
A high ponytail is the workhorse of girls’ hairstyles. It clears the face, stays neat longer than people expect, and takes less time than almost anything else on this list.
Why it works
Gather the hair at the crown or just above the crown, then brush upward from the temples so the sides stay smooth. For extra hold, mist the roots lightly with water or a touch of leave-in spray before you tie it off. If the hair is thick, use two elastics stacked together instead of pulling one tight elastic until it starts slipping.
Wrap a small 1-inch strand around the base if you want it to look finished. That tiny move makes the whole style look cleaner. Stronger, too.
Best for: school days, sports, and hair that gets oily fast.
Watch for: pulling too hard at the front; it can leave a headache by lunch.
Tiny detail that helps: angle the ponytail slightly upward, not straight back.
2. Low Side Ponytail with Ribbon
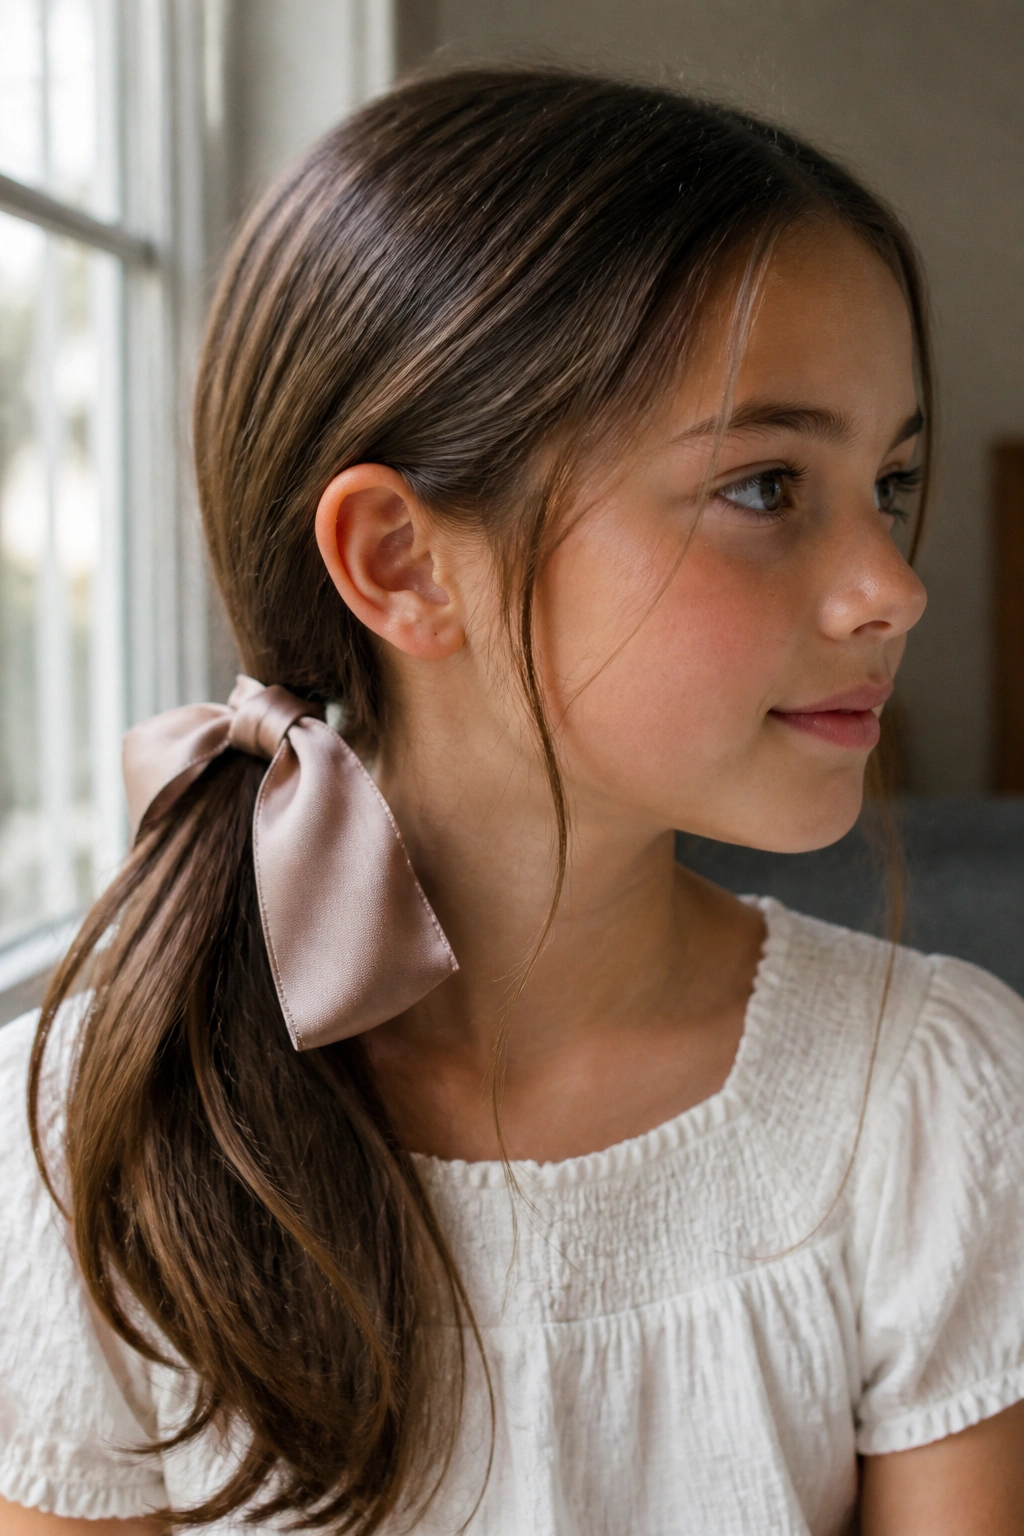
A low side ponytail has a softer feel than a center-back ponytail, and a ribbon changes the whole mood without adding much work.
Brush the hair to one side and fasten it just behind the ear or a little lower at the nape. A wide satin ribbon looks neat and lies flat better than a skinny one that twists. If the hair has layers, leave a few face-framing pieces loose so the style does not look too stiff.
This is one of those hairstyles that looks nicest when it is not overhandled. A little bend in the ends makes the ponytail feel light and natural. Straight hair can stay sleek; wavy hair can keep its texture. Both work.
3. Simple Three-Strand Braid
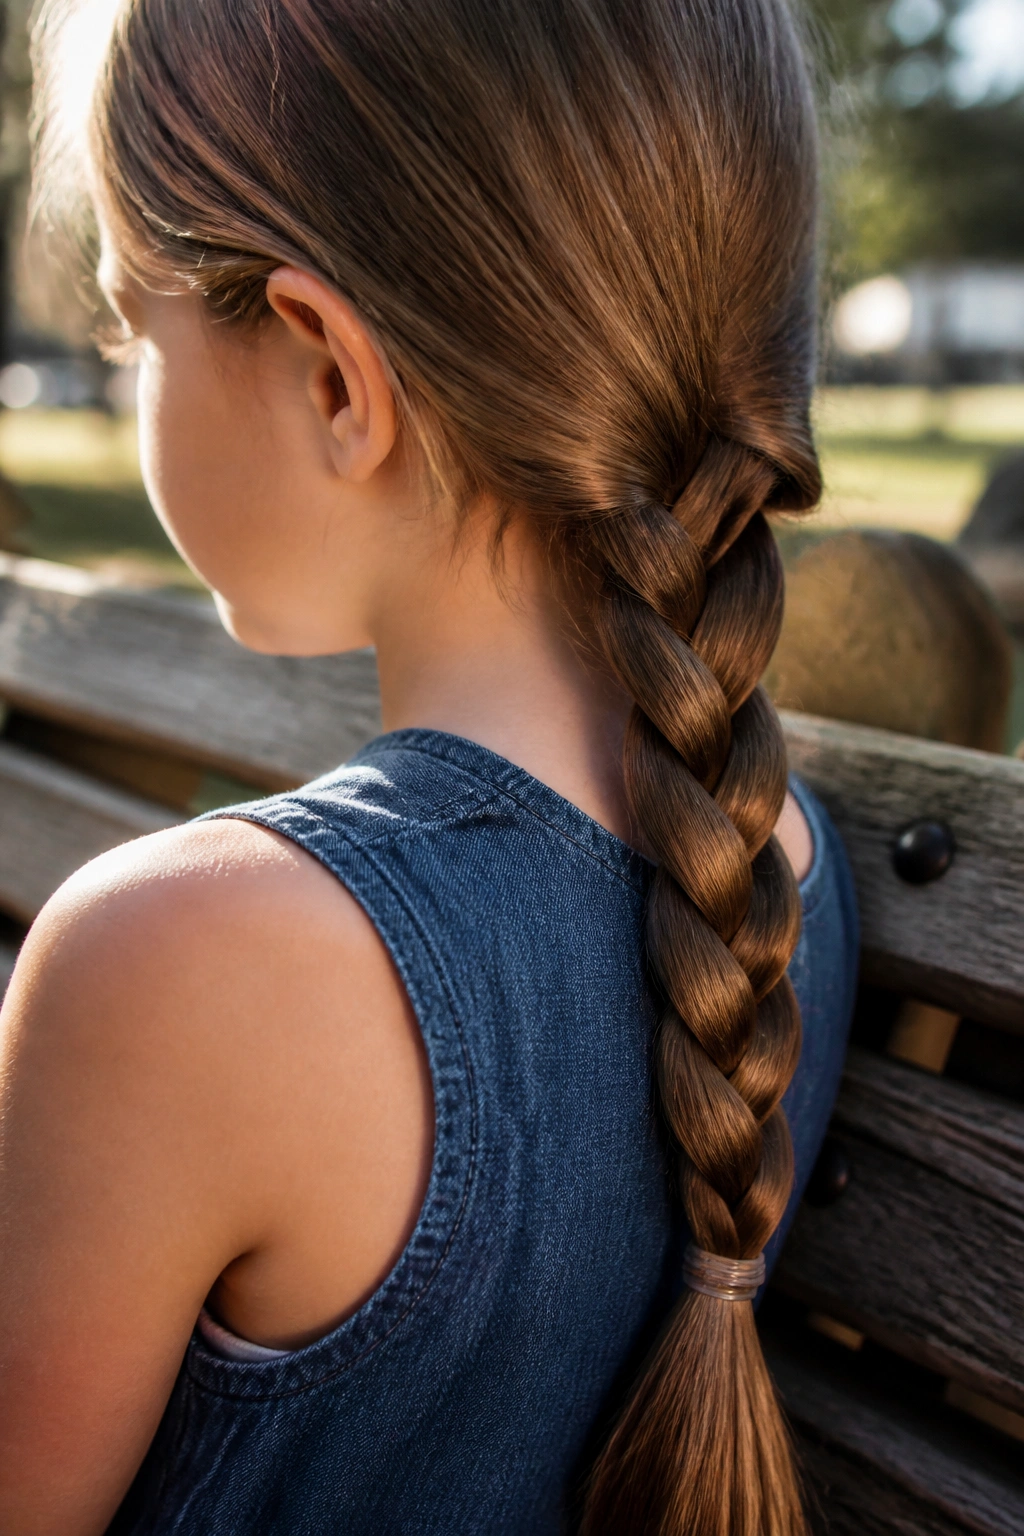
The plain three-strand braid is boring in the best way. It holds, it feels familiar, and it works on hair that is past the shoulders or tucked into a bob with enough length.
Start with the hair brushed free of knots. Split it into three equal sections at the nape or over one shoulder. Cross the right section over the middle, then the left over the new middle, keeping your fingers close to the braid so it does not puff out in odd places.
A small detail that changes everything
If you braid too loosely at the start, the top of the braid will sag before the rest of the hair even dries. If you braid too tightly, the style can look harsh and the ends get wispy.
A medium grip is the sweet spot. Secure the end with a small elastic, then tug the braid edges a little for a fuller look if you want a softer finish.
4. French Braid Down the Back
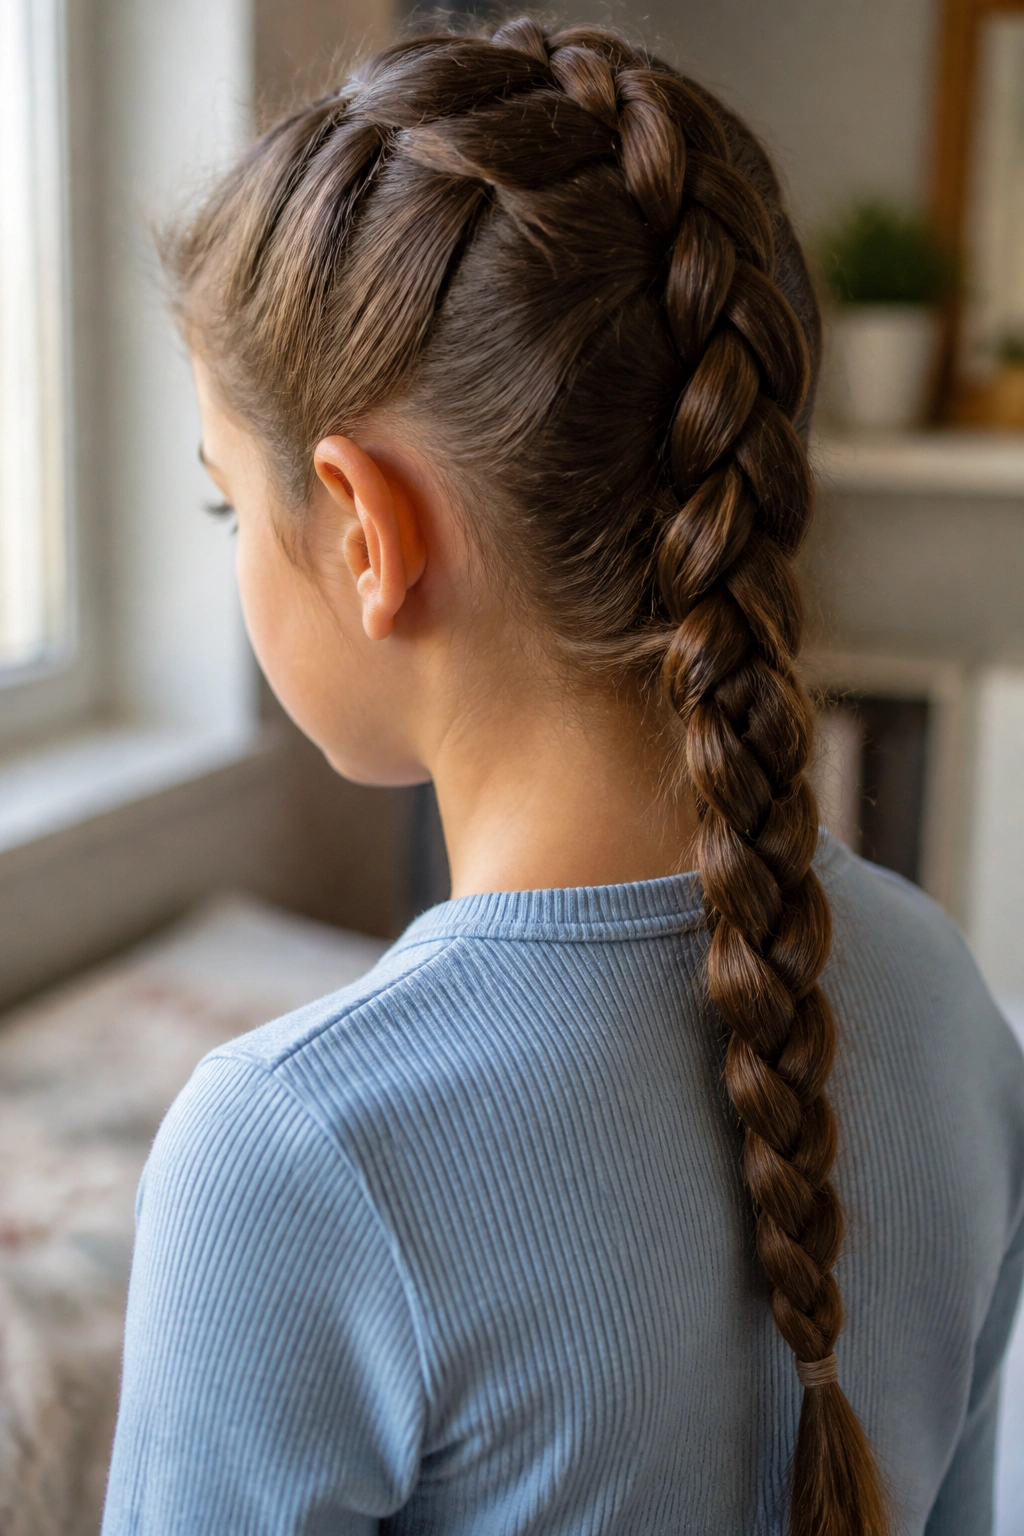
A French braid looks fancier than it is. That is part of the appeal.
The trick is simple: start near the crown, divide the hair into three sections, and add a bit of hair from each side as you braid downward. Keep the added sections even. Uneven pieces make the braid tilt or bulge in strange spots, and once that happens, the whole back section can look lopsided.
What makes it hold
French braids sit close to the head, which makes them great for long school days and active afternoons. They also work well on hair that slips out of regular braids because the added strands help anchor the style.
Use a fine-tooth comb for the parting, then smooth the hair with your palms before you start. A dab of leave-in cream on dry ends helps too. Not much. Just enough to keep the last few inches from fraying.
5. Double Dutch Braids
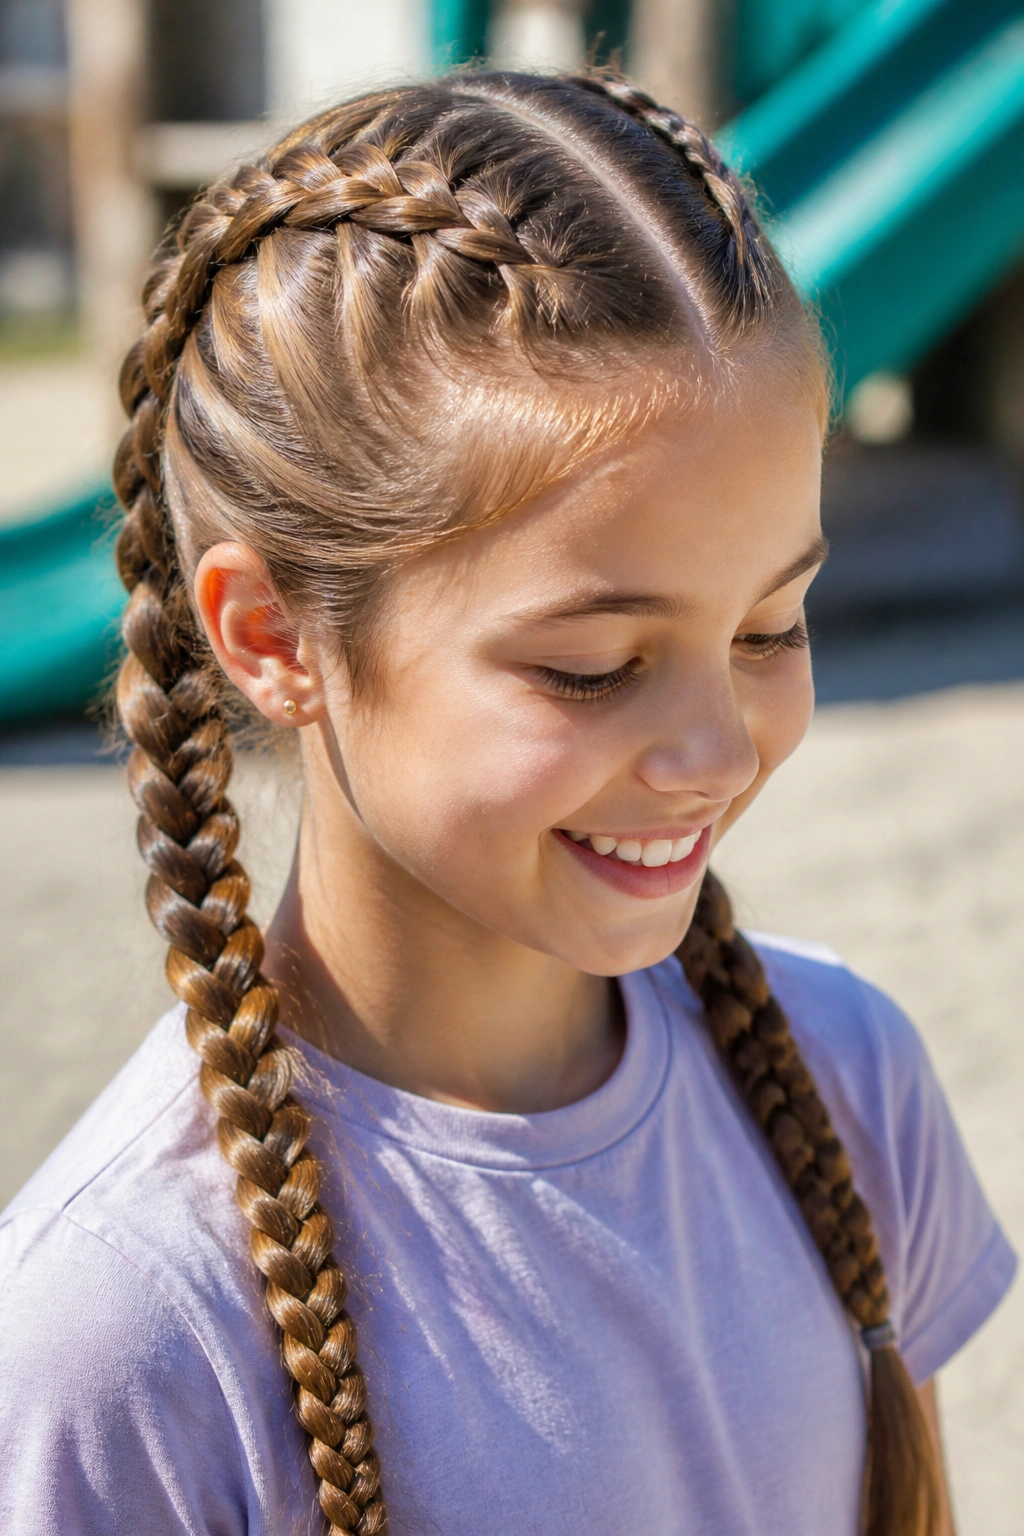
Double Dutch braids have a sporty, tidy look that stays put. They are one of the strongest choices when the day will be busy and the hair needs to survive every part of it.
How they differ
Dutch braids are braided “under” instead of “over,” so the braid sits on top of the hair rather than sinking into it. That gives the braid more shape and makes it easy to see on dark or thick hair.
Part the hair down the middle from forehead to nape. Braid each side close to the scalp, moving from the hairline toward the ears and then down the back. Keep the tension even on both sides so one braid does not end up thicker than the other.
- Use two small elastics at the ends.
- Smooth flyaways with a damp toothbrush or clean mascara wand.
- If the hair is slippery, start with dry shampoo at the roots.
These hold well on active kids. They also look neat on day two hair, which is a useful bonus.
6. Half-Up Twist
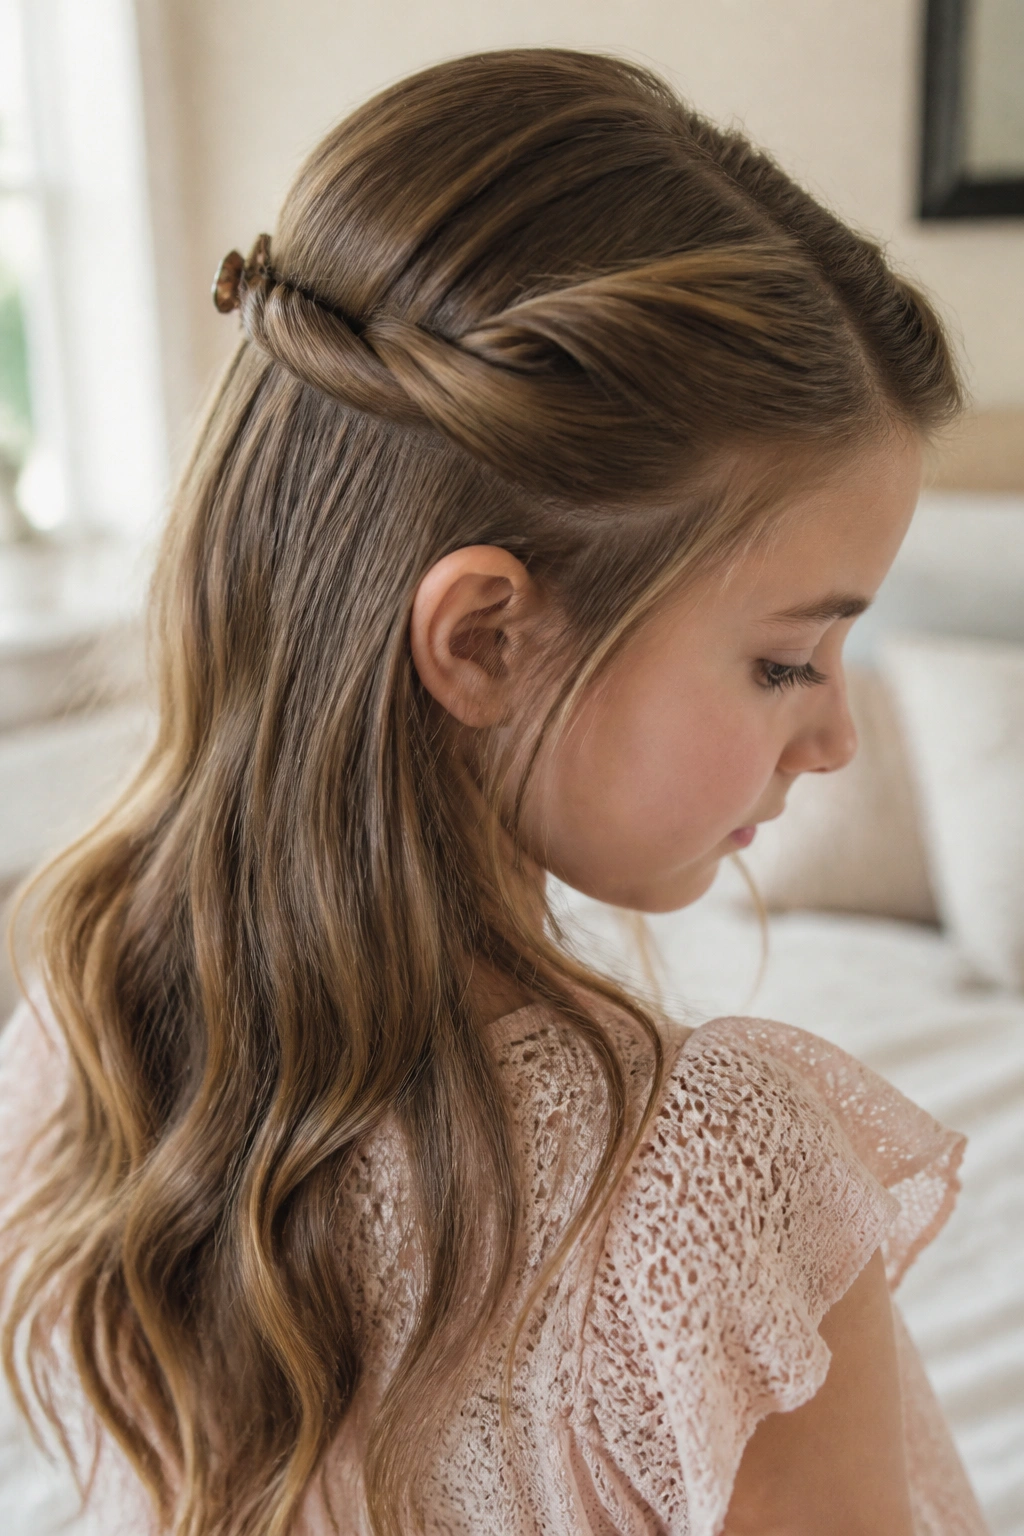
A half-up twist gives you the face-free comfort of an updo and the softer shape of loose hair. It is one of the fastest fixes when the front pieces keep falling into the eyes.
Take a section from each temple, twist them backward, and join them at the back of the head with a small clip or two crossed bobby pins. If the hair is fine, keep the sections narrow. Thin hair disappears into large twists. Thick hair can take wider sections and still look balanced.
Why it suits curls and waves
The lower half of the hair stays down, so the texture shows off instead of getting flattened. On curly hair, this style can look especially good because the twists add control while the rest stays springy and full.
A tiny clip works for short hair. Longer hair can handle a barrette or a ribbon tie. Either way, do not over-tighten the twist. It should hold the hair back, not pinch the scalp.
7. Space Buns
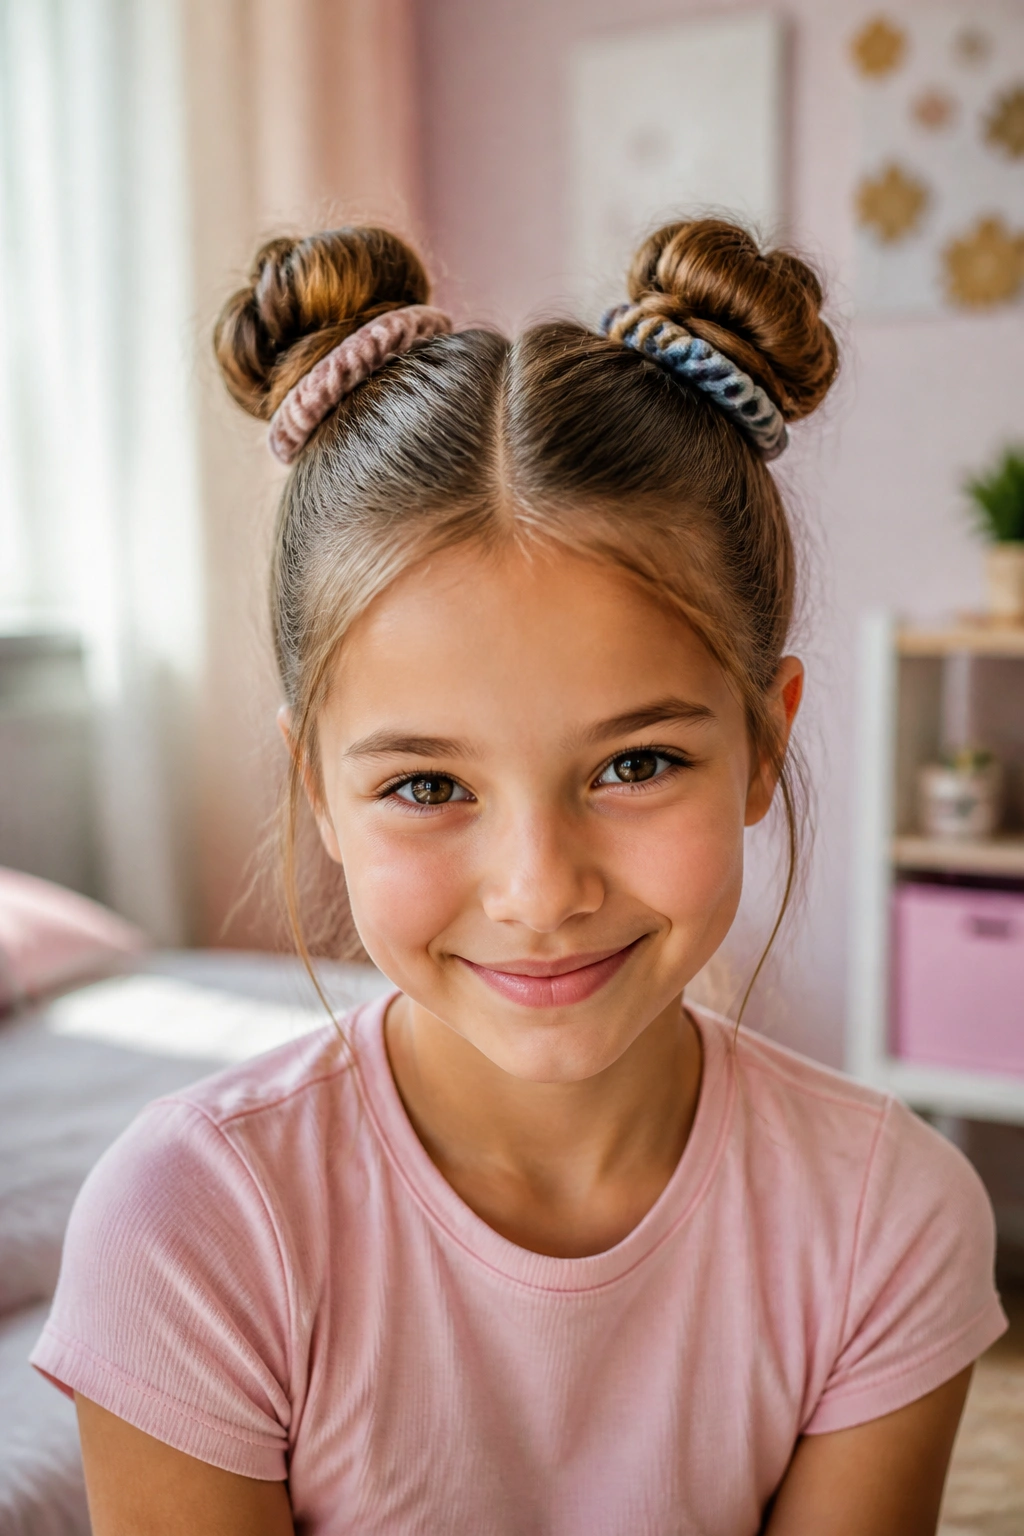
Space buns are playful without turning into a costume. That balance matters.
Split the hair into two equal sections with a straight center part. Make two high pigtails, twist each one into a bun, and pin the base with two or three bobby pins if the hair is slippery. A scrunchie around each bun can help keep the shape from collapsing.
The parting does most of the work here. If the line is clean, the whole style looks sharp. If it wanders, the buns can still be fun, but they will feel less tidy.
Best use case
Space buns are handy for dance practice, birthdays, or any day when a girl wants something that feels a little more playful than a plain ponytail. They also work with layered hair because stray pieces can stay loose on purpose. That is not a flaw. It is part of the style.
8. Messy Top Knot
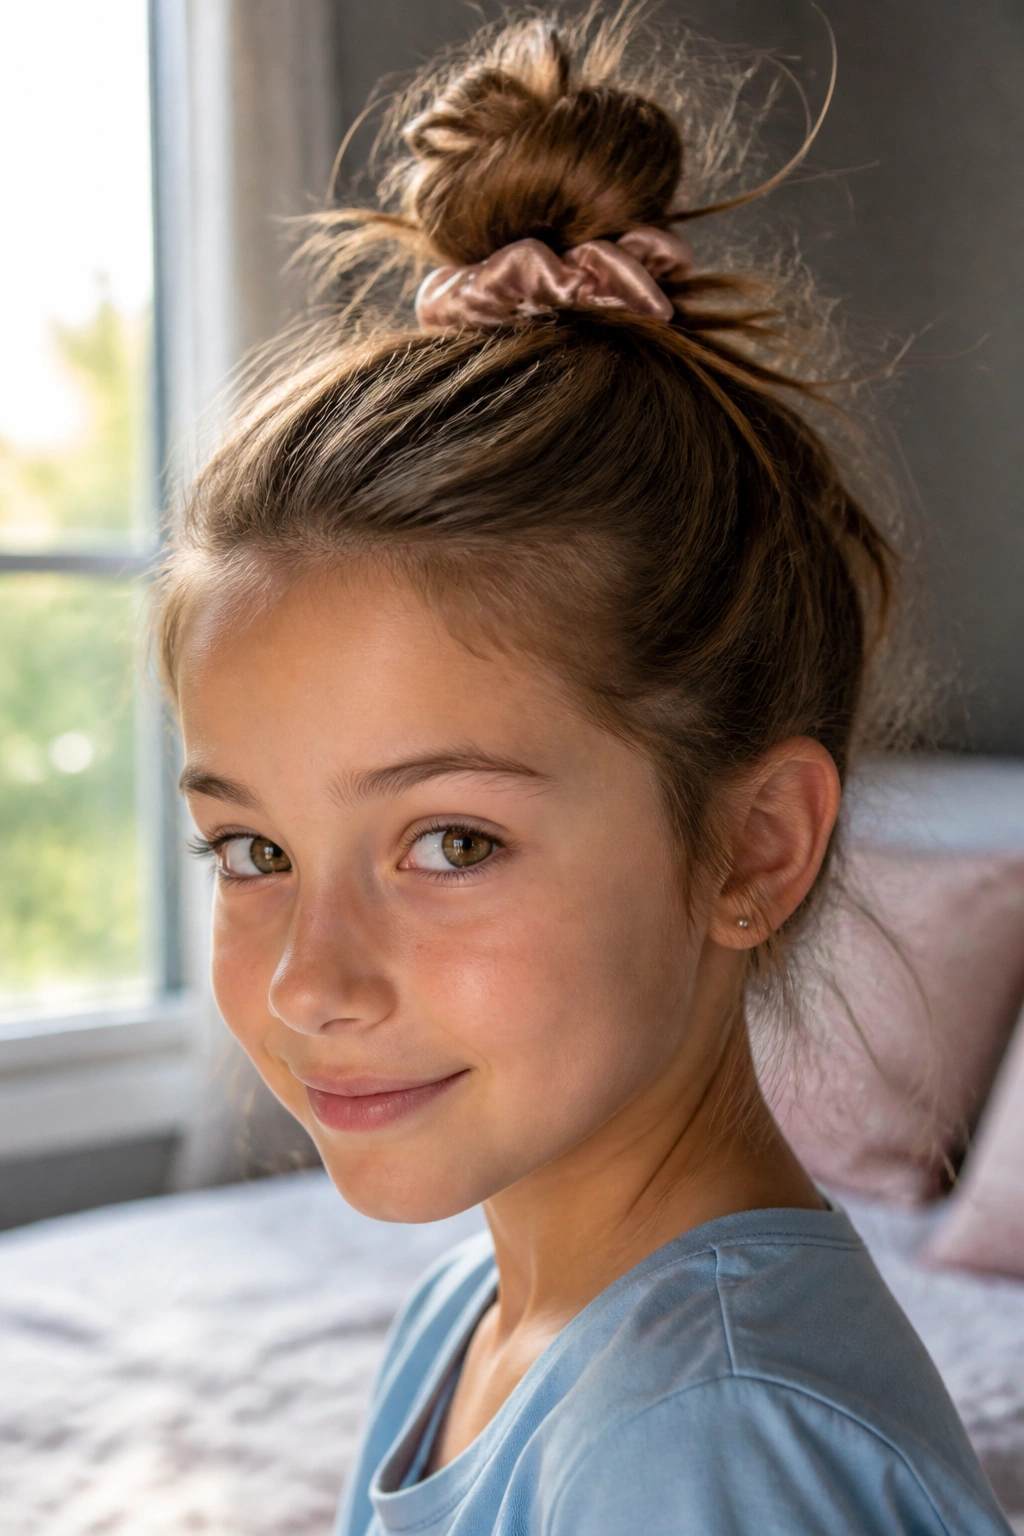
A messy top knot is one of those styles that looks casual but still feels put together. It is also kind to mornings that are already moving too fast.
Gather the hair high on the head, twist it once or twice, and coil it into a loose knot. Leave a few ends poking out. That is the point. A satin scrunchie or soft elastic makes the base more comfortable than a hard rubber band, especially if the hair stays up for hours.
This style is better on hair that is not freshly washed. Day-two or day-three hair has a little grip, so the knot holds without a dozen pins. If the hair is too clean and silky, a light spray of dry shampoo at the roots helps.
Not tidy. Not sloppy either.
9. Bubble Ponytail
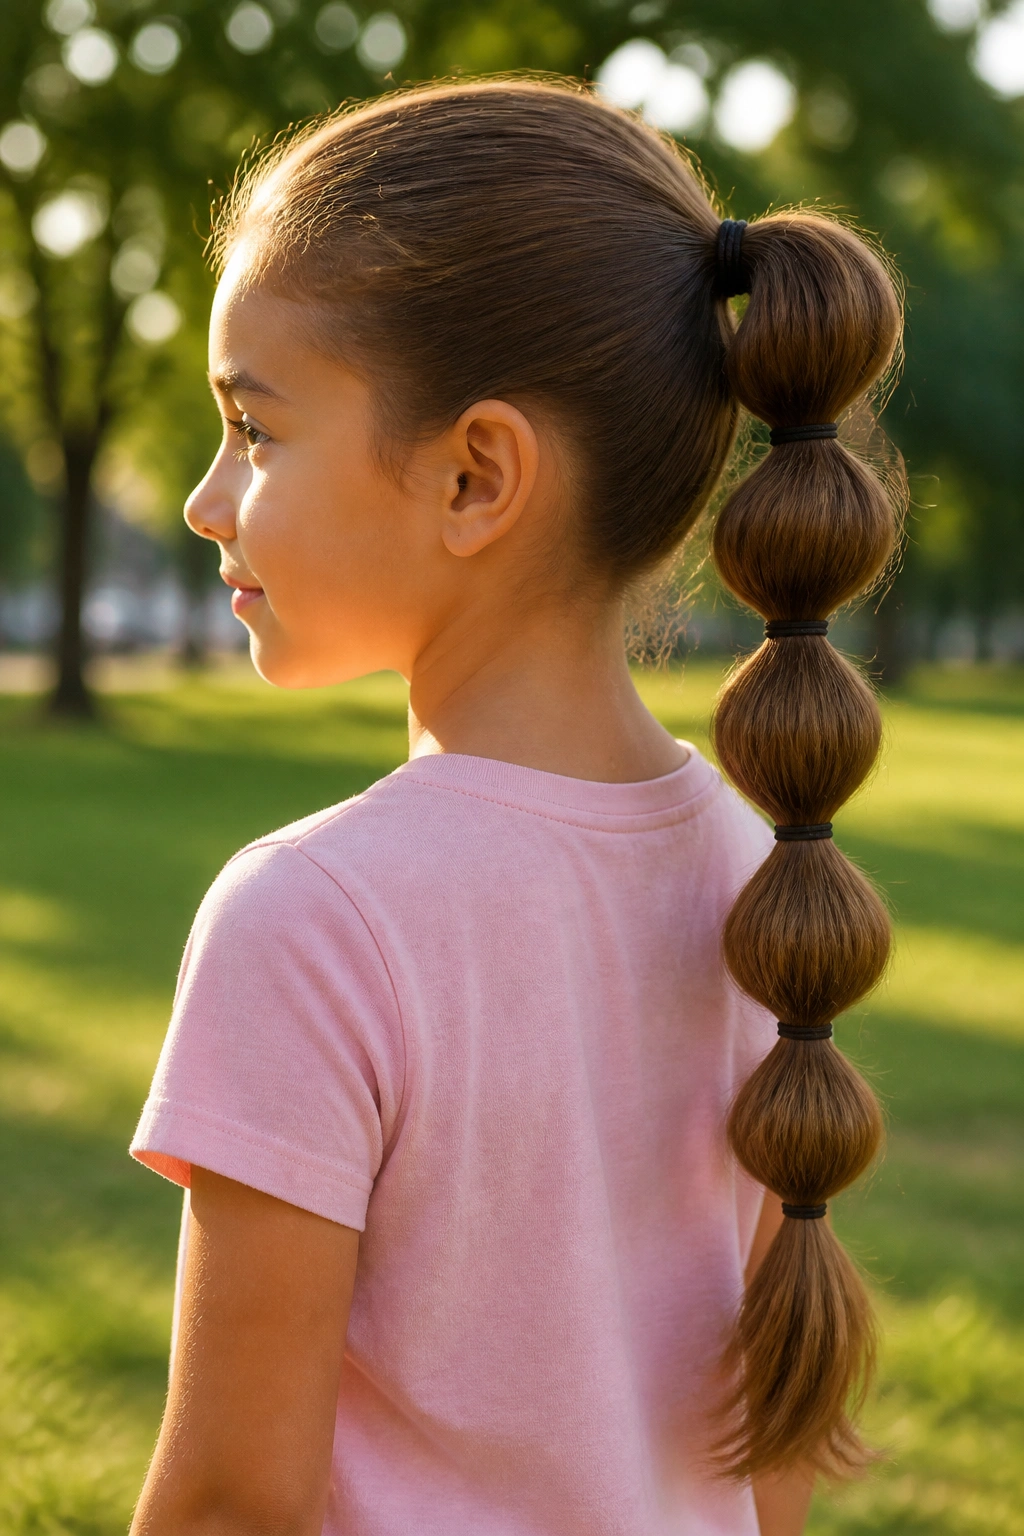
A bubble ponytail looks complicated from a distance and takes far less skill than people assume. That makes it one of the smarter styles for girls who like something a little different.
Start with a regular ponytail. Then add clear elastics down the length every 1.5 to 2 inches, depending on hair length. Gently tug each section between the elastics outward so it rounds into a bubble. The bubbles should look full, not stretched thin.
A quick setup
- Use 4 to 6 clear elastics for a medium ponytail.
- Smooth the top first so the style does not look messy at the scalp.
- Keep the bubbles evenly spaced.
This style works especially well on long straight hair, but it also gives wavy hair a sharper shape. It is a good choice when a regular ponytail feels too plain and braids feel like too much effort.
10. Fishtail Braid
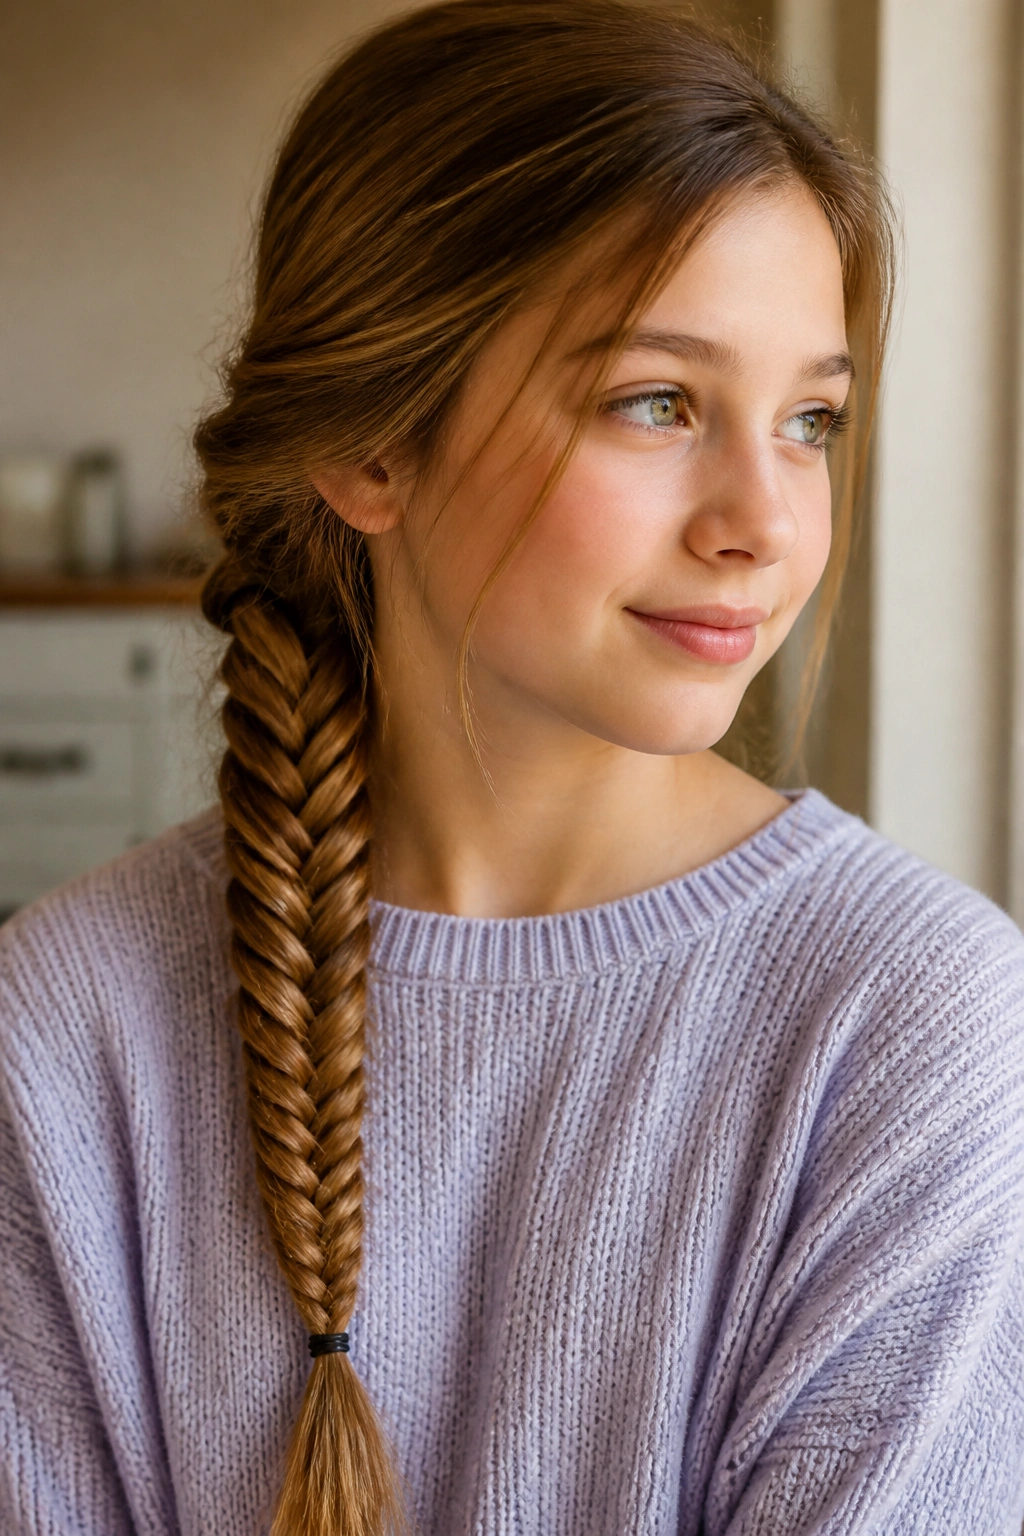
A fishtail braid has a tight, textured look that makes ordinary hair feel more dressed up. It takes longer than a three-strand braid, but the rhythm is simple once your fingers learn it.
Split the hair into two sections. Take a thin piece from the outside of the right section and cross it over to the left section. Then do the same from the other side. Keep the pieces small and even. Larger pieces make the braid look chunky in a rough way.
What helps most
Use dry hair or hair that has been lightly textured with spray. Silky hair slides apart too easily. A little grip makes the braid much easier to control.
The fishtail can sit down the back or over one shoulder. If the braid needs more volume, gently pull the edges outward once it is tied off. That softens the look without loosening the weave too much.
11. Crown Braid
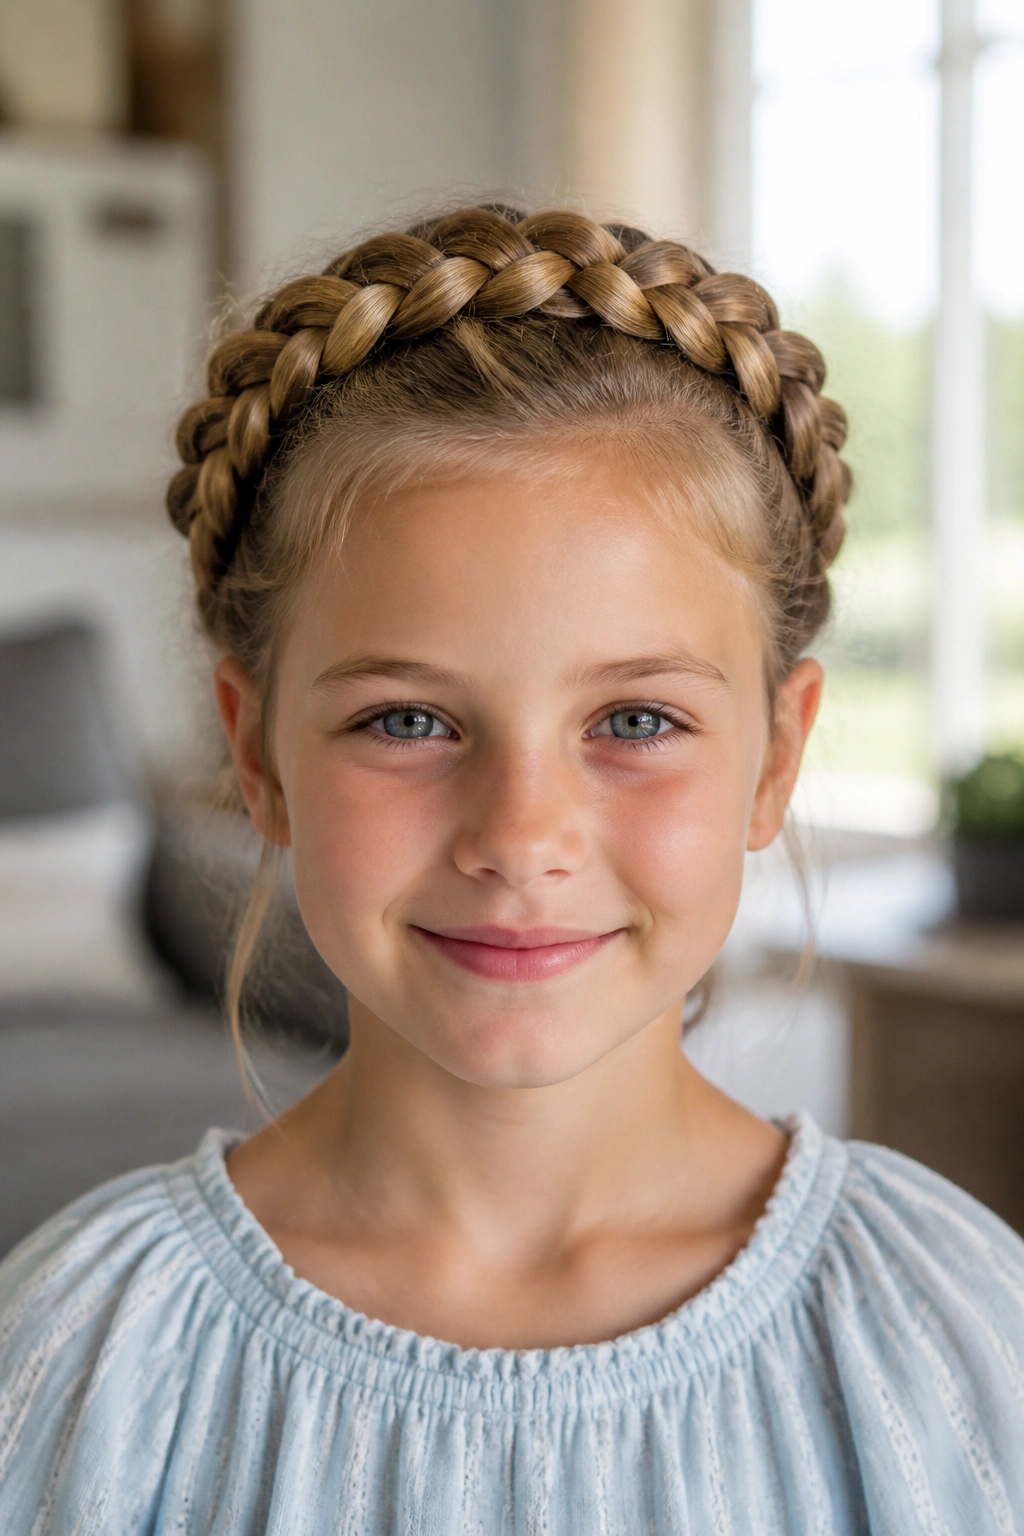
A crown braid wraps around the head like a built-in headband. It is neat, secure, and very good at keeping hair off the face without looking severe.
You can build it by braiding from one side of the head and following the hairline around, or by making two braids and pinning them across the crown. Both versions work. The second method is easier for beginners, and it is easier to fix if one side comes out a little thicker than the other.
Use bobby pins that match the hair color if you can. Hide them under the braid, not on top of it. The braid should look like it is sitting in place by itself, even though pins are doing the real job.
This one is especially nice for special outfits, but it does not need a special event. It just needs enough length to go around the head.
12. Pigtails with Soft Waves
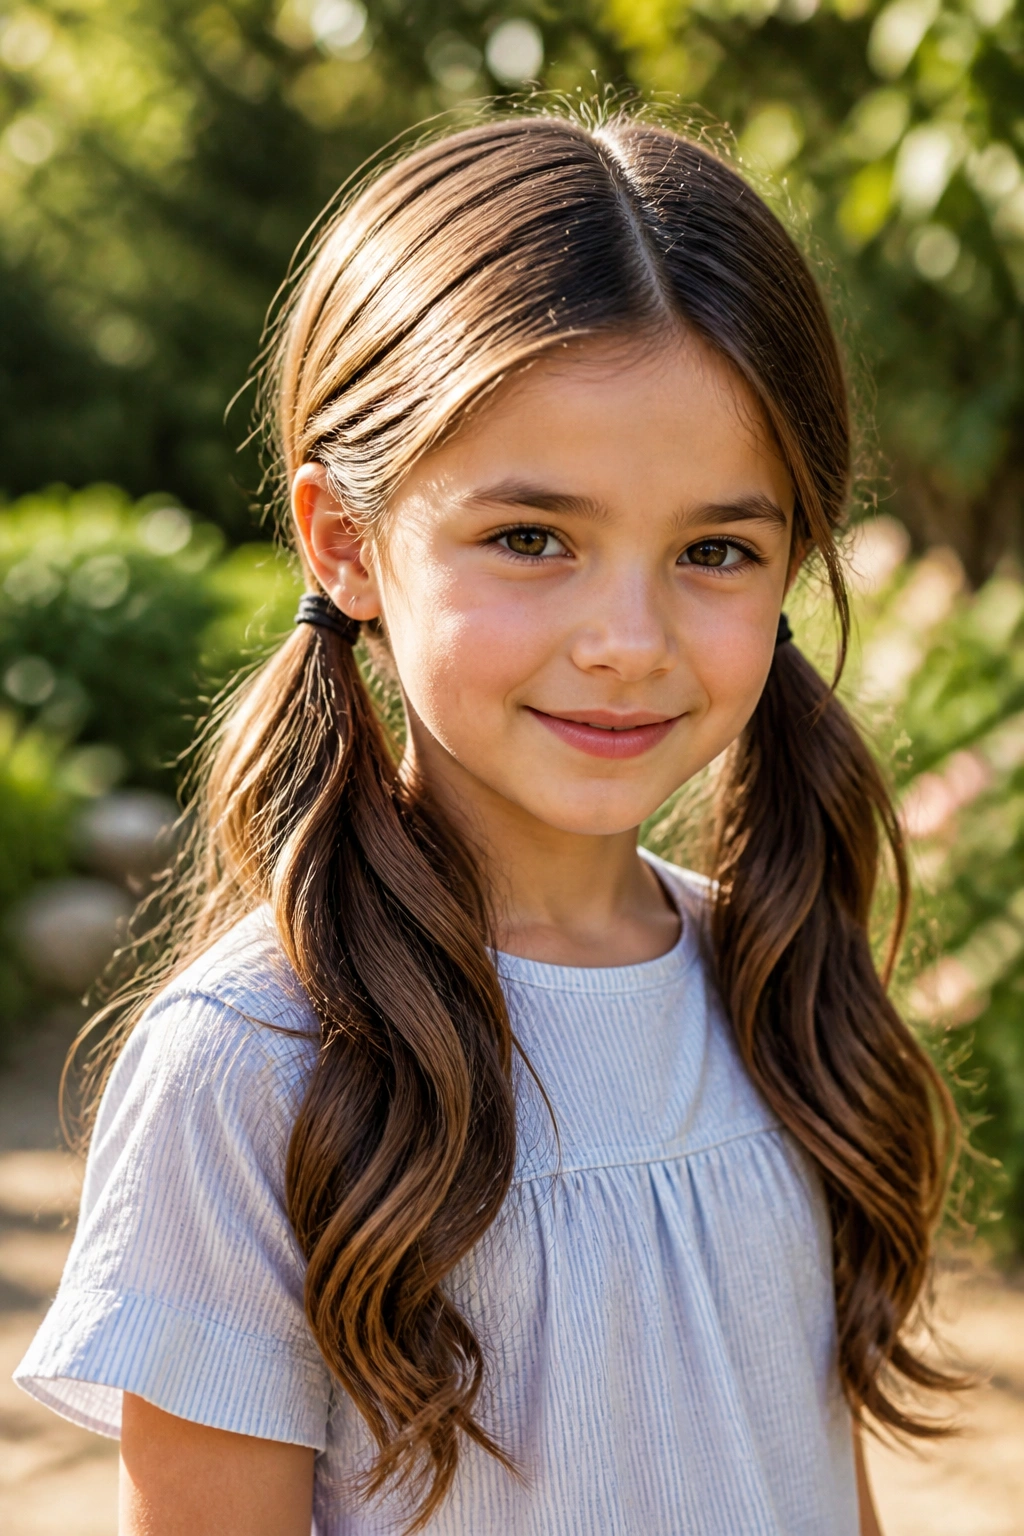
Pigtails can look childish or polished depending on how they are done. The difference is in the placement and the texture.
For a softer look, set the part a little off-center and place the pigtails low or mid-height instead of high and bouncy. If the hair is straight, add soft waves with overnight braids, a few braids undone in the morning, or a heatless curling method if that is part of the routine.
Where this style shines
Pigtails keep the hair out of the face while still leaving plenty of movement around the shoulders. They work well for shoulder-length hair, which can sometimes feel awkward in other styles because it is too short for long braids and too long to leave loose on a windy day.
Use small elastics that do not snag. If the ends puff out, wrap a tiny ribbon or tie a small bow around each base. That makes the style feel finished without making it fussy.
13. Sleek Low Bun
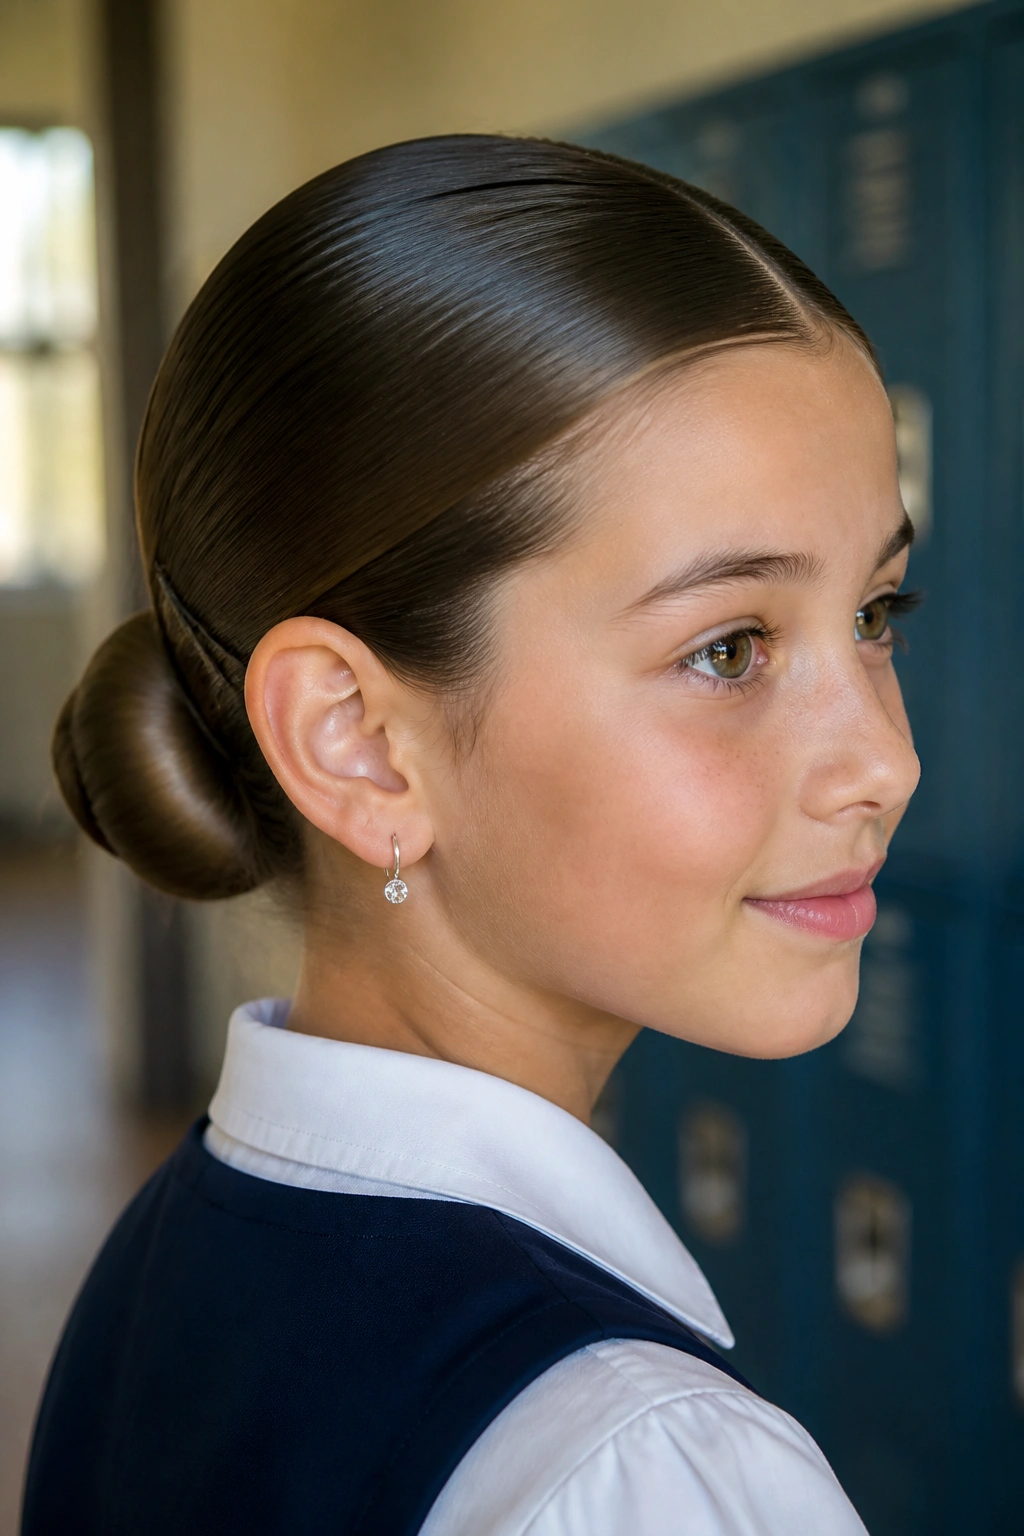
A sleek low bun has a clean, grown-up look without trying too hard. It is one of the neatest ways to handle hair for school uniforms, photo days, or anything where stray pieces would be annoying.
Brush the hair straight back or with a center part, then gather it at the nape. Add a light smoothing cream or gel through the top if flyaways are a problem. Twist the hair into a bun and pin it down with bobby pins placed in a crisscross pattern.
Small details that matter
A wide paddle brush helps here. So does patience. If the top is not smooth before the bun goes in, the finish will show every bump and dent.
This bun is a good choice for thick or frizzy hair because it contains volume instead of fighting it. It can also sit lower and a little looser for a softer look, which is often nicer on younger girls than a tight, severe knot.
14. Twisted Half-Up
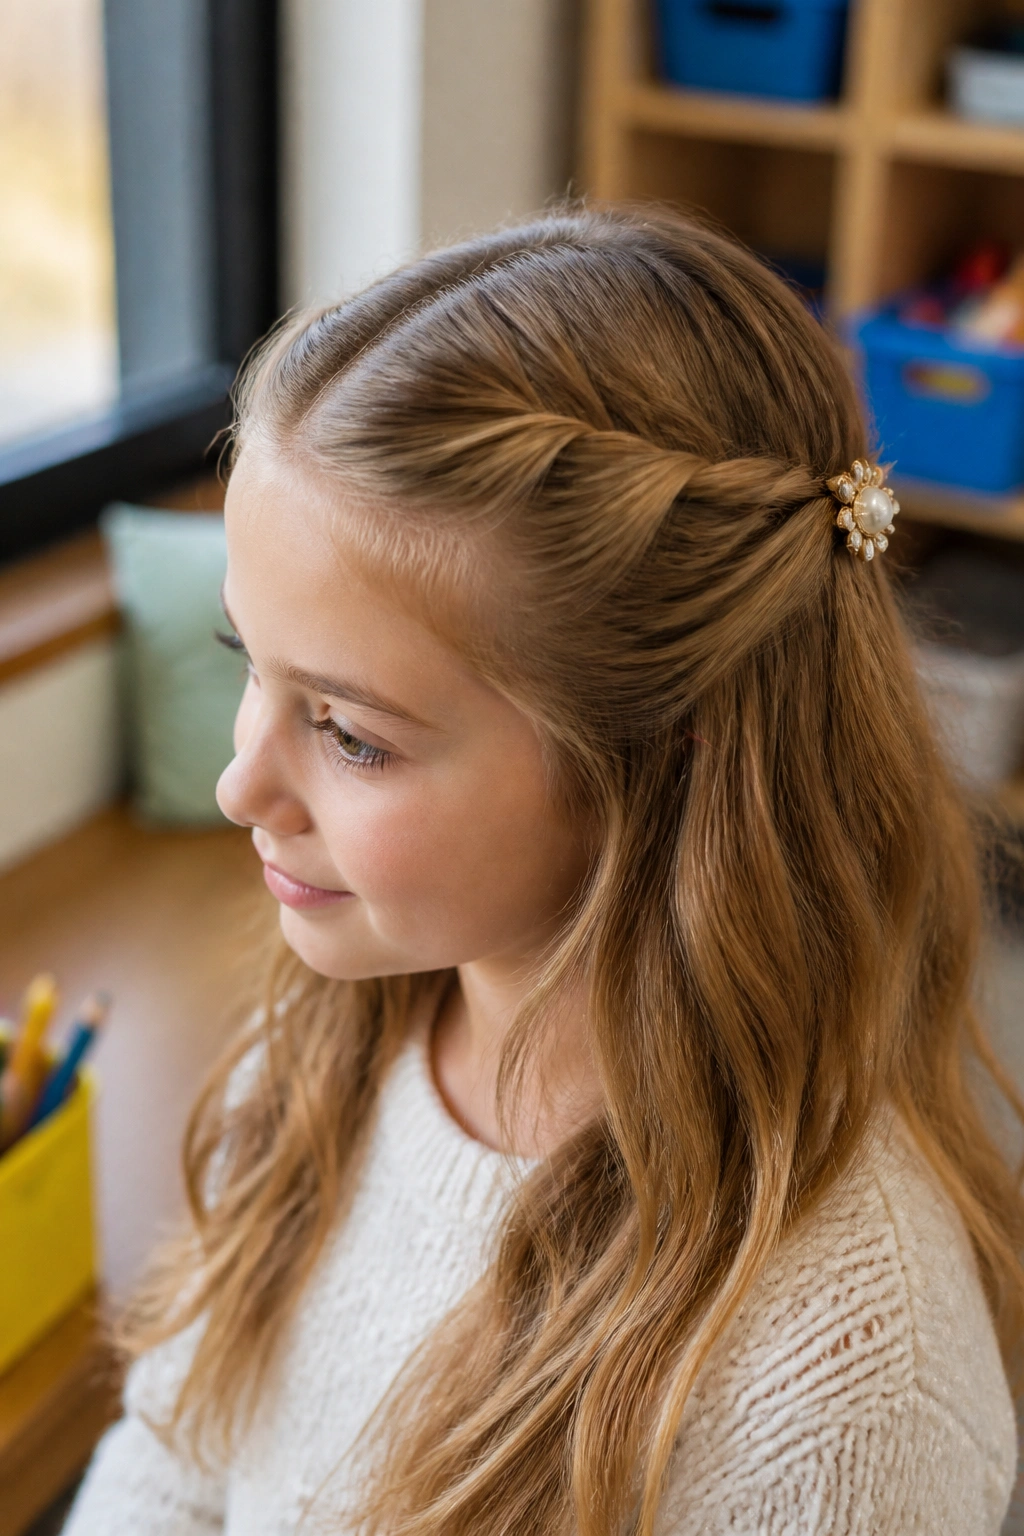
Twisted half-up styles are the fast cousin of braids. They give you shape at the back without asking for neat sections or extra hand strength.
Take two sections from the front, twist each one backward, and pin them together where they meet. If the hair is layered, make the sections slightly thicker so the twist does not disappear into the rest of the hair. A small decorative clip can hide the pinning point and make the style feel more finished.
How to keep it from slipping
Use two crossed bobby pins instead of one if the hair is silky. One pin often slides out by the time the car ride is over.
This style works well with loose waves, curls, and straight hair that has a little texture. It is especially handy when a full braid feels like too much and a ponytail feels too plain.
15. Waterfall Braid
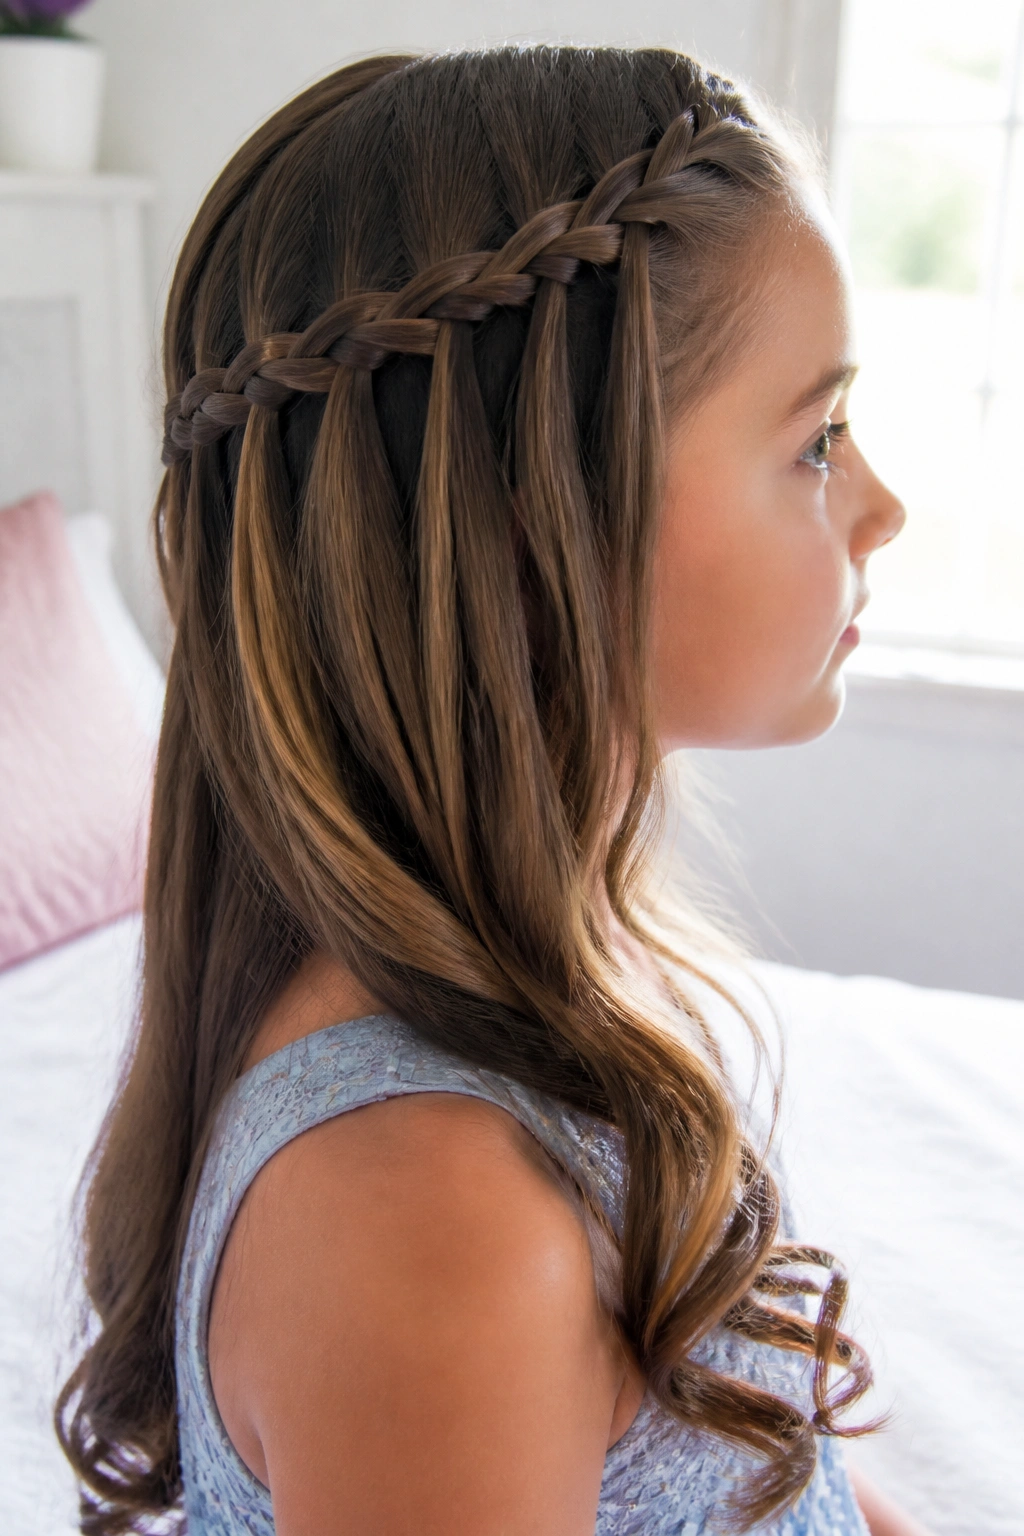
A waterfall braid looks delicate because one strand keeps dropping through the braid like a little cascade. That is where the name comes from, and it fits.
Start near the front hairline and braid across the side of the head. Each time you cross a piece, let the bottom strand fall and replace it with a fresh piece from above. The loose strands that hang through the braid should be roughly even in length, or the pattern starts to look messy.
This style likes smooth hair and a steady hand. It is not the fastest one on the list, and that is fine. Some hairstyles are for speed. This one is for the days when the hair is allowed to be a little more decorative.
A curled finish underneath makes the waterfall effect stand out. Straight ends work too, though they look simpler. Both versions can sit well for birthdays, family gatherings, or school events where the hair is expected to stay neat for a while.
16. Braided Bun
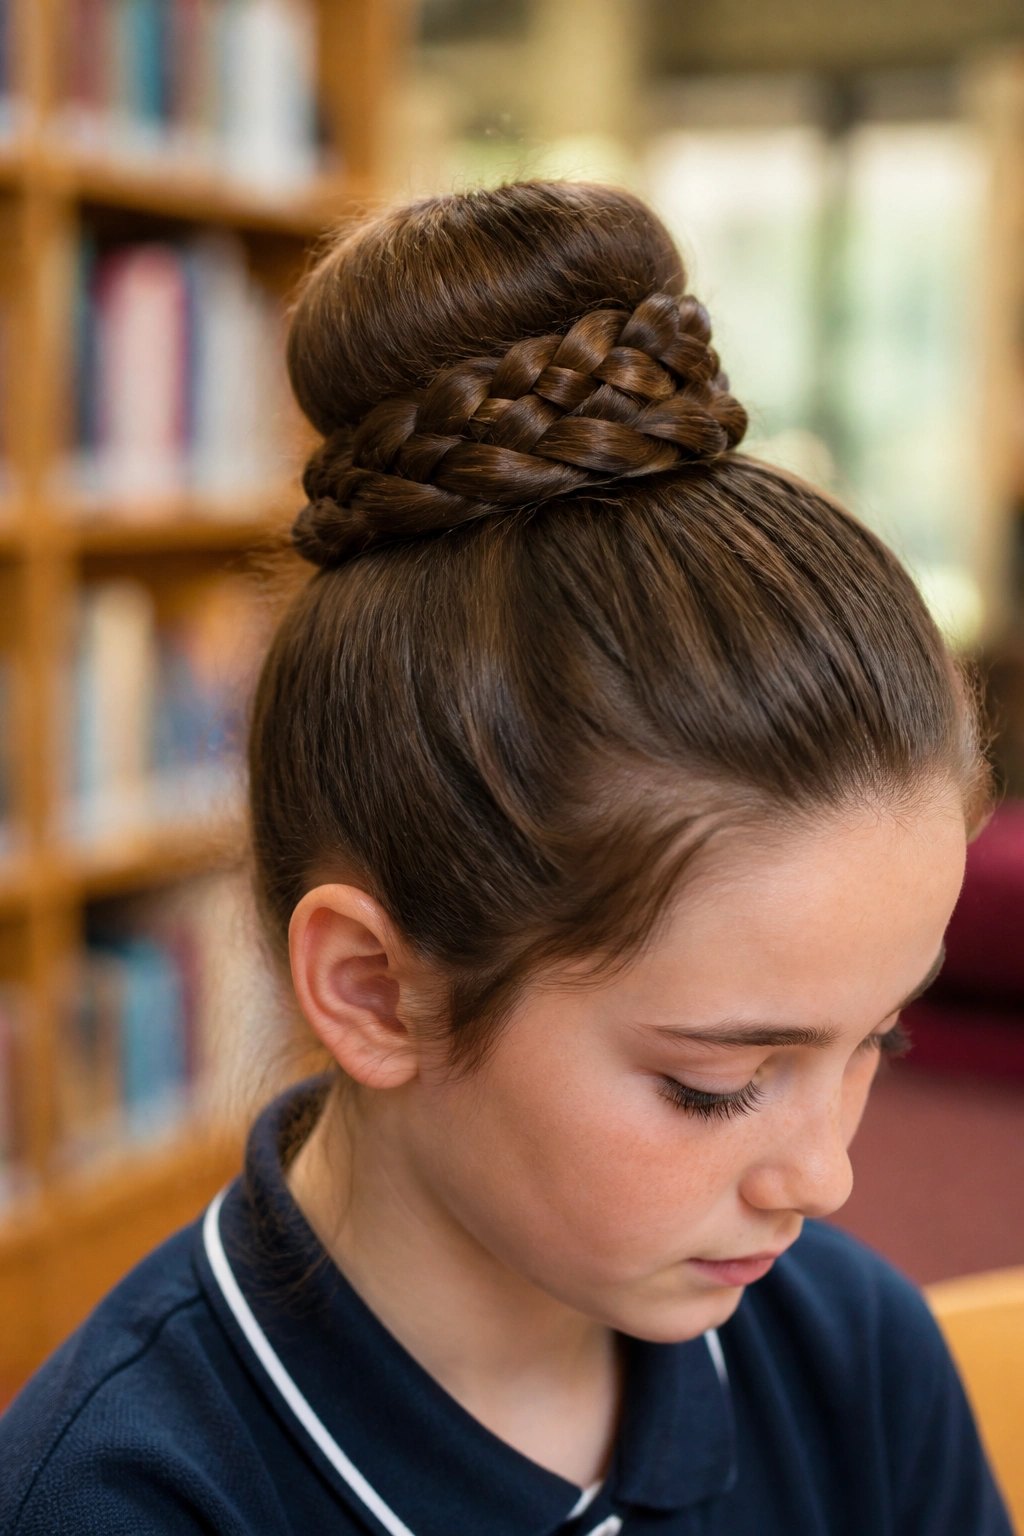
A braided bun has a stronger shape than a plain bun because the braid gives the knot extra structure. It is one of the more useful styles for thick hair, since thick hair can make a basic bun sag.
Make one braid first, then wrap it around its base and pin it in place. A second braid can be wrapped the same way if the hair is especially long or heavy. The finished bun should feel firm when touched lightly, but not so tight that it pulls at the scalp.
What makes it stay
Pins should go in through the braid, not just the outer layer. That helps the bun lock into itself. If the hair is slippery, start with a little dry shampoo or texturizing spray.
The style looks neat from every angle, which is part of its appeal. You do not get a messy side that needs hiding. You get a tidy circle of braid that can handle a full day without much fuss.
17. Pull-Through Braid
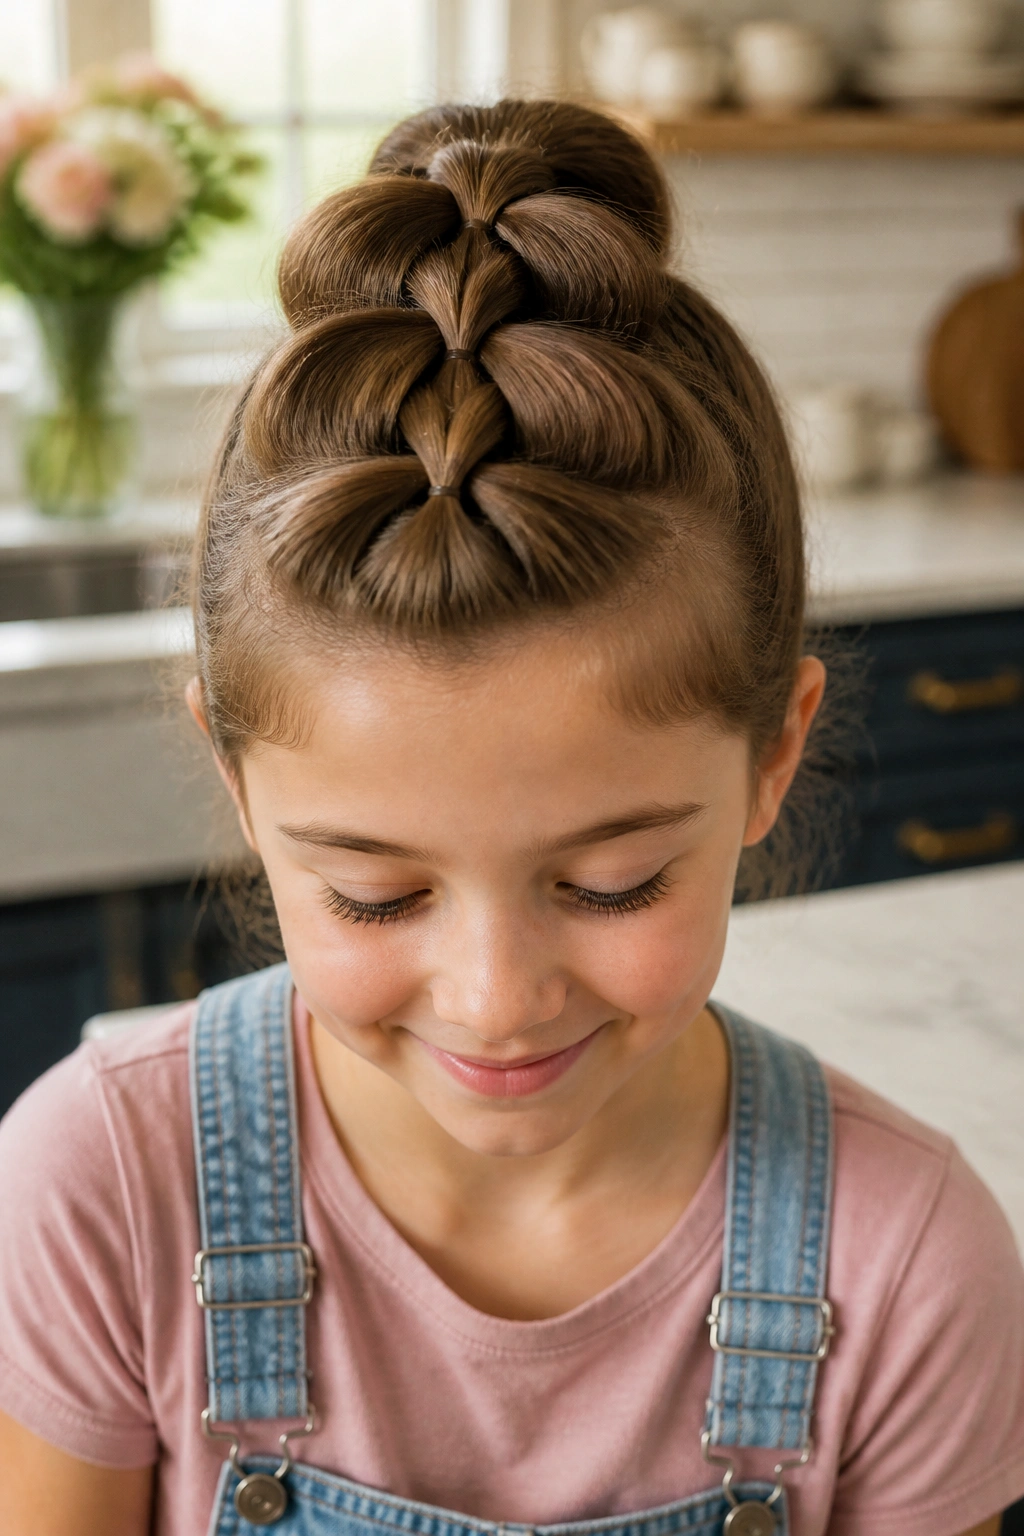
A pull-through braid gives the look of a thick braid without actually weaving strands over and under. That makes it a nice choice for parents or kids who can manage ponytails but not intricate braiding.
Start by making a small ponytail at the crown. Create a second ponytail underneath it, split the top ponytail in half, and bring the lower ponytail up through the middle. Keep repeating with new sections. The result looks full, almost padded, even on fine hair.
Good to know
- Use clear elastics if you want the braid itself to show.
- Keep each section brushed smooth before clipping it in.
- Pull the loops gently for volume after the last elastic is secure.
This style can take a little longer than it first appears, but it gives a lot of shape. It works on medium to long hair and is useful when someone wants a braid that feels fuller than a regular one.
18. Heart-Shaped Braid Accent
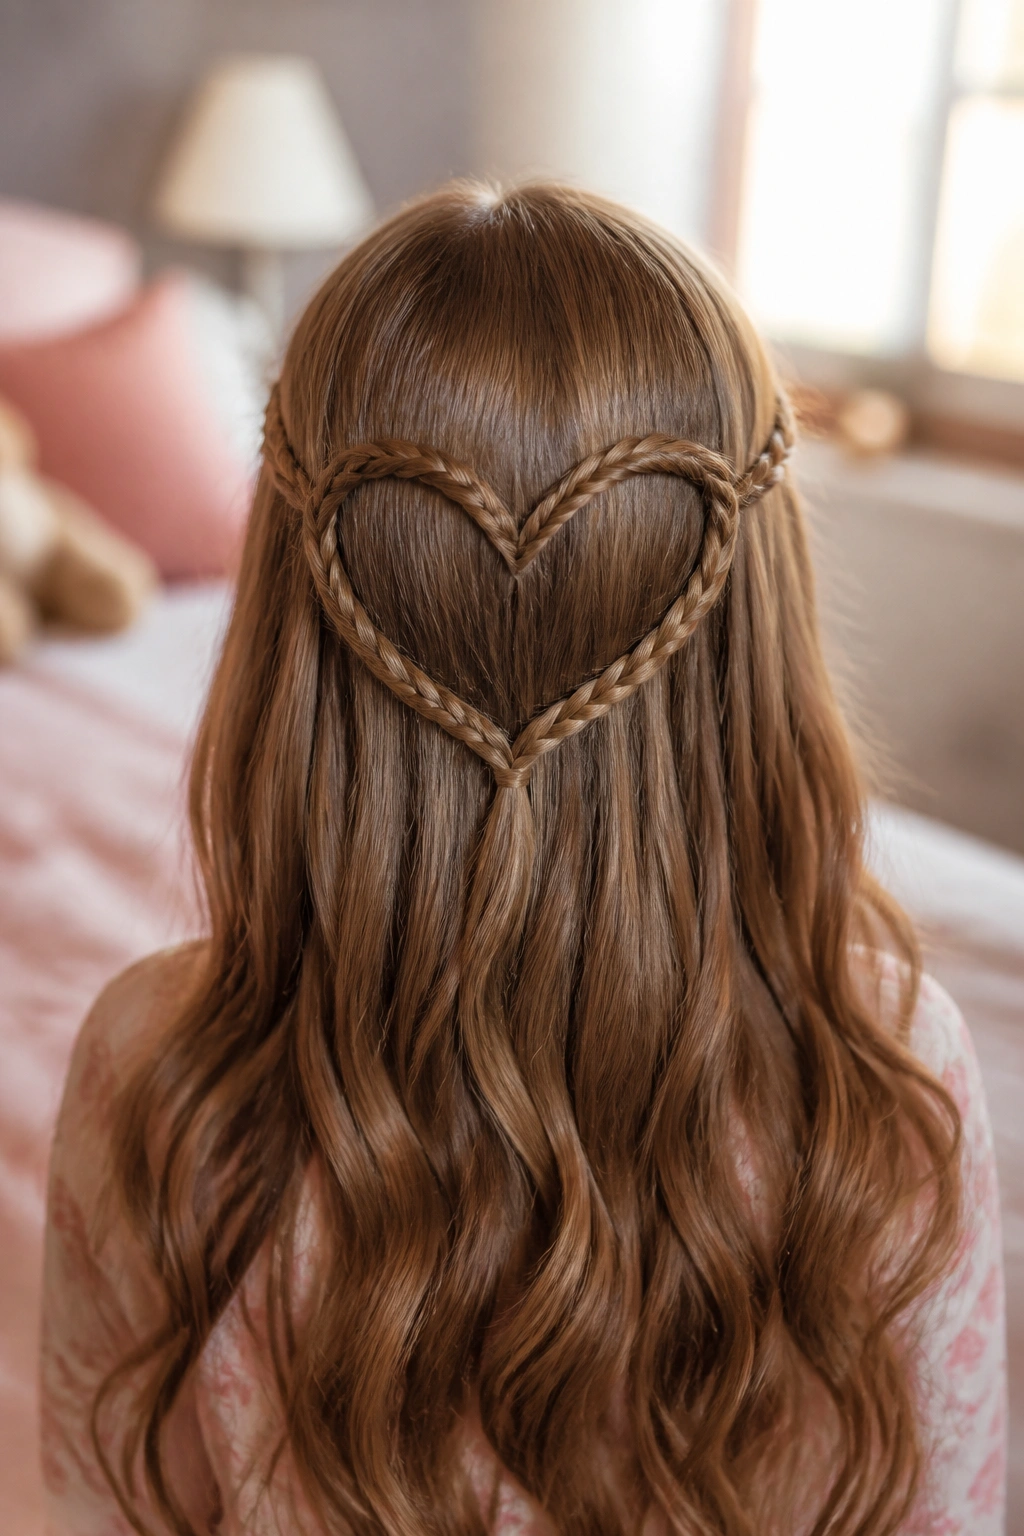
A heart-shaped braid accent is a little more decorative, and yes, it takes more patience. But it is one of those styles that turns a basic hair day into something memorable without needing curls, heat, or a ton of accessories.
The easiest version uses two thin braids. Part the hair near the center, braid one thin section from each side, curve them inward toward the back, and pin the ends so they form the top curves of a heart. A small elastic or ribbon can hide the center point where the braids meet.
Why people like it
It works because it feels special without covering the whole head in heavy styling. The rest of the hair can stay down, in a ponytail, or in soft waves. That keeps the style from looking too fixed or stiff.
This one is best for a girl who enjoys a bit of detail in her hair. If precision is not your thing before breakfast, save it for a slower morning.
19. Side-Swept Braid
A side-swept braid has a relaxed shape that flatters almost everyone. It also keeps the braid visible, which is nice if the hair is dark or very thick and a back braid tends to disappear.
Pull all the hair over one shoulder and start the braid near the opposite temple or just behind the ear. Keep the top flatter and let the braid loosen a little as it falls forward. A tiny bit of volume at the crown makes the shape prettier than a flat braid pressed against the head.
This style is especially good for layers. Loose pieces near the face are not a problem here; they make the braid look softer. It also works on second-day hair because the braid grips better when the hair is not freshly washed and slippery.
A side-swept braid is one of those styles that can be neat enough for school and soft enough for pictures. That is a useful combination.
20. Two Low Buns
Two low buns feel balanced and tidy. They can be small and close to the neck, or a little fuller and placed behind the ears. Either way, the symmetry is part of the charm.
Make two low pigtails first, then twist each one into a bun and secure it with pins or a second elastic. If the hair is thick, divide each pigtail into two sections before coiling so the bun does not get bulky in one place.
A practical note
This is one of the better styles for active days because the hair stays off the neck and does not swing around. It also works well for dance or dress-up days when a high bun feels too tall and a ponytail feels too plain.
A few soft pieces around the hairline can make the style less severe. If the goal is a neat finish, smooth those pieces back. If the goal is a gentler look, leave them.
21. Headband Tuck
The headband tuck is old-school in a good way. It gives a soft rolled shape that looks polished, and it does not need much more than a stretchy headband.
Put the headband over the hair, then tuck sections of hair up and over the band until the ends disappear. Start near the front and work backward in 1-inch sections if the hair is short to medium length. Longer hair may need to be tucked in smaller pieces so the roll stays even.
How to make it behave
A little grip helps. Hair that is too clean can slip out, so a light mist of texture spray or dry shampoo at the roots makes the tuck hold better.
This style is one of the better options for girls who dislike hair touching the neck. It stays neat, works without heat, and has a soft shape that feels different from a bun or ponytail. The finish is clean, but not rigid.
22. Claw-Clip Twist
A claw-clip twist is fast, practical, and far more useful than people give it credit for. If the hair is medium to long, a good clip can hold a style that looks intentional in under a minute.
Gather the hair at the back, twist it upward, fold the twist inward, and clip it from the base. The shape depends on the clip size. Fine hair can use a smaller clip with a stronger spring. Thick hair needs a larger clip or the twist will slip out when the head moves.
This style is nice when the hair needs to be off the neck but not fully pinned. It also works for school pickup, errands, or any stretch of the day where a brush is not handy and nobody wants a full styling session.
If a few ends stick out, let them. A claw-clip twist looks best when it reads as easy, not forced.
23. Ribbon-Woven Braid
A ribbon-woven braid gives a simple braid a more dressed-up look without changing the basic shape. The ribbon can match an outfit, a school color, or just the mood of the day.
Start the ribbon at the top of the braid and fold it into one of the three sections, or tie it to the first strand and braid it through as you go. A satin ribbon about 1/4 to 1/2 inch wide usually sits neatly without crowding the braid. Wider ribbon can work, but it takes a stronger braid to hold it.
The braid should stay even, so keep the ribbon flat as you work. If it twists too much, the braid starts to bulge in odd places. That is easy to fix, though. Unwrap the last few inches and set it again.
This style is a nice middle ground: more detailed than a plain braid, less fussy than a full updo.
24. Zigzag Part Ponytails
A zigzag part does more than people expect. It turns a basic pair of ponytails into something that feels playful before the hair is even tied.
Use the pointed end of a comb to create a zigzag line down the scalp instead of a straight center part. Then make pigtails or ponytails as usual. The parting gives the style a little edge, and it works especially well when the hair itself is plain or naturally straight.
Quick ways to finish it
- Add colored elastics at the bases.
- Keep the ponytails low for a softer look.
- Make them high if the goal is bounce and movement.
The important part is the clean parting. Once the line is crisp, the rest can stay simple. That is what makes this style so useful. It looks as if there was more planning than there really was.
25. Milkmaid Braid
A milkmaid braid wraps braids across the top of the head, which gives it a sweet, tidy shape that stays put. It is one of the more useful styles for long hair that needs to stay out of the way but still look finished.
Make two braids, one on each side, then bring them up and across the crown. Tuck the ends under the opposite braid and pin everything securely. The braids should sit low enough to feel stable and high enough to show the shape around the head.
Small adjustment, big difference
If the braids are too tight, the style can look stiff. If they are too loose, they will sag by midday. Aim for a braid that can be lifted slightly off the head without collapsing.
A milkmaid braid works well with middle parts and side parts. It also handles long layers better than people expect, as long as the hidden ends are pinned firmly. Strong pins are not optional here.
26. Curly Puff Ponytail
A curly puff ponytail celebrates texture instead of flattening it. That is why it matters. Curly and coily hair often looks best when it is gathered in a way that keeps the shape full and soft.
Use fingers or a wide-tooth comb to gather the hair into a high or mid-high ponytail. A satin scrunchie is gentler than a tight elastic, and a little leave-in conditioner at the roots can help with dryness and frizz. Do not brush the curls into submission; that just makes the puff lose shape.
The ponytail can stay rounded and airy, or it can be stretched a bit with a pick for more height. Either way, the point is to show the texture, not hide it. That makes this one feel different from the straighter ponytail styles above.
A few face-framing curls are nice here. They soften the hairline and keep the style from looking too strict.
27. Four-Strand Braid
A four-strand braid looks more intricate than a classic braid, but it is mostly a matter of keeping track of the pieces. Once the order is clear, the pattern settles in.
Divide the hair into four sections. Cross the outer strand over the next, then under the next, and repeat in the same rhythm all the way down. Keeping the sections even is the hard part, so clip the unused strands away at the top if that helps. A small mirror can also help the first few times.
What to expect
The braid has a flatter, ribbed look that stands out on long hair. It is a smart choice when a girl wants a braid that feels a little different without jumping into something fussy or full of pins.
A four-strand braid needs patience. Not a lot. Just enough to keep the sections from tangling in your hands. Once finished, it holds well and looks tidy from morning to afternoon.
28. Rope Braid Ponytail
A rope braid ponytail is one of the simplest ways to make a ponytail look more finished. It uses twisting instead of weaving, so it comes together fast and stays neat.
Make a ponytail first. Split it into two sections, twist each section in the same direction, then wrap them around each other in the opposite direction. That opposite twist is what makes the rope hold. If both twists go the same way, the braid falls apart faster.
This style is good for medium to long hair and works especially well when the hair has a little texture already. A light mist of spray or a small amount of pomade on the ends keeps the twist from unraveling.
It is tidy, quick, and less fussy than it looks. Pick it when the morning is moving fast and you still want something with a little shape.
A hairstyle only has to do three things well: hold, flatter the hair you actually have, and survive the day without turning into a problem. Pick the one that matches the hair under your hands, not the one that looks hardest on a screen.
