



Wavy hair has a stubborn streak. Leave it alone and it looks relaxed; fuss with it too much and the top layer turns fuzzy before lunch. That’s why the smartest natural hairstyles for wavy hair are the ones that work with the bend you already have.
I keep coming back to low-tension styles for this texture: half-up twists, loose braids, clipped-back crowns, little knots at the nape. They protect the wave pattern instead of flattening it under too much brushing or too much product.
Loose 2A bends, fuller 2B waves, and more defined 2C texture all behave a little differently, but they share the same headache. Heavy styling at the roots makes the crown go limp, while tight ties leave a crease that hangs around far longer than it should.
The looks below are built for real life — school runs, office days, dinner plans, and those mirror checks you do when you’re halfway out the door. Some are polished, some are a little undone, and a few are almost offensively easy. Start with the simplest shape first: a center part that lets the wave pattern do the work.
1. Air-Dried Center Part for Wavy Hair
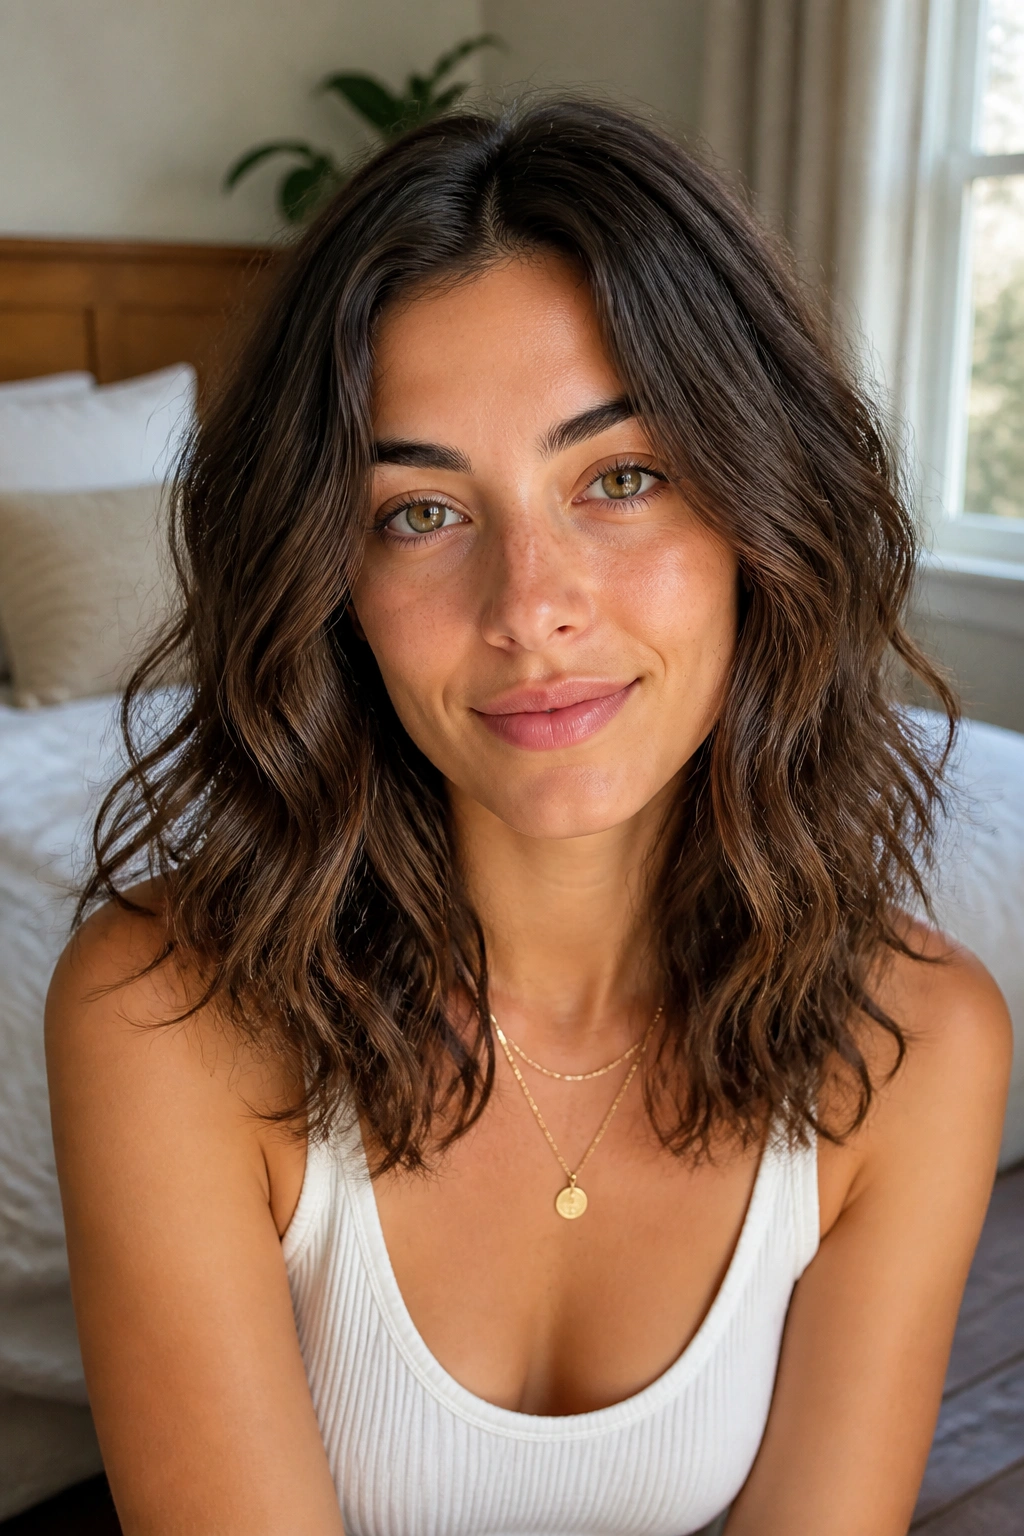
A clean center part is often the easiest way to make wavy hair look intentional without making it stiff. When the hair dries in its own bend, that straight line down the middle gives the waves something to frame, and the whole style looks calmer than a side part that keeps getting pushed around.
This works especially well if your waves fall in soft S-shapes and you don’t want to pile on clips or braids. A light mousse or curl cream on damp hair helps the ends stay together, but the real trick is not overworking the crown. Fingers do the job better than a brush here.
- Best for shoulder-length or longer hair
- Strong choice for second-day waves
- Use a wide-tooth comb only on damp hair
- Tuck one side behind the ear if you want a softer finish
Pro tip: flip your part while the hair is still damp, then switch it back once it’s mostly dry. That tiny reset gives the roots a little lift without heat.
2. Side-Swept Waves With One Tucked Side
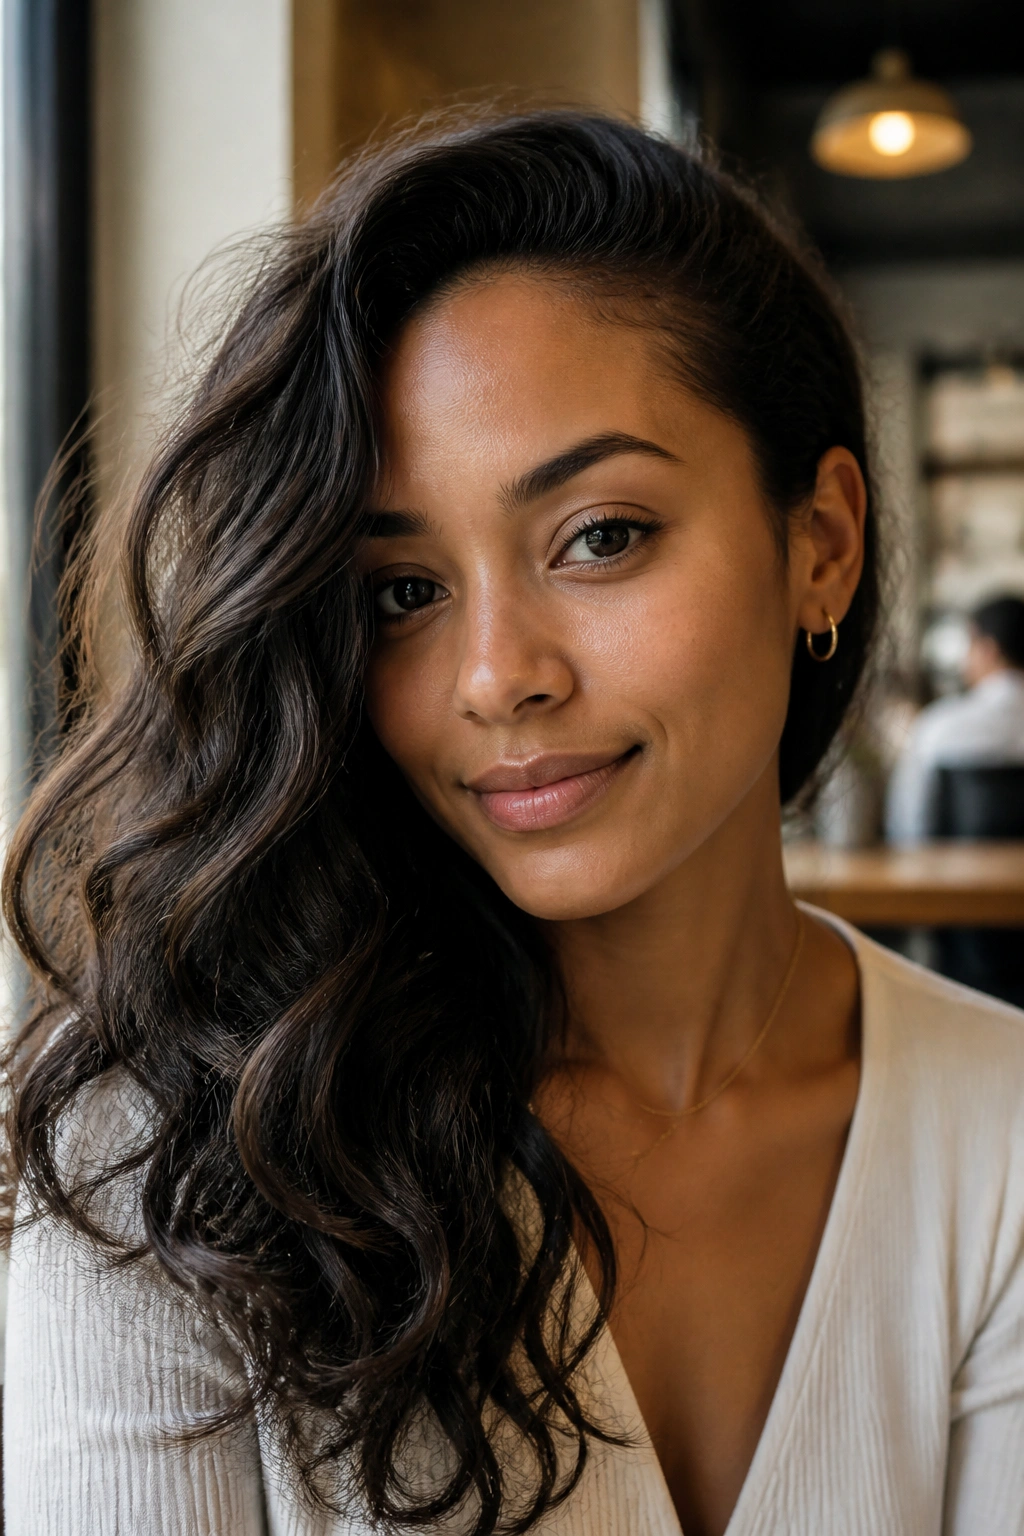
Why does a side-swept shape flatter wavy hair so often? Because it gives the front pieces somewhere to land. Instead of letting shorter layers float around your face, you guide them to one side and let the rest of the wave pattern stay loose.
Why It Helps Wavy Hair
A deep side part can make the crown look fuller, which is useful if your roots flatten fast. Tucking one side behind the ear also keeps the style from feeling too busy, and it’s a nice fix on days when the front layers keep slipping into your eyes.
How to Wear It
Use a single bobby pin, a decorative barrette, or even a small claw clip near the temple. If your hair is fine, keep the tuck loose and place the pin under a top layer so it doesn’t show. If it’s thick, press the tucked side flat with your hand for a second before pinning — that extra hold matters.
One tidy side, one loose side. Done.
3. Half-Up Twist Crown
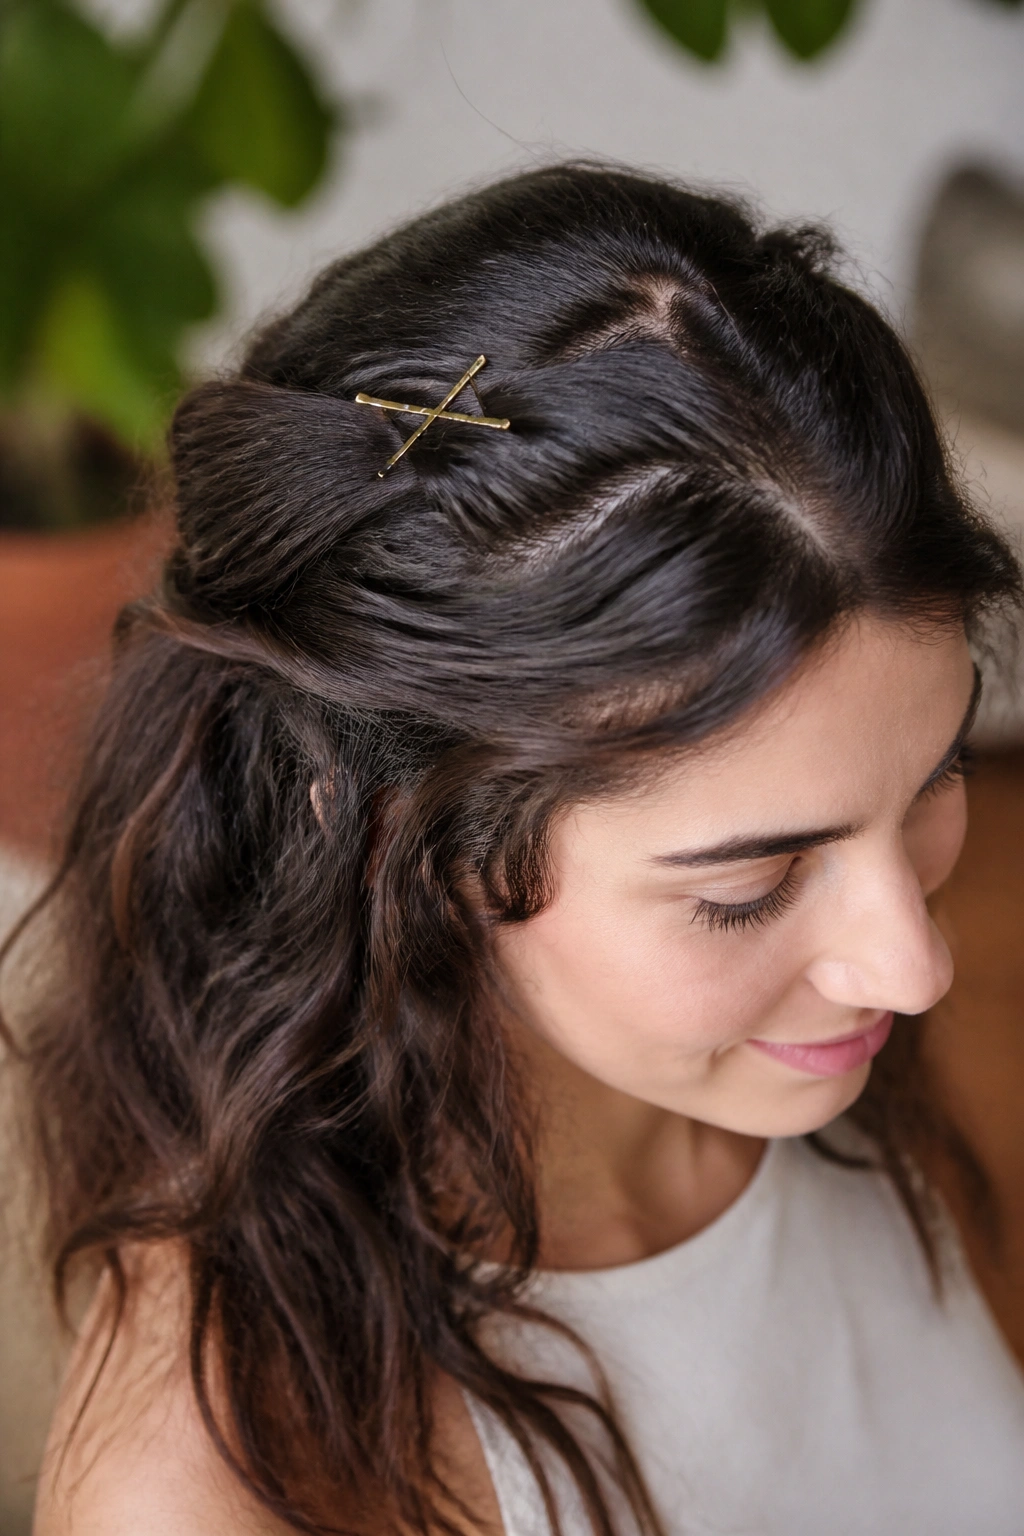
Picture the hair you didn’t wash last night. The roots have a little lift, the mid-lengths still hold their bend, and the ends are doing that soft, sleepy curve only waves seem to get. A half-up twist crown makes that texture look deliberate instead of accidental.
Take a section from each temple, twist it back toward the crown, and secure the two pieces together with two crossed bobby pins. Crossing the pins in an X keeps the style from sliding, which is useful if your hair is slippery or layered.
Quick Notes
- Works well on medium and long wavy hair
- Looks especially good with face-framing pieces left out
- Two pins are usually better than one
- Light texturizing spray helps if your hair is freshly washed
One small thing: keep the twists loose. Tight twists make the top look narrow, and wavy hair usually looks better when it keeps a little width through the crown.
4. Claw-Clip French Twist
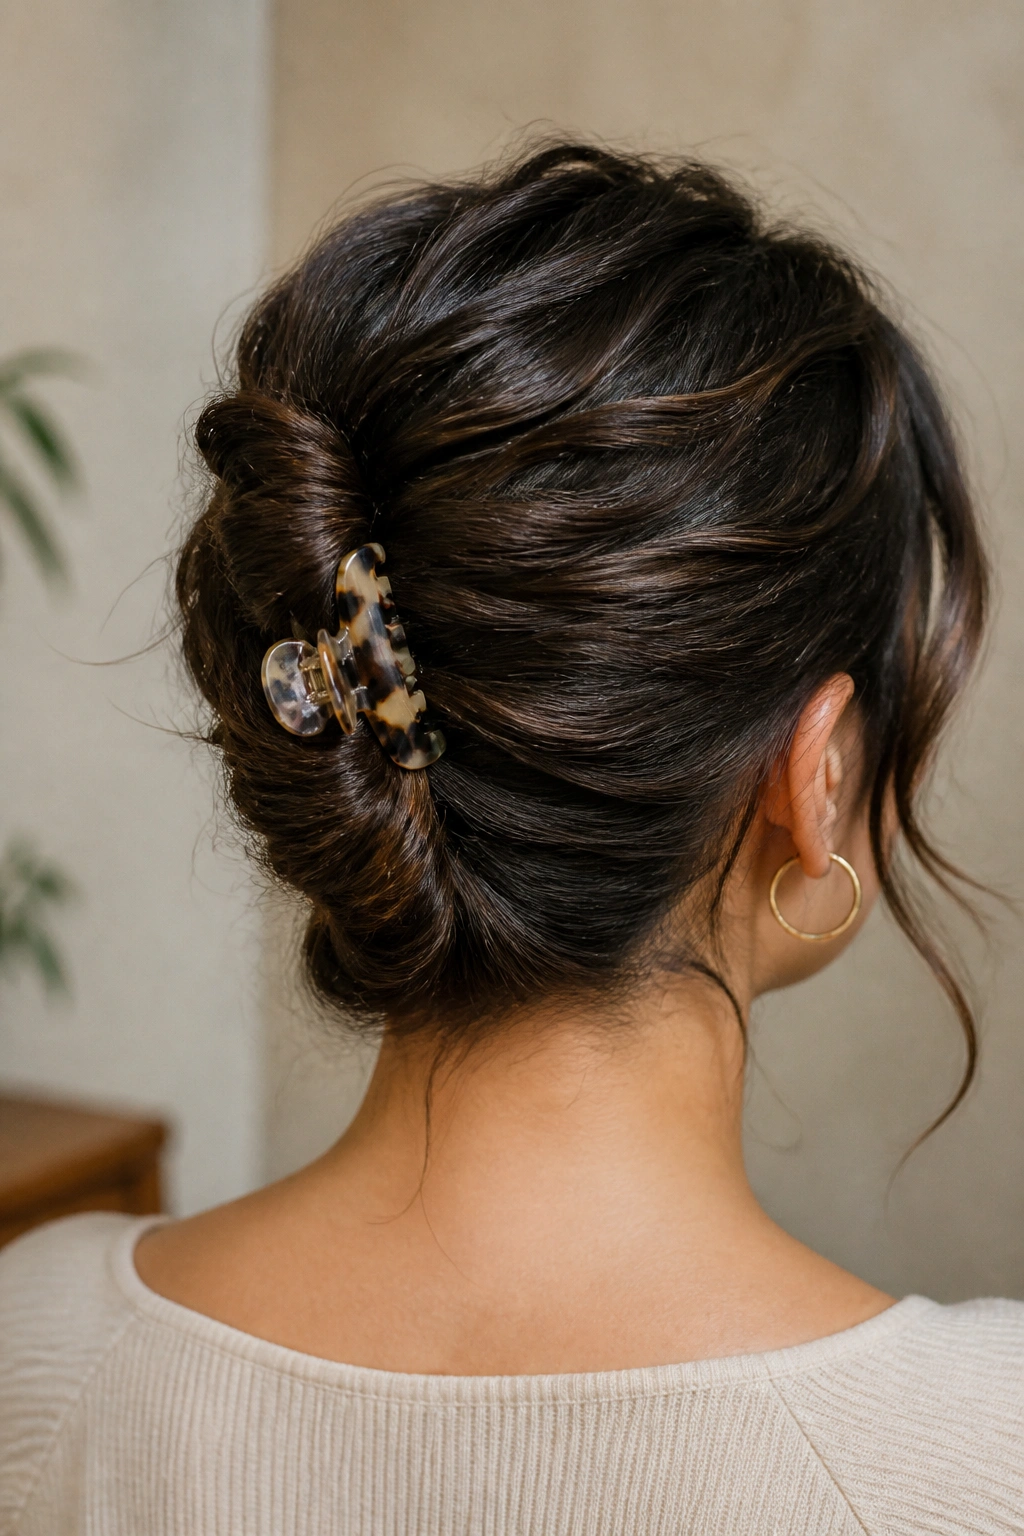
A claw clip is the laziest good-looking fix in the room. I mean that kindly. The French twist version works because it lets the wave pattern keep moving while the clip does the heavy lifting.
Gather the hair low, twist it upward, and fold the length in on itself before clipping near the center back of the head. Leave the ends a little loose if you want a softer look, or tuck them fully inside for a cleaner finish. The shape should feel secure, not clenched.
This is a strong choice for day-two waves that have enough texture to hold. Fine hair may need a smaller clip with teeth that grip well. Thicker hair usually does better with a medium or large clip and a little pin reinforcement at the sides.
If your hair keeps falling out of clips, the fold is probably too tight. Open it up a touch.
5. Loose Low Bun
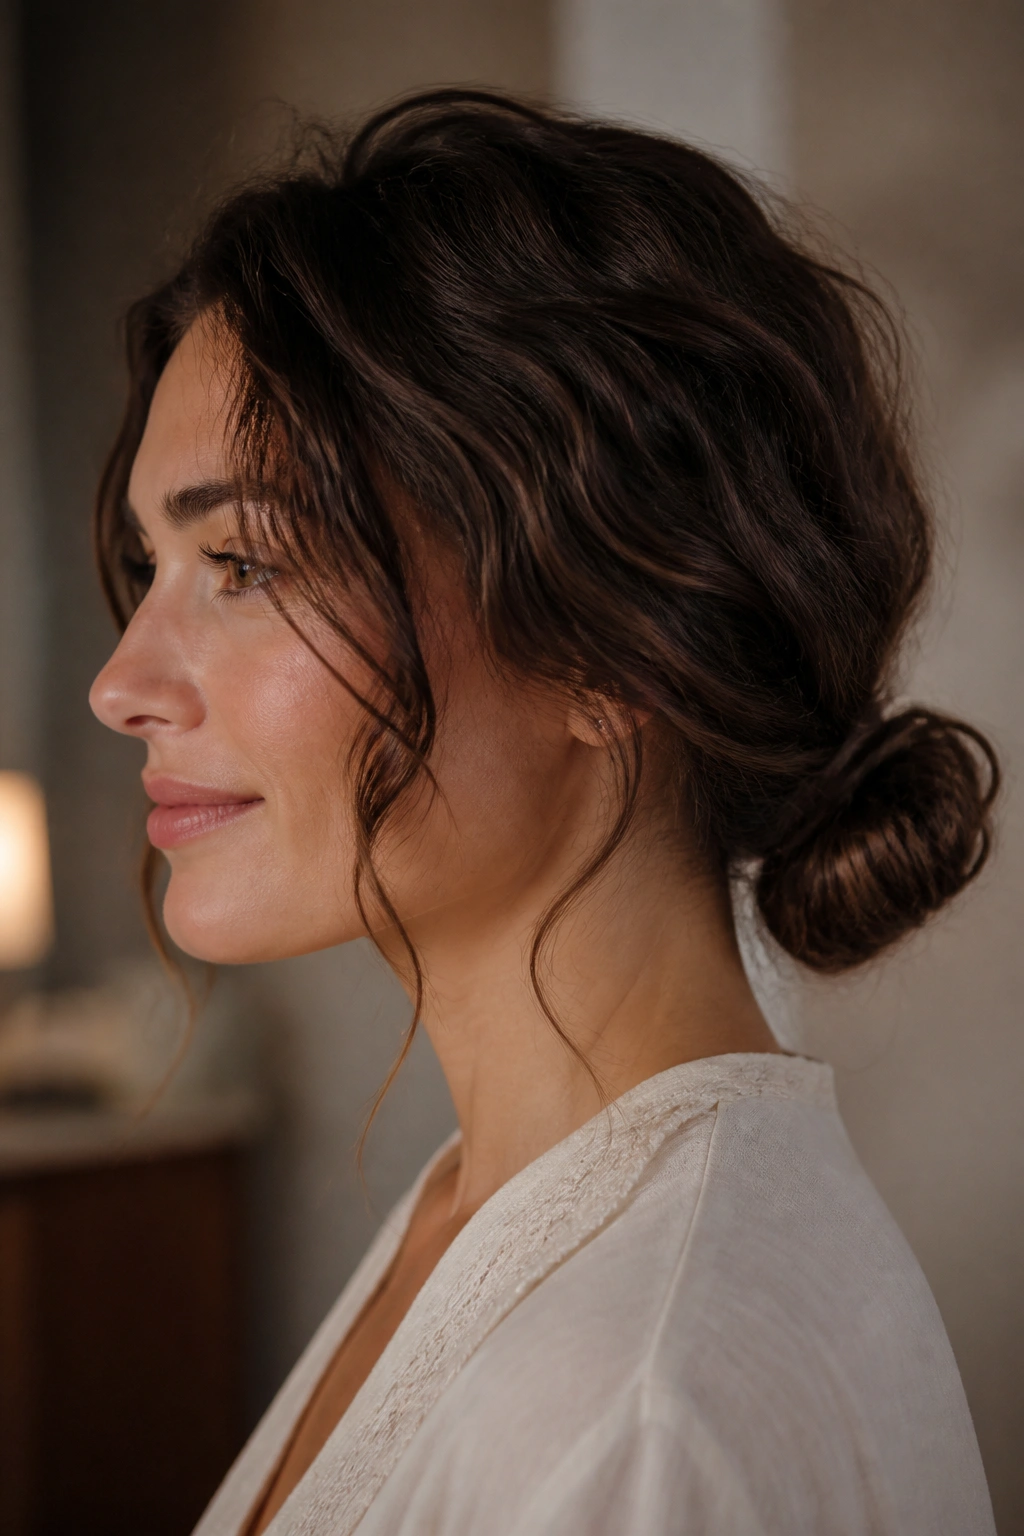
A low bun should feel like it was tied with ribbon, not cinched with wire. That matters with wavy hair because the texture around the nape is where the style gets its softness.
Pull the hair back to the nape, twist once or twice, and wrap it into a bun without smoothing every strand flat. Let a few pieces slip out near the ears and along the hairline. Those loose edges stop the look from turning severe.
Keep It Soft
Use one hair tie first, then add a pin or two to lock the bun in place. A second tie can work if your hair is very thick, but it often makes the bun sit too high and too stiff. The goal is a shape that moves a little when you turn your head.
This one is excellent for work, errands, or a quick dinner out. It also hides frizz better than people expect, which is half the reason I trust it so much.
6. Rope-Braid Ponytail
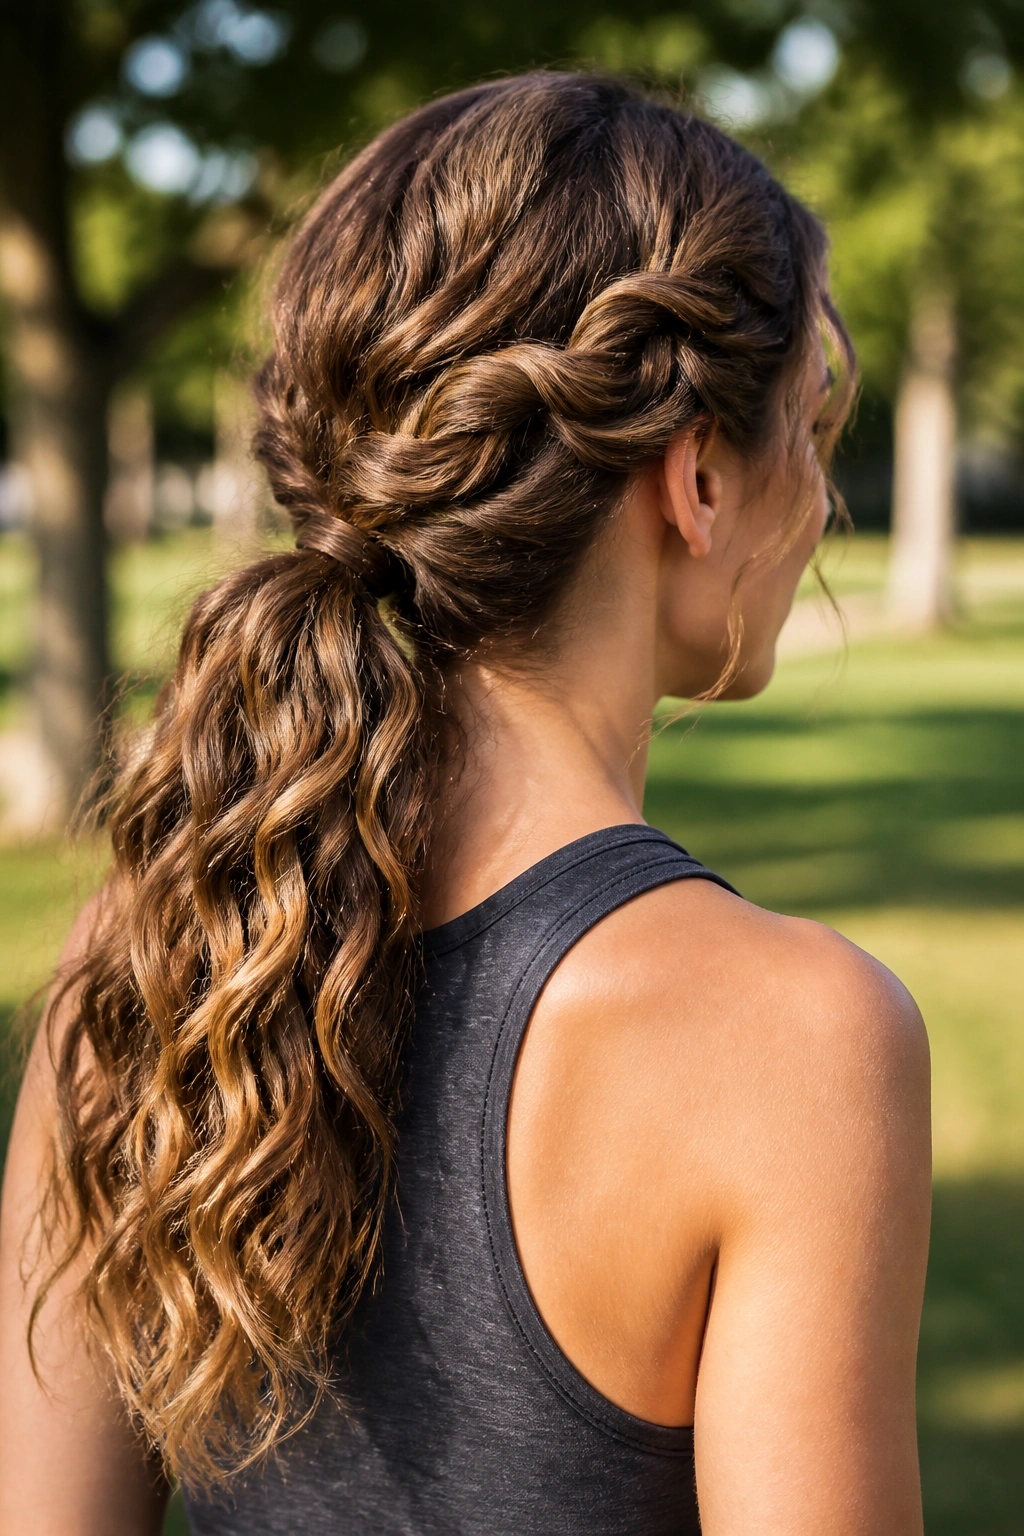
Rope braids sound fussy, but they are friendly to waves. Split the ponytail into two sections, twist each section in the same direction, then wrap them around each other in the opposite direction so the braid locks into place.
The result looks cleaner than a normal ponytail and keeps the ends from puffing out in all the wrong spots. If your hair is thick, this style can control bulk without making the head feel squeezed. If it’s fine, keep the twists loose so the braid doesn’t go flat.
I like this one when the hair is a little rough around the edges and needs shape more than polish. The wave pattern still shows through, especially in the tail, which makes the whole thing look more natural than a standard sleek ponytail.
A tiny elastic at the bottom helps, but a clear one usually disappears better.
7. Braided Headband
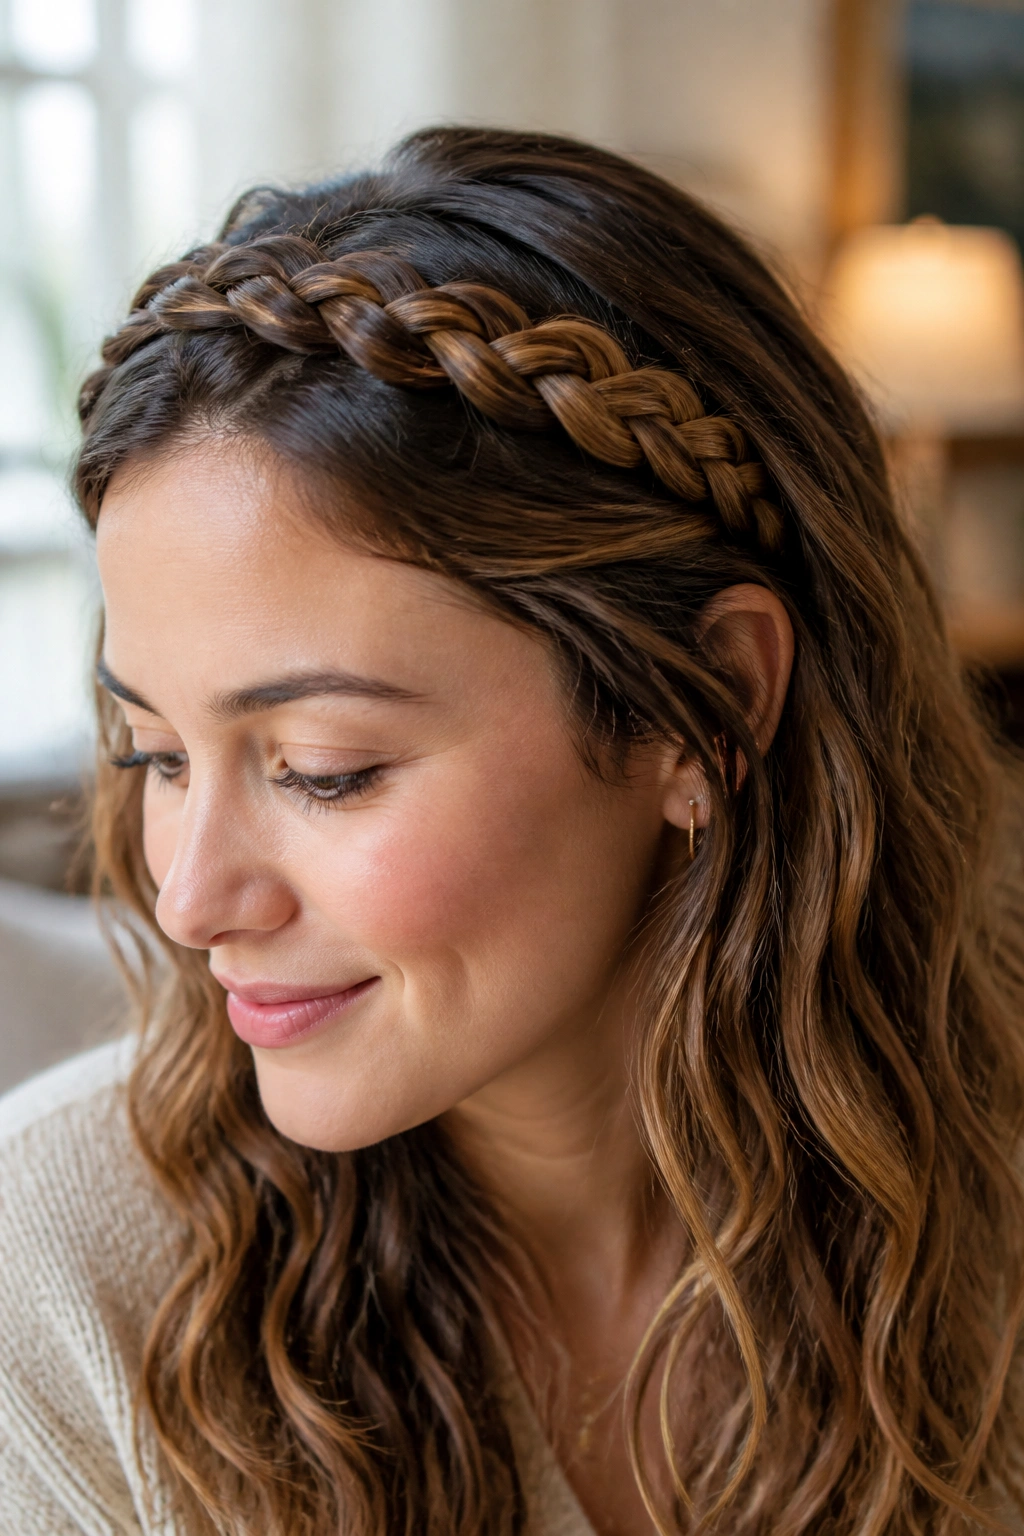
Need a way to keep front pieces off your face without flattening the rest? A braided headband does that job neatly. It uses one section of hair as a built-in accessory, which is one of those tricks that sounds fancier than it is.
Where to Place the Braid
Start at one temple, braid along the hairline, then pin the end behind the opposite ear. A three-strand braid is enough. No need to make it tight or perfect. Loose tension keeps the braid from carving a hard line into the waves around it.
What to Watch For
- Keep the braid about one inch back from the hairline
- Use a fine pin under the braid’s tail
- Leave the rest of the hair down and wavy
- Add a small mist of flexible hold spray if your layers slip
This style looks especially nice on shoulder-length cuts, where the braid has enough hair to stay visible but not so much that it starts competing with the rest of the style.
8. Bubble Ponytail
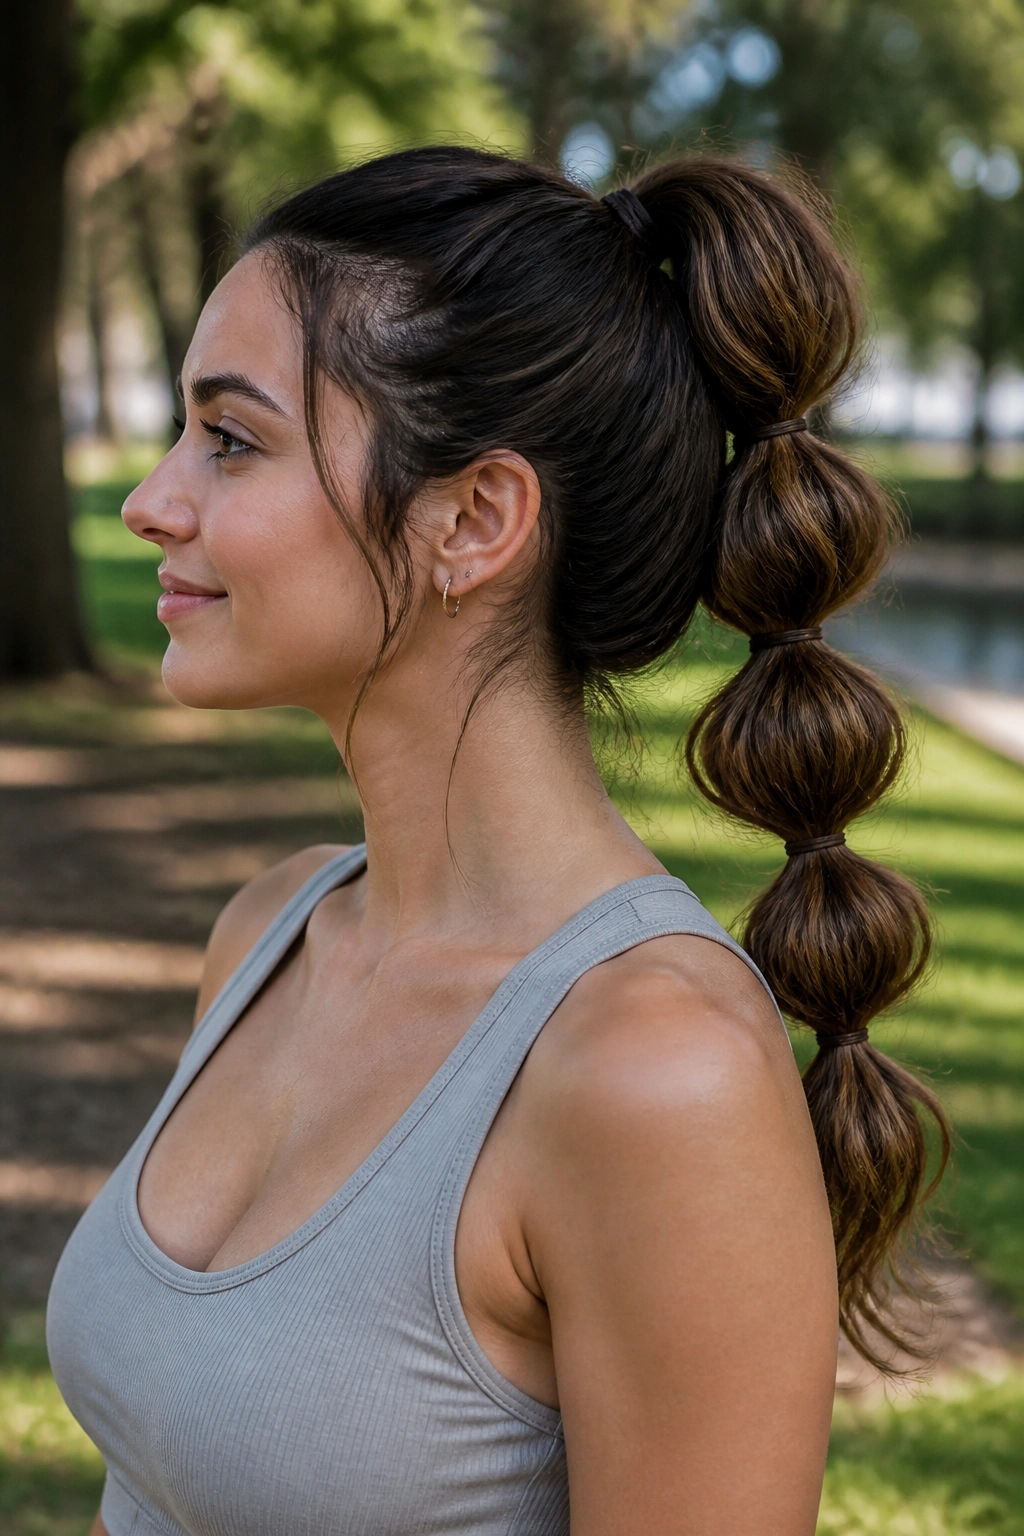
A bubble ponytail gives wavy hair something it likes: movement inside structure. Instead of forcing the tail into one narrow shape, you break it into little sections with elastics and puff each section out with your fingers.
Tie the hair back in one ponytail, then add small bands every 2 to 3 inches. After each band, tug the hair gently between the elastics until a rounded “bubble” forms. The waves create a soft, uneven texture inside each section, and that is the whole point.
This style works well when the ends need a little help. It also keeps long waves from tangling as much as they would in a loose ponytail. If you want a cleaner look, wrap one strand around the base and pin it under the first elastic.
A bubble ponytail can read playful or polished depending on how neat you make the sections. That range is useful.
9. Loose Dutch Braid
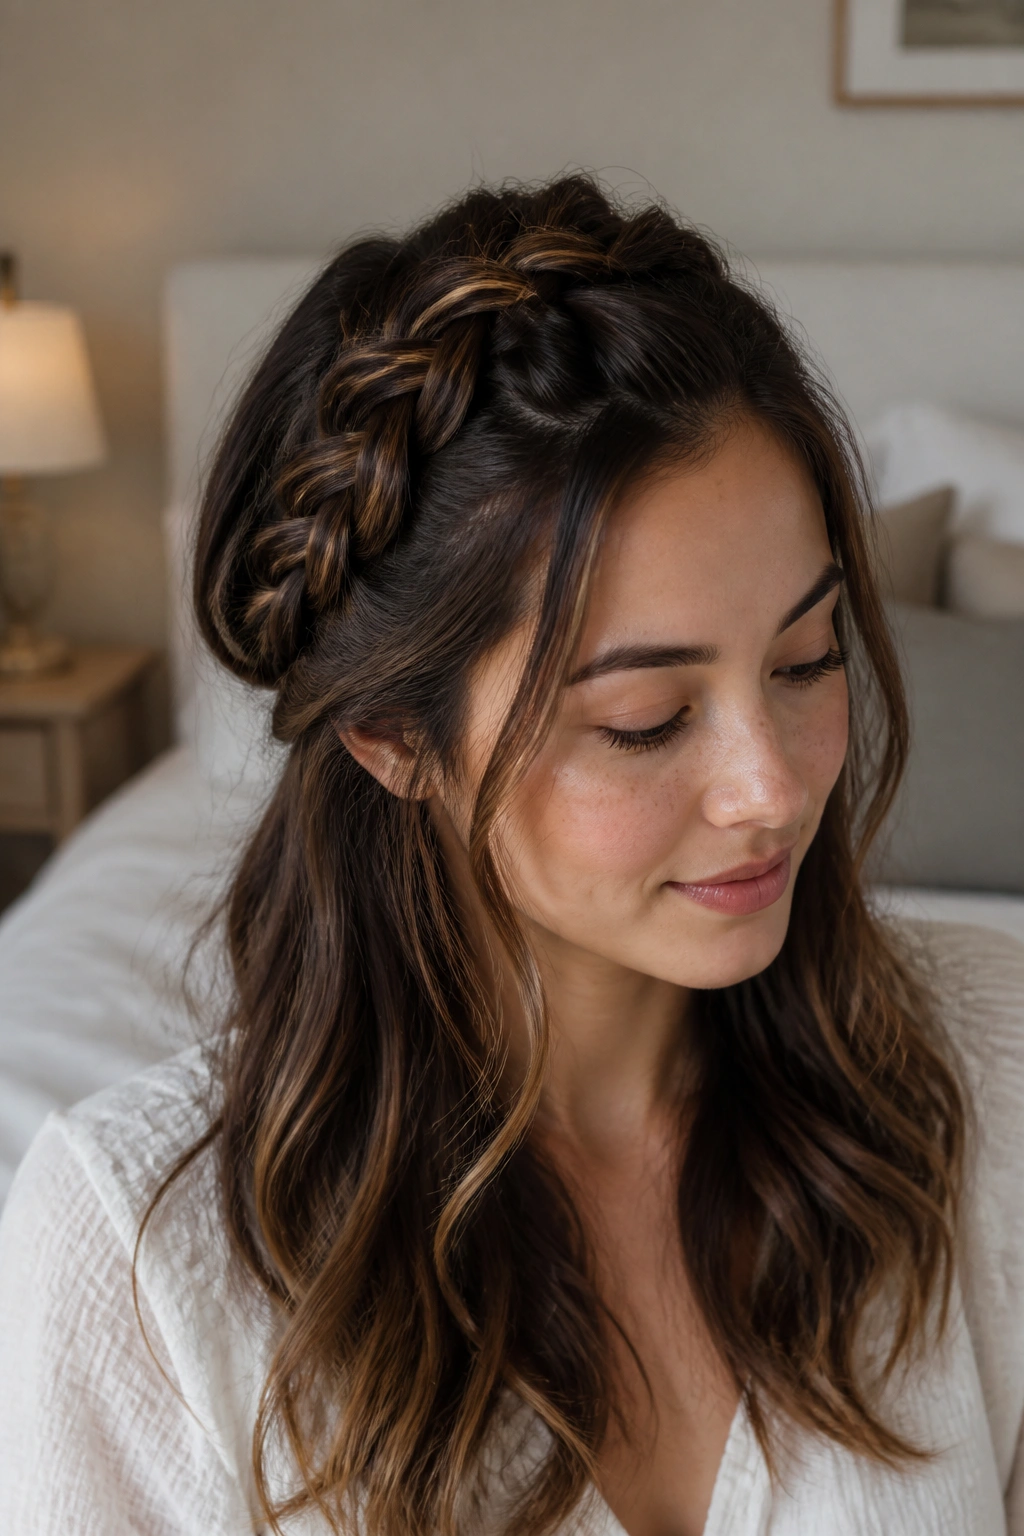
A braid does not have to be tight to hold. A loose Dutch braid proves that, and wavy hair usually gives it extra texture that straight hair can’t fake.
What Makes It Different
Because the braid sits raised on top of the hair rather than disappearing into it, the pattern stays visible. That little bit of depth helps if your hair is dense or layered, since the braid can look full without needing extra teasing.
How to Keep It Relaxed
- Start with a clean middle or side part
- Take wider sections than you would for a tight school braid
- Pull gently on the braid after securing it
- Leave the last few inches unbraided if you want a softer tail
The biggest mistake is pulling too hard at the start. Tight tension at the crown makes the rest of the braid fight for volume later. Loose hands, firm pins. That’s the better balance.
10. Scarf-Wrapped Half-Up
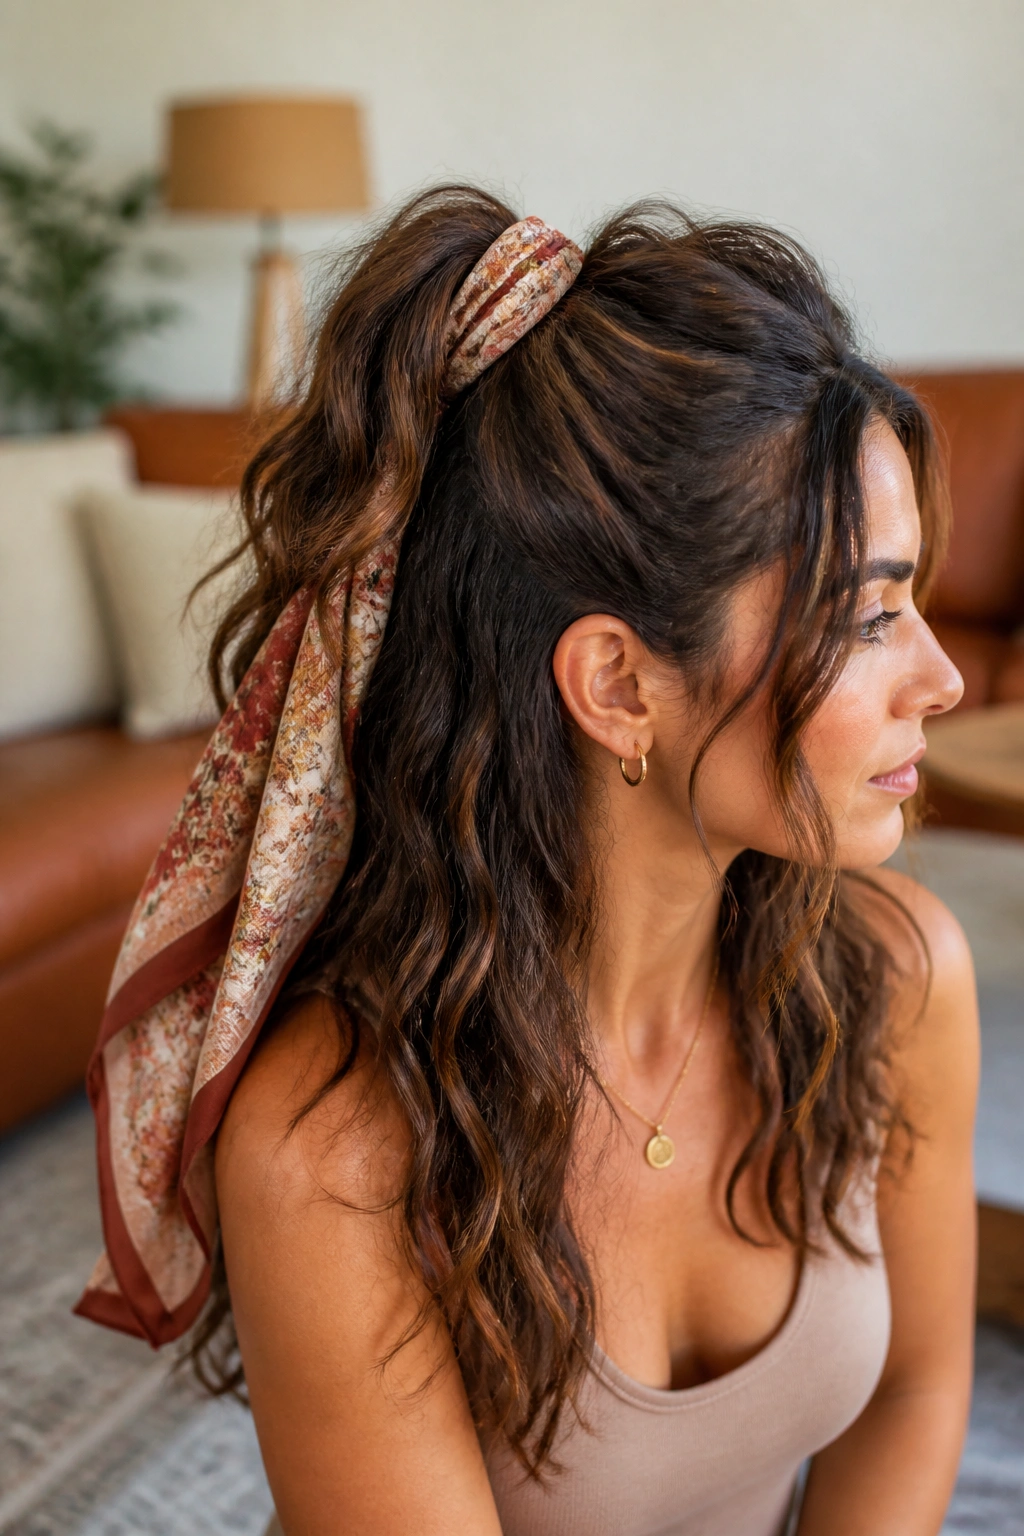
A scarf can do more than cover bad roots. It can turn a half-up style into something that looks planned, even when the hair underneath is doing its own thing.
Gather the top half of the hair and tie it into a small half-up ponytail or knot. Then wrap a silk or cotton scarf around the base and let the ends fall down the back or off to one side. The scarf should feel like an accent, not a disguise.
This is one of the easiest ways to make day-two waves look richer. The scarf adds color and takes attention away from uneven texture near the crown, which is handy on humid days or when the top layer is behaving badly.
I like this for shoulder-length hair because it gives the upper half some shape without hiding the waves completely. If the scarf slips, tie it once more under the hair rather than above it.
11. Face-Framing Mini Braids
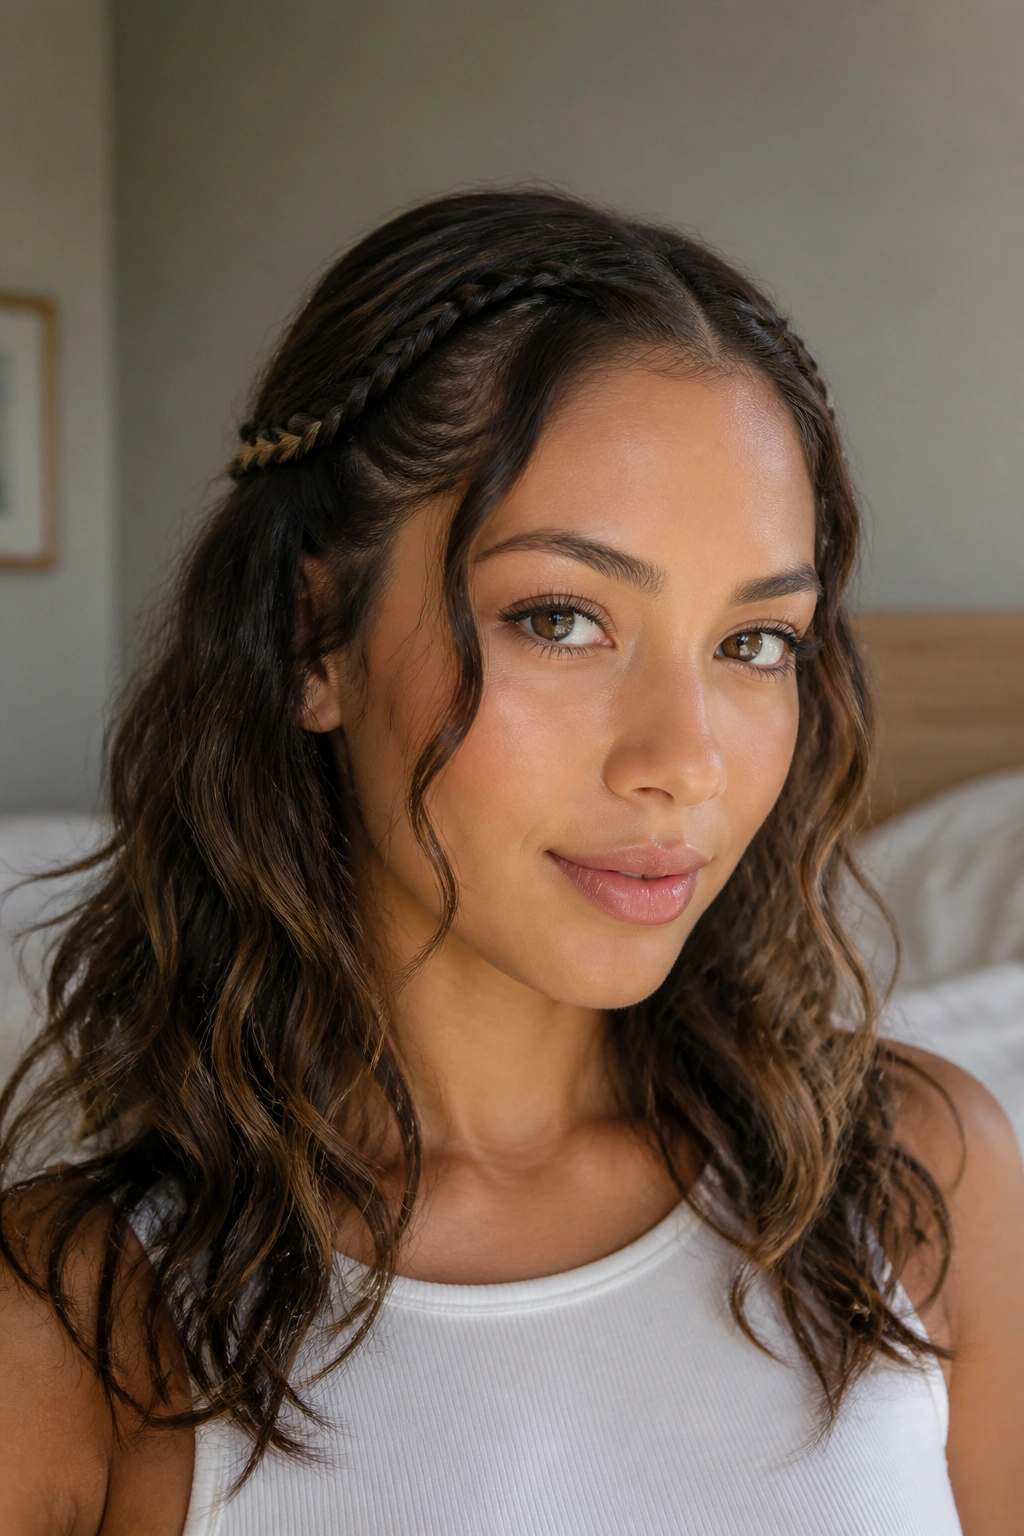
Tiny braids are sneaky. They look casual, but they solve a real problem for wavy hair: the front pieces that never quite stay where you want them.
Take one small section from each side of the face, braid it loosely, and pin or tie it just behind the ear. You can leave the braids plain or weave them into the rest of the hair. Either way, they hold the front layers down without killing volume elsewhere.
This works especially well if your haircut has shorter face-framing pieces. Those layers usually escape from buns and ponytails first, so giving them their own little braid keeps the style from unraveling by noon.
A small dab of styling cream on the ends helps, but not too much. If the braids start looking stiff, they lose the whole point.
12. Messy Top Knot
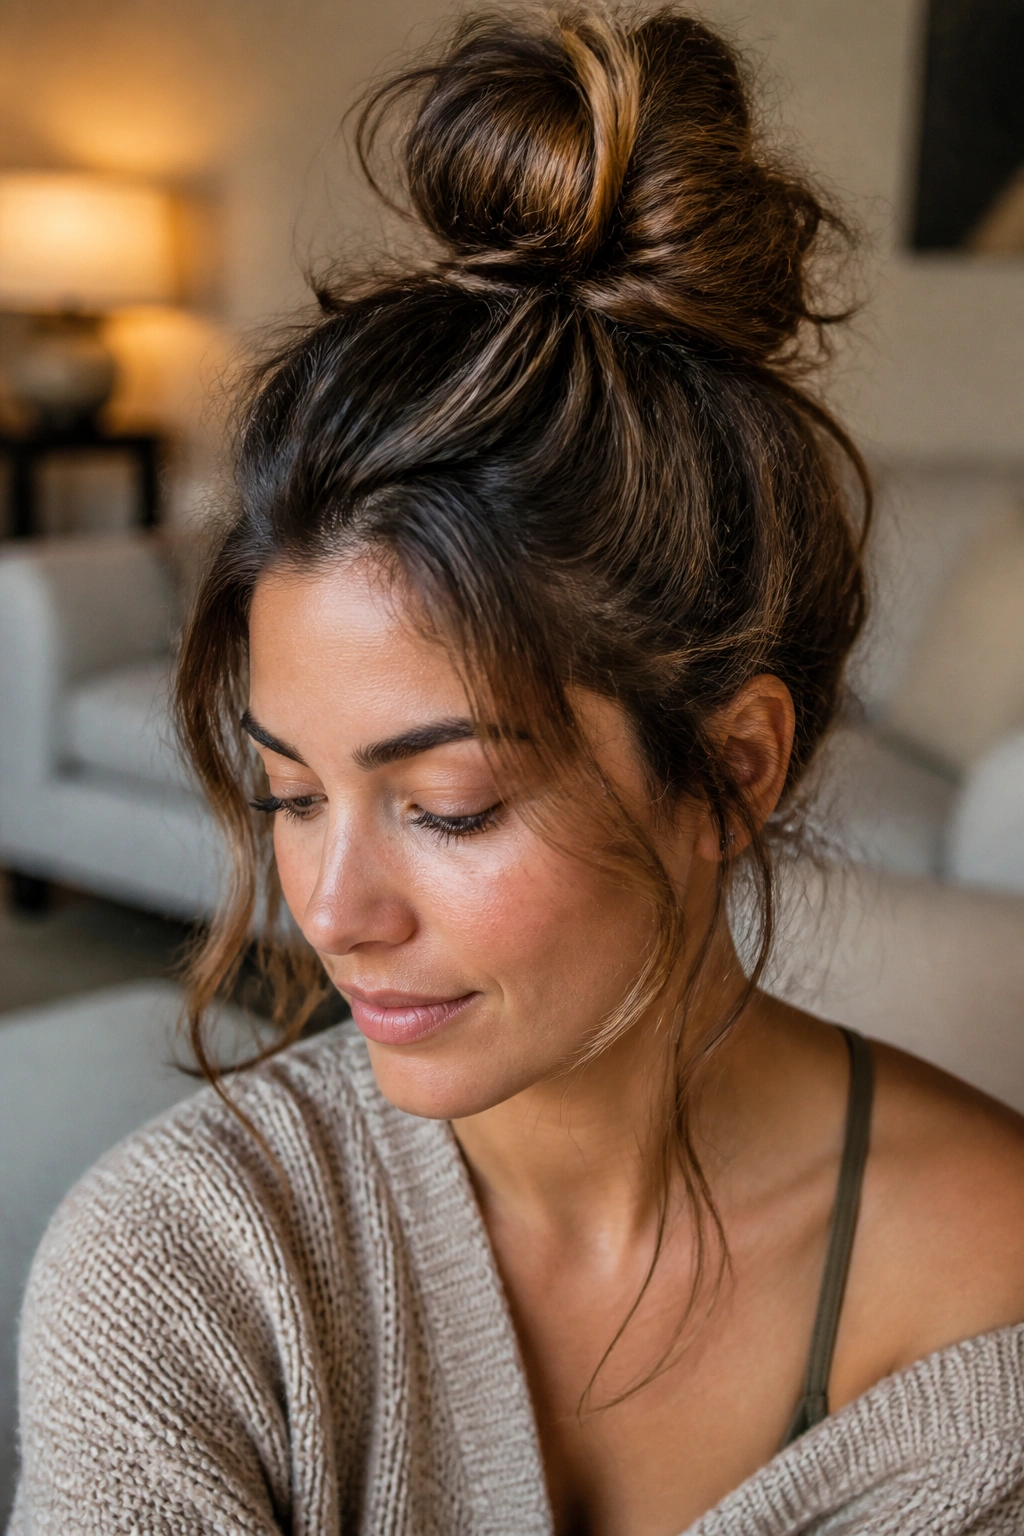
A top knot can look careless in the best way if you stop before the last twist. That is where wavy hair helps — it already brings texture, so you do not need to fake it.
Pull the hair high, twist it into a knot, and secure it loosely with a tie or pins. Leave a few strands around the face and at the nape. A little unevenness is welcome here, because the shape is supposed to feel relaxed, not engineered.
This style is useful when you need hair off your neck fast. It also handles frizz better than a tight slick-back, especially if your waves have lost their neatness during the day. If you have very long hair, coil the knot in two loops so it sits lower and doesn’t pull.
One warning: don’t chase symmetry too hard. The more you perfect it, the less natural it looks.
13. Wrapped Low Ponytail for Wavy Hair
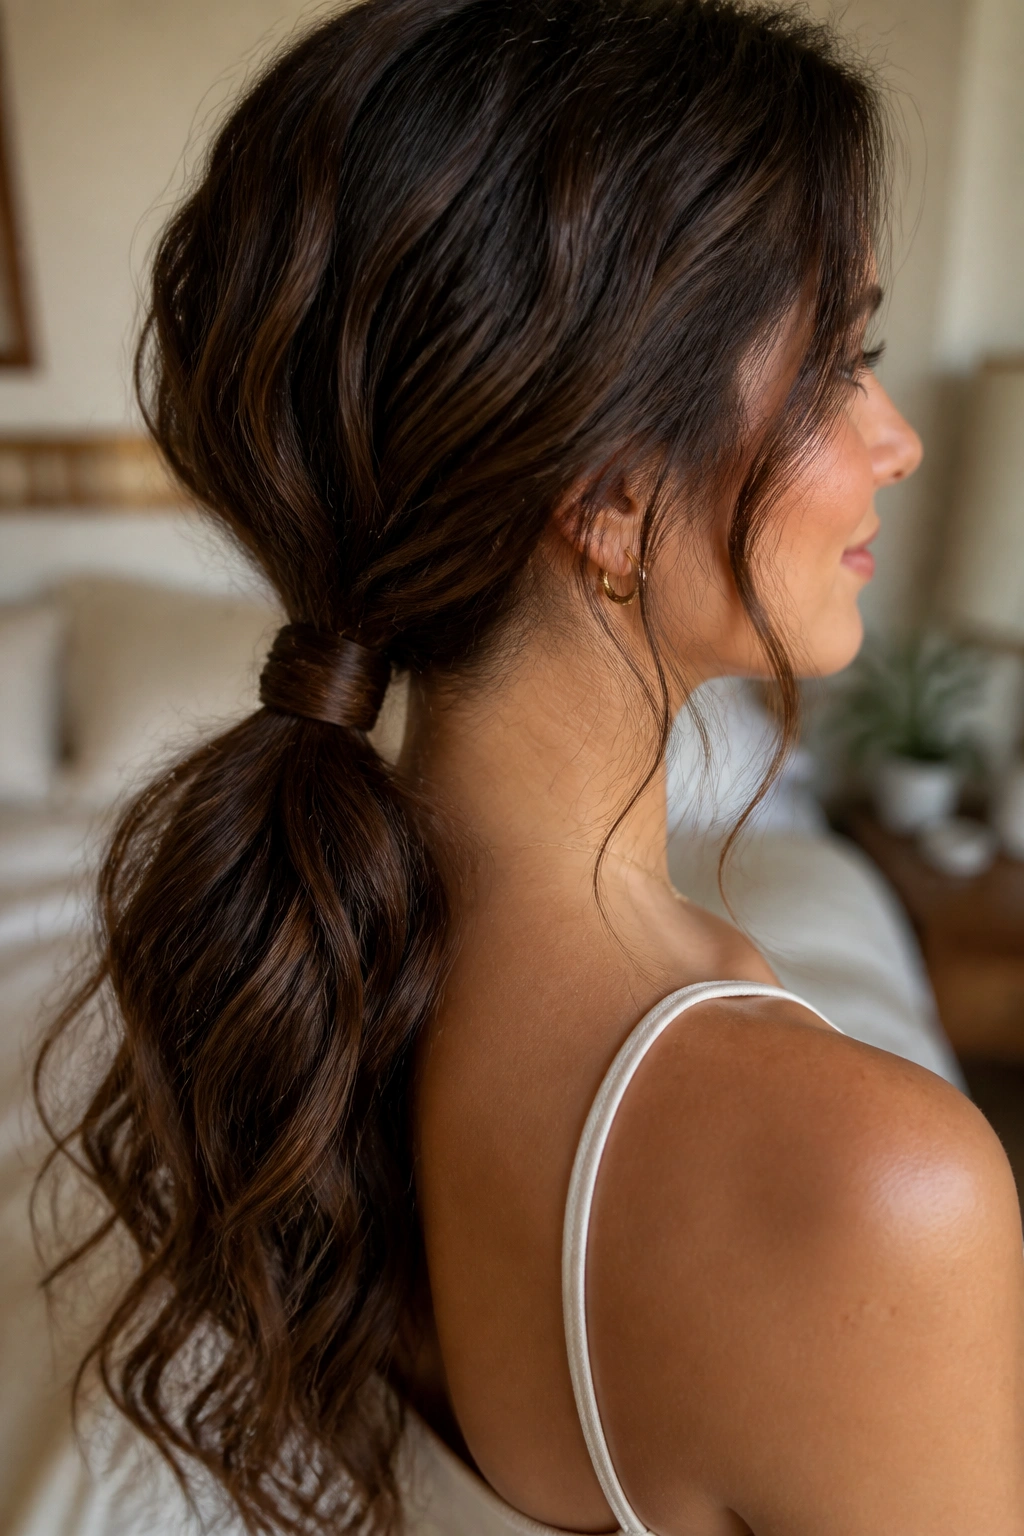
The wrapped low ponytail is the style I reach for when the hair needs to look finished fast. It takes the plain ponytail and gives it one small detail that changes the whole read.
Where to Wrap the Elastic
Tie the ponytail at the nape, then take a thin strand from underneath and wrap it around the elastic until it disappears. Pin the strand under the ponytail with a small bobby pin. If your hair is thick, use a second pin from the opposite side so the wrap doesn’t unwind.
When to Skip the Brush
If the waves are still intact, finger-comb only. A brush can stretch the top too much and leave the tail flat. A slightly loose finish keeps the movement in the lengths, which is the part people usually want to see anyway.
- Strong on medium to long hair
- Good for offices and dinner plans
- Looks cleaner with a side part
- Works with a light mist of shine spray on the tail
This one is plain in a good way. No drama. No extra steps you do not need.
14. Side Braid Into a Bun
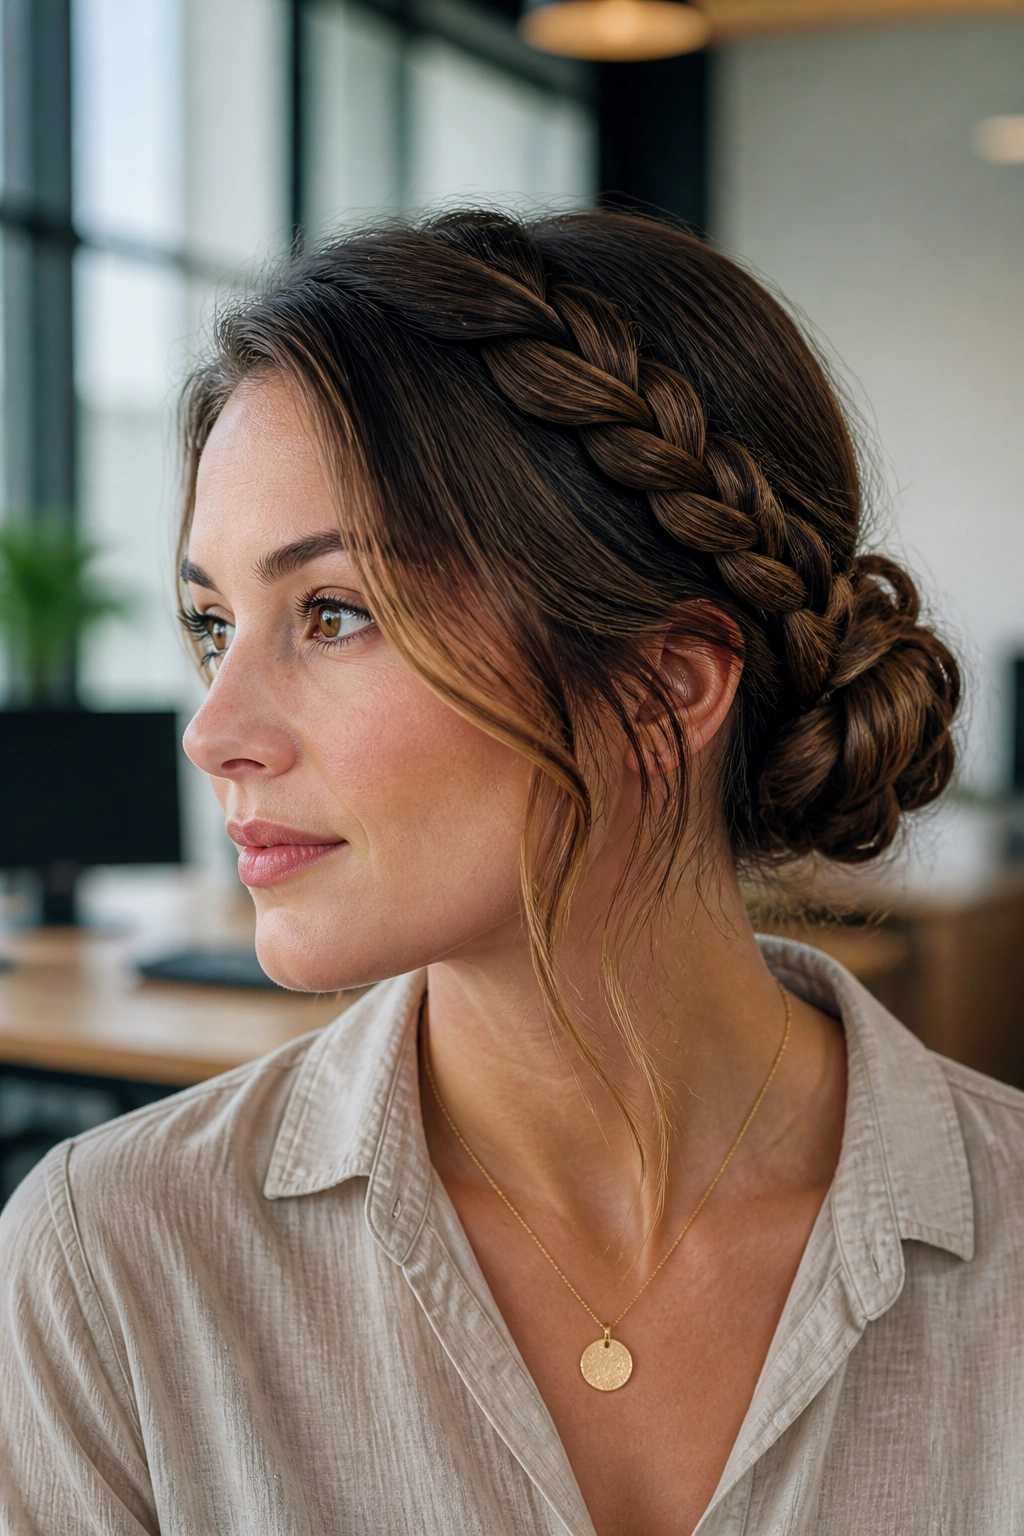
If you need one style that moves from desk to dinner, this is it. A side braid into a bun keeps the hair controlled, but it still lets the wave pattern show in the loose parts around the face and at the back.
Start with a side braid from one temple or just above the ear. Once you reach the nape, gather the rest of the hair into a bun and pin the braid into the bun’s edge so it disappears into the shape. You get the neatness of a braid and the softness of a bun in one move.
This is especially good for layered wavy hair, because the braid handles the shorter pieces that tend to break out of a bun on their own. If your hair is thick, braid only one side. If it’s fine, braid both sides loosely and meet them at the bun for a bit more structure.
There’s no need for anything fancy. The contrast does the work.
15. Twisted Halo
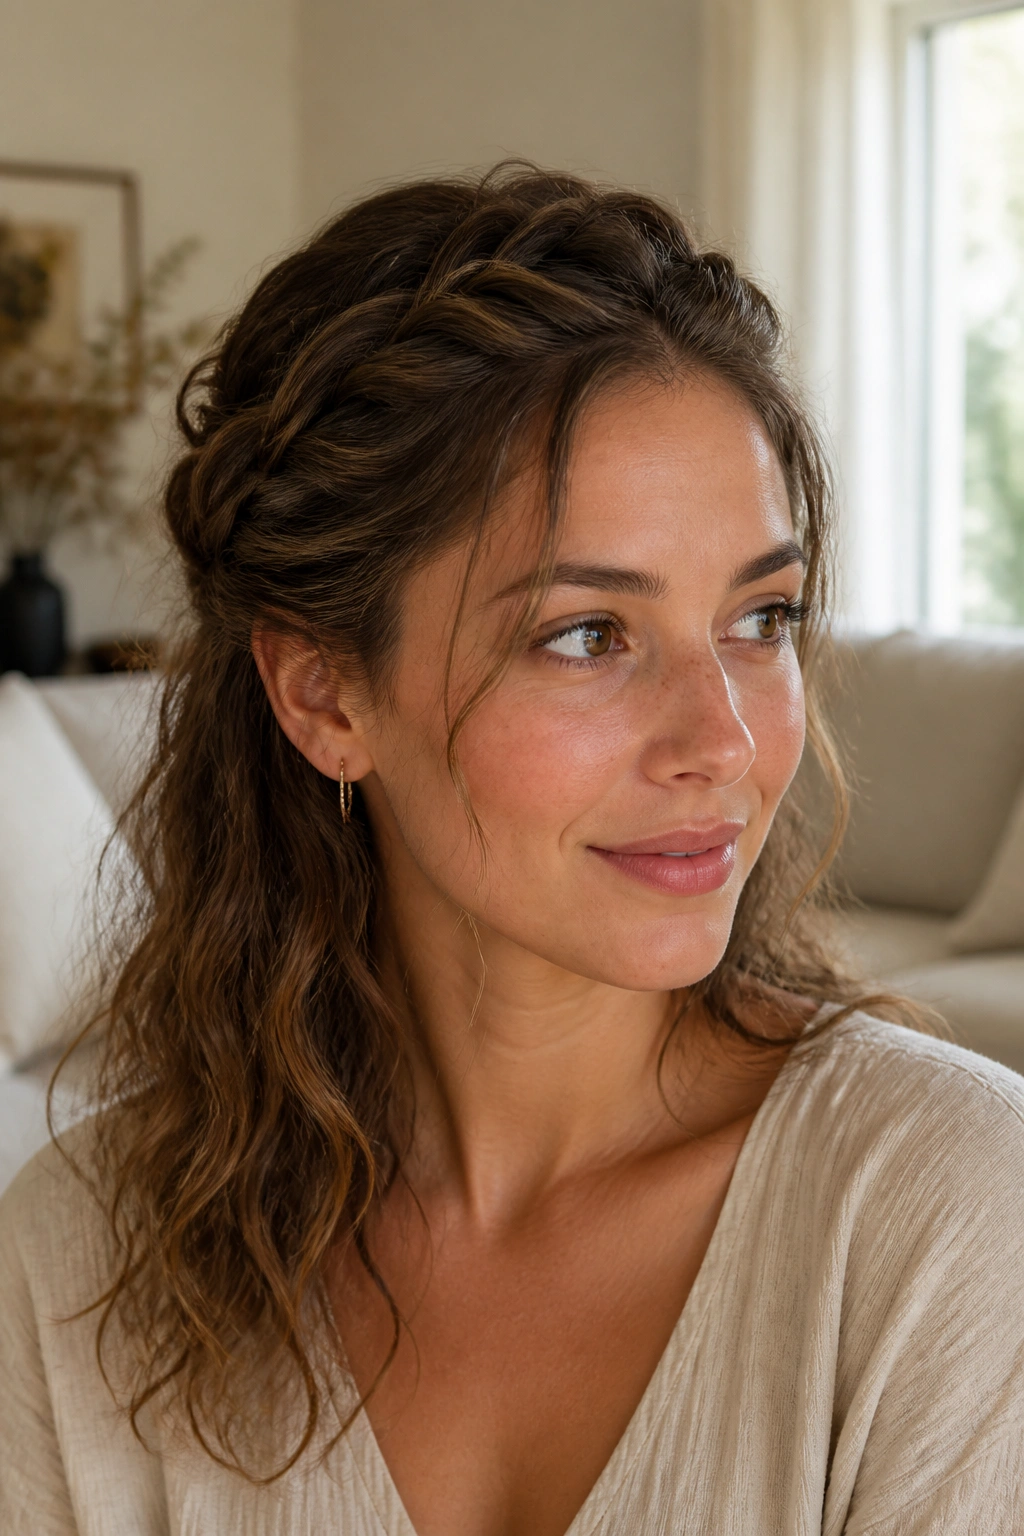
What if a braid crown feels like too much work? A twisted halo gives you a similar outline with less fuss and fewer tiny sections to keep track of.
Take a section from each temple, twist each one toward the back of the head, and pin them where they meet. Let the remaining hair fall down naturally. The twists frame the face and keep the front from puffing up, but they do not lock the whole head into a rigid shape.
How to Pin the Halo
Use crossed bobby pins if your hair is slippery. One pin can hold for a while, but two crossed pins stay put much longer, especially if the hair is fine or freshly washed. Aim the pins slightly upward so they catch the twist from underneath.
This style feels lighter than a full braid crown and usually takes less time to set up. That makes it a nice option for wavy hair that wants some structure but still needs movement through the back.
16. Pinned-Back Waves
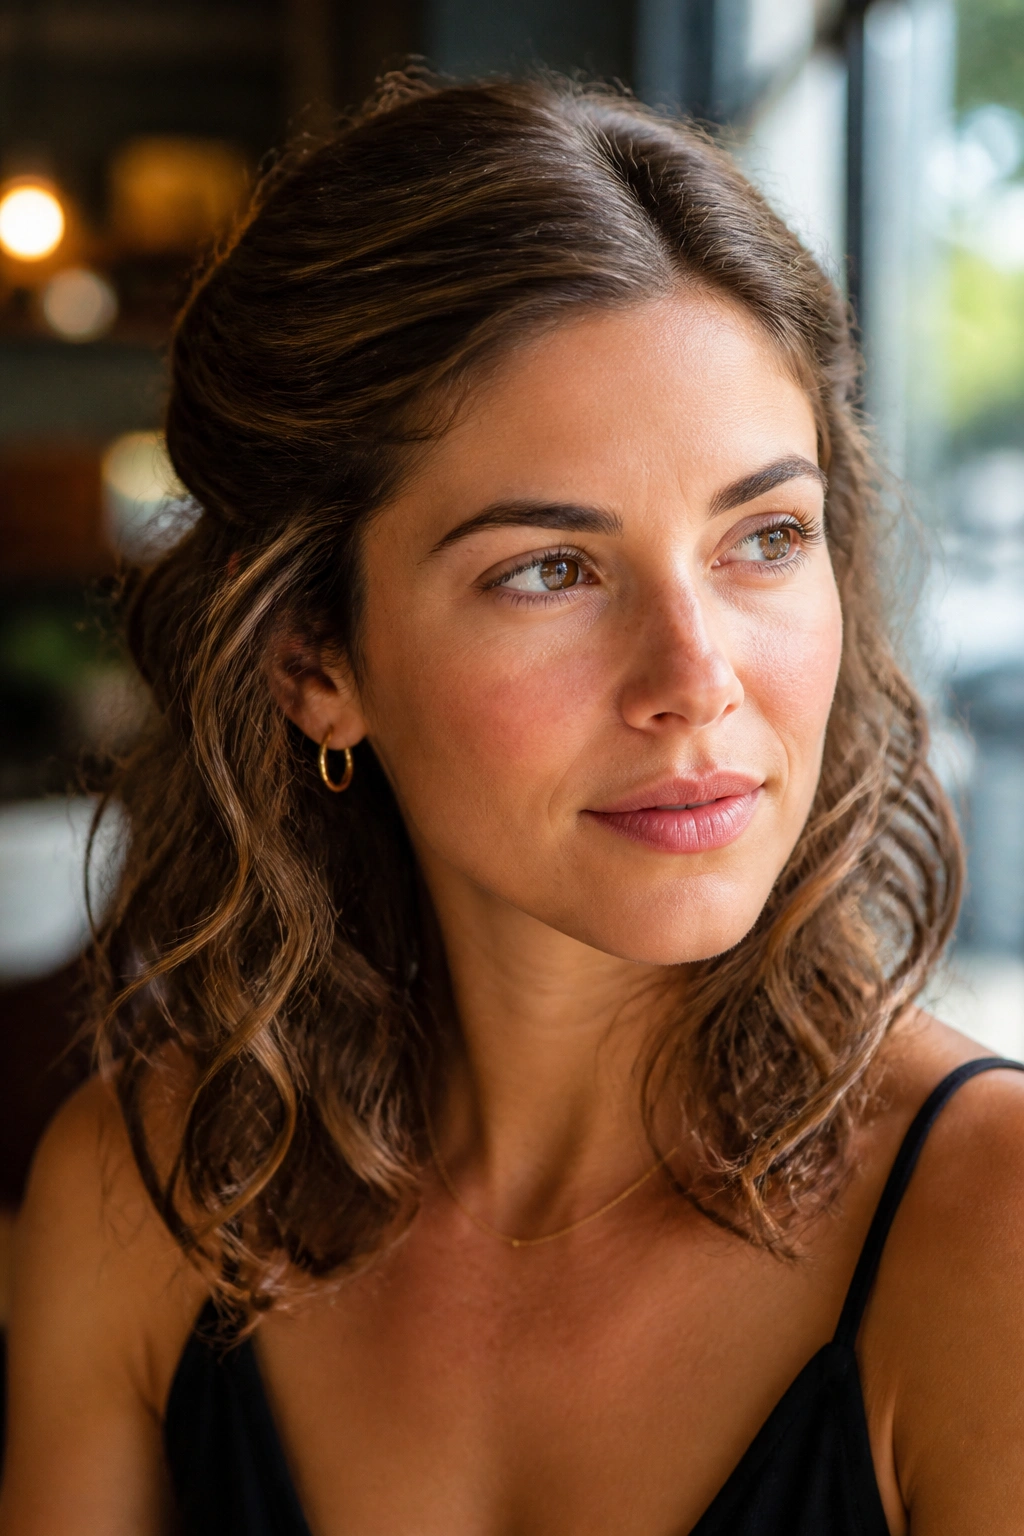
Pins. That is the whole trick.
Grab both front sections, twist or smooth them back, and pin them just behind the ears or at the temples. Leave the rest of the hair down. The shape is tiny, but it changes how the whole style sits because it opens the face and keeps the front from drooping into the eyes.
This works well on shorter wavy cuts where braids can get too small to bother with. It also helps when your layers are too short for a bun but too long to leave completely alone. Three neat pins on each side is usually enough.
- Place the pins in a crisscross if you want extra hold
- Keep them hidden under the top layer for a softer look
- Use matte pins if shiny ones stand out too much
- Great for day-old waves with a little lift at the crown
Sometimes the simplest answer is the one that lasts.
17. Space Buns With Soft Ends
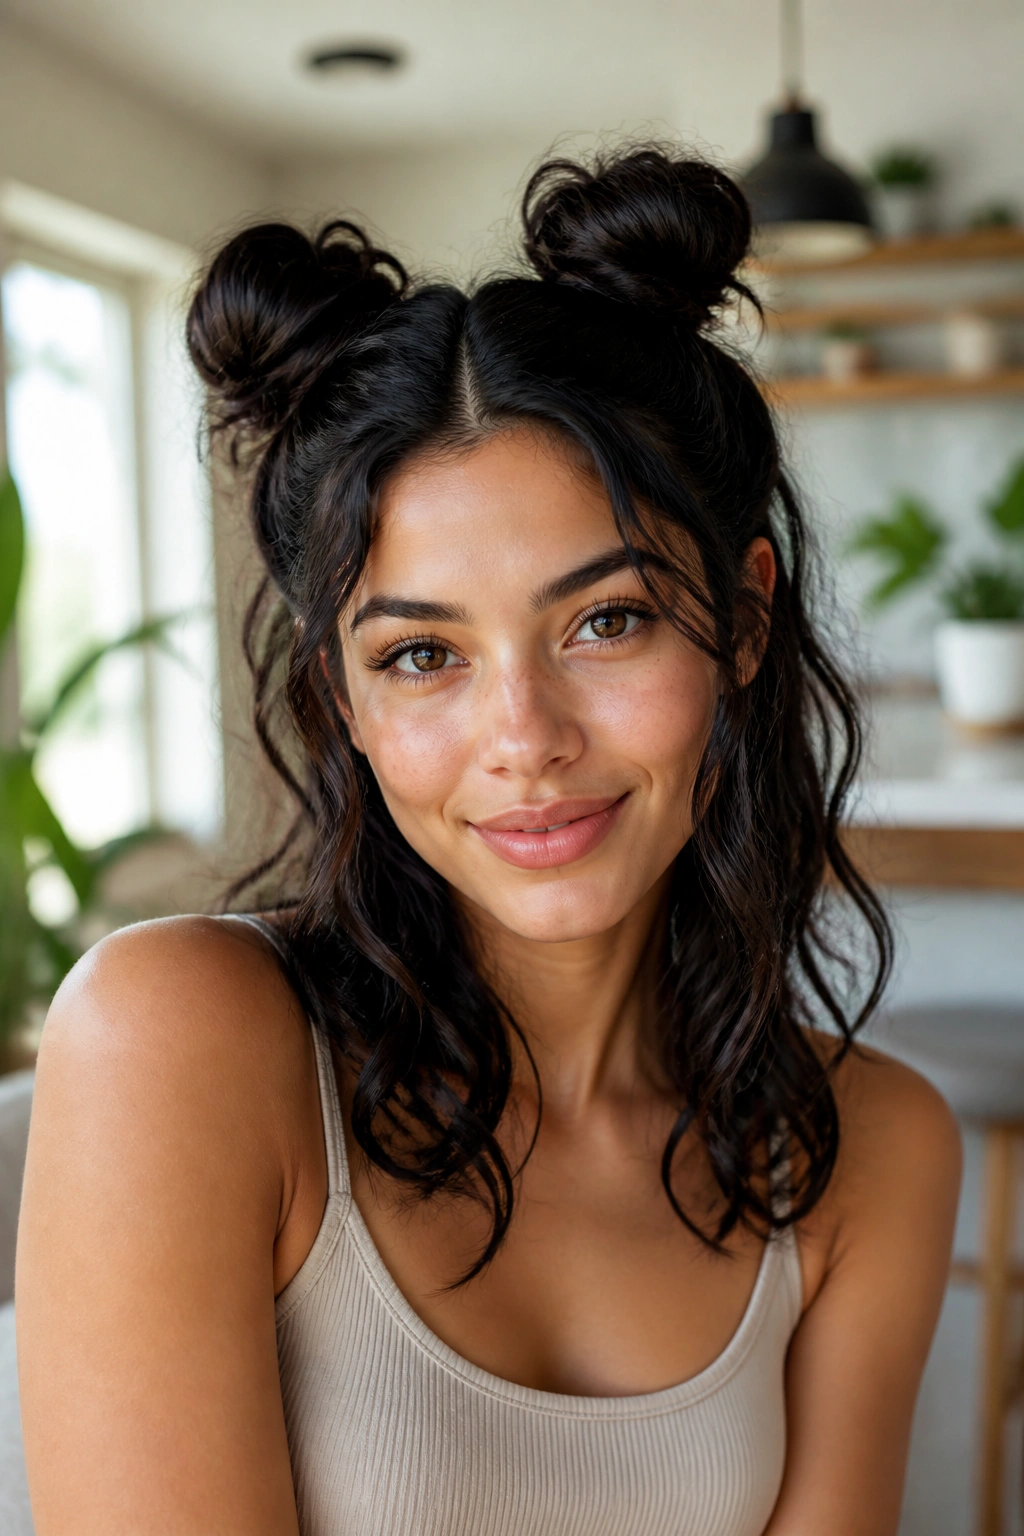
Space buns sound playful, but on wavy hair they behave like little anchors. They keep the hair lifted and controlled while still leaving enough movement in the ends to stop the style from feeling childish.
Part the hair down the middle, gather each side into a high section, and twist each side into a small bun. You can tuck the ends fully inside or leave them poking out a little for a softer finish. The latter usually looks more relaxed on wavy hair.
This style is handy when the hair needs to stay off the face and neck for hours. It also handles bulk well, which is good news for thicker waves that feel heavy in one large bun. If your hair is fine, keep the buns smaller and secure them with pins instead of pulling the ties too tight.
A little asymmetry helps here. It keeps the style from looking too neat.
18. Gibson Tuck
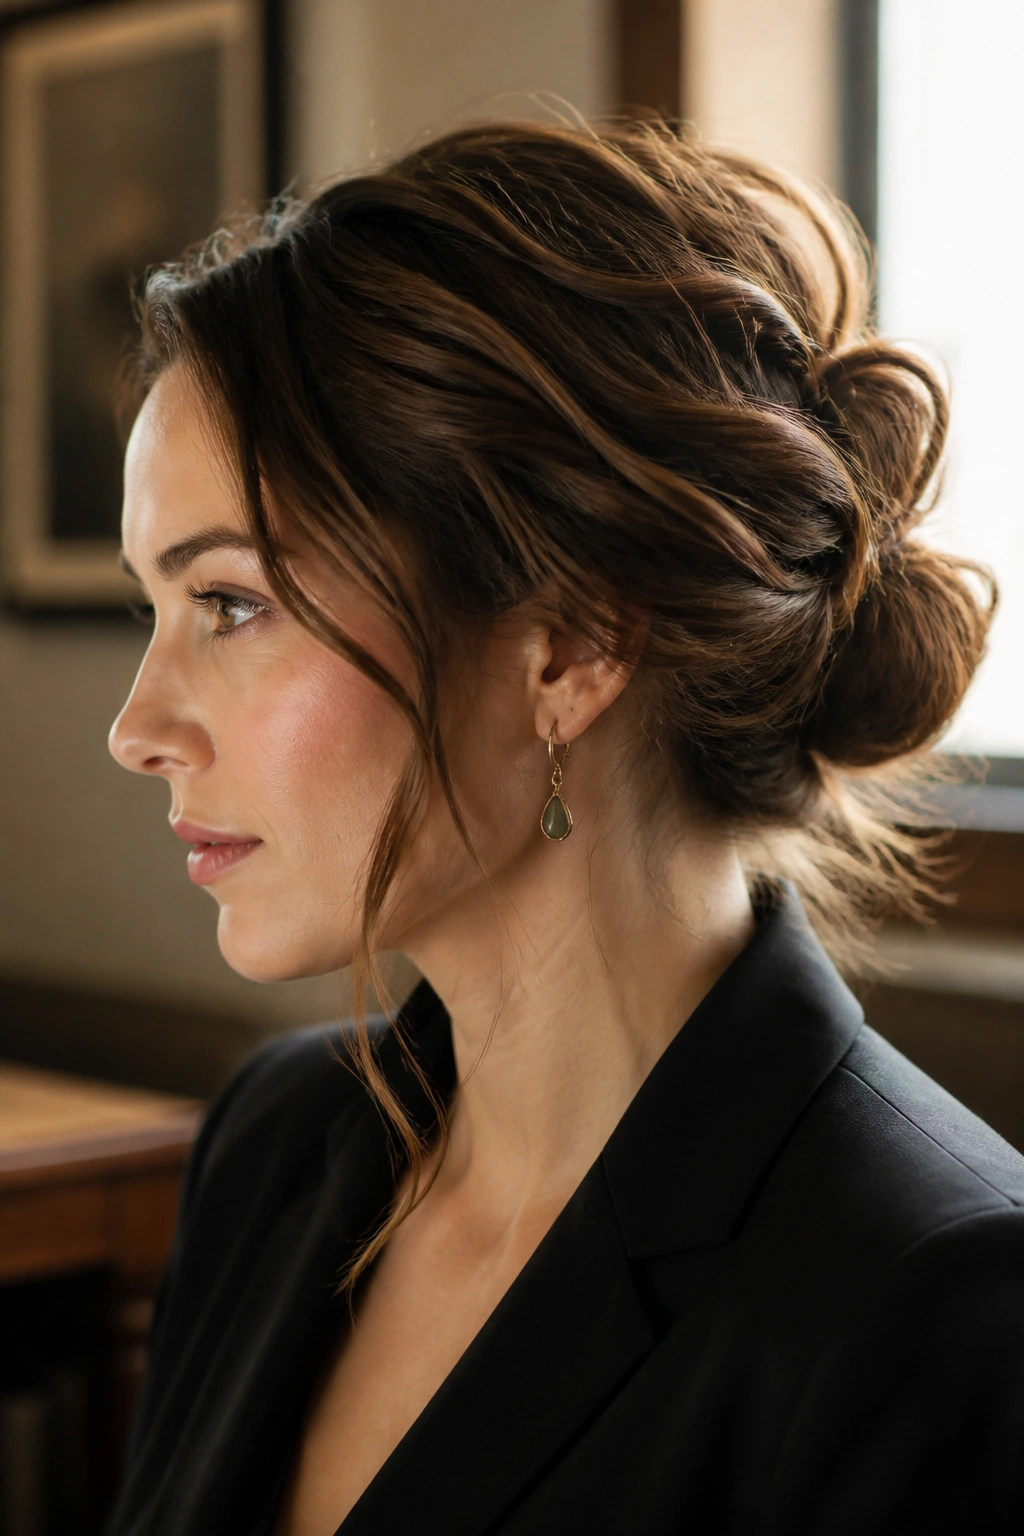
The Gibson tuck does one thing well: it hides length without crushing texture. That is why it works so nicely on medium-length wavy hair.
Pull the hair into a low loose ponytail, split a space above the elastic, and roll the tail upward and inward until it tucks into the gap. The hair folds into itself and forms a soft roll at the back of the head. Pins on each side keep the shape from sagging.
This style has a polished shape, but it still leaves wavy ends and little irregular pieces around the neck. Those loose edges matter. Without them, the tuck can look too severe.
If your hair is layered, leave the shortest front pieces out on purpose. They soften the shape and keep the tuck from looking helmet-like. I like this one for events where you want to look a little dressed up without using hot tools.
19. Fishtail Half Ponytail
Unlike a full ponytail, a fishtail half ponytail leaves the bottom wave pattern alone. That makes it a smart pick if you want some control at the crown but still want the lengths to do their own thing.
Why It Sits Well on Waves
A fishtail braid naturally shows texture, so wavy hair usually looks richer in it than straight hair does. The top half stays tidy, the tail stays loose, and the whole style gets a bit of texture from the braid itself.
Best Hair Lengths
- Shoulder-length hair for a shorter, fuller fishtail
- Long hair for a longer, more draped finish
- Layered cuts if the top pieces can still reach the back of the head
- Hair with some grip from second-day texture
Keep the braid loose. If you pull it too tight, the half ponytail starts to look narrow and the waves lose their shape. A soft braid is better here, even if it takes a minute to pancake it open with your fingers.
20. Crown Braid
A crown braid takes longer than a twist, but it earns its keep when you need hair off the neck and out of the eyes. Wavy hair gives it a little softness that straight hair often has to fake with texture spray.
Start braiding around the head, following the hairline, and pin the braid into place as you go or once it reaches the other side. If the hair is very layered, use small clear elastics at the ends before pinning so the braid doesn’t unravel.
This style suits longer waves the most, though medium lengths can still manage a partial crown braid. It is one of the few looks that can handle weather, movement, and a long day without turning into a mess too quickly.
A crown braid does not need to be tight to look finished. In fact, a little looseness makes it better.
21. Low Knot With Tendrils
The low knot with tendrils looks soft because the ends are allowed to misbehave a little. That tiny bit of looseness around the face keeps the knot from feeling too formal.
Gather the hair at the nape, twist it into a knot, and leave two front pieces out before you pin anything down. Those tendrils can fall straight, curl outward, or rest against the cheeks. All three versions work. The key is leaving enough movement that the style still feels like wavy hair, not a stiff bun pretending to be wavy.
What to Let Fall
- One piece on each side of the face
- A few short strands at the temples
- Soft edges at the nape if your hair is very thick
I like this style when the rest of the outfit is clean and simple. The hair does not need to be complicated to look considered.
22. Double Twists Pulled Back
Short layers slipping out? Double twists handle that better than a braid.
Take one section from each side of the face, twist each piece back toward the center, and pin them together or under a small barrette. The twists are quick, but they hold shorter pieces more easily than braids because they need less length to stay together.
This is one of those styles that saves you on awkward-length hair. If your waves are shoulder-length with lots of layers, the double twist can keep the top controlled while leaving the rest loose. If you have thicker hair, twist a little lower so the pins sit against more hair and don’t pop open.
It also works nicely on hair that has already started to separate into its natural wave clumps. That texture gives the twists some grip, which is half the battle.
23. Sleek Low Ponytail for Wavy Hair
A sleek low ponytail is the style for days when the hair needs to look controlled, not fluffy. The trick is keeping the root smooth while letting the tail keep some wave so it doesn’t look overprocessed.
Apply a small amount of gel or smoothing cream to the top and sides, comb the hair into a low ponytail, and secure it at the nape. Then leave the tail alone. Don’t iron the life out of it with a brush. The contrast between smooth roots and textured lengths makes the style feel sharper.
This works well for interviews, formal events, or any day when you want your hair to stay put. If your waves are very loose, a light mist of water before the smoothing step helps the top lay down more evenly. If they’re strong and springy, use more pinning at the sides and less product overall.
A wrapped elastic can make it look cleaner without adding much work.
24. Clipped-Back Volume Crown
Volume at the crown changes everything. It keeps wavy hair from falling flat at the top and gives the rest of the style a bit more lift, even if the back is simple.
Small Changes That Add Lift
Tease the roots very lightly with your fingers or a soft brush, then clip the sides back with two small clips near the temples. You are not trying to build a tall bump. You are just opening the shape at the top so the waves can sit with some height.
What Works Best
- Medium to thick wavy hair
- Clips with a strong hinge
- Second-day hair that has lost a little root volume
- Styles where the back stays loose or half-up
A single clip can work, but two smaller clips often hold better and look less bulky. This style is useful when you want the face open but still want the hair to move around the shoulders. It’s tidy without looking strict.
25. Side Roll With Bobby Pins
A side roll looks old-school in the best sense, and wavy hair gives it some looseness that keeps it from feeling costume-y. It is one of the neatest ways to pin the front back without turning the whole head into a hard updo.
Take a front section from one side, roll it backward along the hairline, and secure it with two or three bobby pins placed diagonally. Repeat on the other side if you want symmetry, or leave one side open for a softer line. The roll should sit flat enough to hold, but not so flat that it kills the wave pattern.
This is a good choice for shoulder-length hair and longer cuts with a bit of front layering. It also behaves well with earrings, which sounds small until you’re getting dressed and realize the hair either supports the whole look or fights it.
A side roll is not the first thing most people reach for. That’s part of why it feels fresh.
Final Note
Wavy hair tends to look best when the style leaves a little movement behind. Not every strand has to be controlled. In fact, the looks that hold up longest usually keep one small area loose on purpose — a face-framing piece, a soft nape, a tail that still bends.
A good clip, a handful of pins, and one scarf can take you a long way here. Those tools work because they support the wave pattern instead of flattening it into something else.
Pick one style for rushed mornings, one for long days, and one that feels a little dressed up. That’s enough to keep the routine from getting boring, and it saves you from repeating the same ponytail until you’re sick of it.
